
Installation Manual

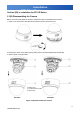


Table Of Contents
- Important Safety Instructions
- Troubleshooting Tips
- Regulatory Notices
- 1. Introduction
- 2. Installation
- 2.1(A) Inserting Screw Anchors
- 2.2(A) Connecting the Wiring
- 2.3(A) Mounting the Camera
- 2.4(A) Adjusting the Camera Position
- 2.5(A) Locking (fixing) the Camera Body
- 2.1(B) Disassembling the Camera
- 2.2(B) Connecting the Wiring
- 2.3(B) Mounting the Camera
- 2.4(B) Adjusting the Camera Position
- 2.5(B) Adjusting the Lens (if equipped with varifocal lens)
- 2.6(B) Completing the Installation
- 3. Specifications
- PRODUCT WARRANTY AND RETURN INFORMATION

Installation
OSD Setup Menu
15
C3909M-EN (03/12)
2.5(B) Adjusting the Lens (if equipped with varifocal lens)
Refer to Figure 2-3(B), for FD1-IRV9, please carry out the following steps to adjust the lens:
1. Loosen the zoom lever (#5) counter-clockwise a little, then rotate the zoom lever and determine
the image view.
2. Loosen the focus lever (#4) counter-clockwise a little, then adjust the focus for optimum picture
sharpness.
3. Re-tighten the zoom lever and focus lever after adjustment.
Note: It is important that you lock the zoom and focus levers after making adjustments. This will avoid
the positions moving (for example, from temperature changes or vibrations).
2.6(B) Completing the Installation
Once all adjustments are done, attach and secure the camera housing:
1. Use a soft, lint-free cloth to wipe the dome cover clean and remove fingerprints.
2. Attach the dome cover (#3) to the tilt adjustment bracket (#2). Push down until it clicks into place.
3. Assemble the dome cover (#3) and the bottom case (#1).
Figure 2-4(B) Completing the Installation
FD1-IRF4 (typical)
1. Bottom case
2. Tilt adjustment bracket
3. Dome cover