
Installation Manual

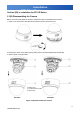


Table Of Contents
- Important Safety Instructions
- Troubleshooting Tips
- Regulatory Notices
- 1. Introduction
- 2. Installation
- 2.1(A) Inserting Screw Anchors
- 2.2(A) Connecting the Wiring
- 2.3(A) Mounting the Camera
- 2.4(A) Adjusting the Camera Position
- 2.5(A) Locking (fixing) the Camera Body
- 2.1(B) Disassembling the Camera
- 2.2(B) Connecting the Wiring
- 2.3(B) Mounting the Camera
- 2.4(B) Adjusting the Camera Position
- 2.5(B) Adjusting the Lens (if equipped with varifocal lens)
- 2.6(B) Completing the Installation
- 3. Specifications
- PRODUCT WARRANTY AND RETURN INFORMATION

Installation
OSD Setup Menu
12
C3909M-EN (03/12)
Section 2(B) is installation for FD1-IR Series.
2.1(B) Disassembling the Camera
Before you mount and adjust the camera, follow these steps to disassemble the camera.
1. Insert a coin or flat tool to the side hole and twist to remove the dome cover.
2. Remove the dome cover (#3) by gently pulling it free from the tilt adjustment bracket (#2).
3. Set the dome cover (#3) aside.
Figure 2-1(B) Disassemble the Camera
1. Bottom case
2. Tilt adjustment bracket
3. Dome cover
FD1-IRF4
FD1-IRV9