65” Glasses-Free 3D Display User Manual Version: 1.
Table of Contents 1. Safety Precaution 1.1. Power . . . . . . . . . . . . . . . . . . . . . . . . . . . . . . . . . . . . . . . . . . . . . . . . . . . 1 1.2. Cleaning . . . . . . . . . . . . . . . . . . . . . . . . . . . . . . . . . . . . . . . . . . . . . . . . . 1 1.3. Vent Holes . . . . . . . . . . . . . . . . . . . . . . . . . . . . . . . . . . . . . . . . . . . . . . . . 2 1.4. Temperature & Fire . . . . . . . . . . . . . . . . . . . . . . . . . . . . . . . . . . . . . . . . . 2 1.5. Lightning . . . .
4.5. Preferences Menu . . . . . . . . . . . . . . . . . . . . . . . . . . . . . . . . . . . . . . . . . 23 Network Mode Menu ...............................................................................24 Upgrade Software ...................................................................................26 4.6. Device Status Menu . . . . . . . . . . . . . . . . . . . . . . . . . . . . . . . . . . . . . . . 29 4.7. Info Menu . . . . . . . . . . . . . . . . . . . . . . . . . . . . . . . . . . . . . . . . .
Copyright This publication, including all photographs, illustrations and software, is protected under international copyright laws, with all rights reserved. Neither this manual, nor any of the material contained herein, may be reproduced without the express written consent of the manufacturer. Disclaimer The information in this document is subject to change without notice.
Canadian Department of Communications Compliance Statement DOC: This Class B digital apparatus meets all requirements of the Canadian Interference-Causing Equipment Regulations. C-UL: Bears the C-UL Mark and is in compliance with Canadian Safety Regulations according to CAN/CSA C22.2 No.60065-03. FCC Information: # $ % '! *+ monitor so as not to interfere with radio and television reception.
FCC warning < = responsible for compliance with the FCC Rules could void the user’s authority to operate this equipment. Cables Connections to this device must be made with shielded cables with metallic RF / EMI connector hoods to maintain compliance with FCC Rules and Regulations.
Safety Precaution 1. Safety Precaution Please read the following recommended safety precautions carefully for your safety. 1.1. Power To disconnect your seeCube Glasses-Free 3D from the power source, $ % '! *+ ? < [ cable from the power source. 1.2. Cleaning Disconnect your seeCube Glasses-Free 3D from the power source before cleaning. Do not clean your seeCube Glasses-Free 3D while it is switched on.
Safety Precaution 1.3. Vent Holes Vent holes on the cabinet of your seeCube Glasses-Free 3D product ensure optimum performance of your display without overheating. Do not block the openings in any way. 1.4. Temperature & Fire + = % '! *+ < sources. 1.5. Lightning Disconnect your product’s power cord during an electrical storm to prevent a potential electrical shock from lightning. 1.6.
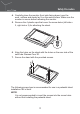
Safety Precaution 4. Carefully place the monitor (front side facing down) over the work surface and slowly lay it on the work surface. Make sure the monitor is secure before releasing the monitor. 5. Remove the 4 plastic caps that cover the screw holes (left side x 2, right side x 2) for attaching the stand. 6. Align the holes on the stand with the holes on the rear side of the seeCube Glasses-Free 3D. 7. Secure the stand with the provided screws.
Safety Precaution Installation of a Wall Mounting Bracket Please use a wall bracket appropriate for the size and weight of the display. The seeCube Glasses-Free 3D is compatible with a standard VESA mount. ; Four people are required for installation 1. Unplug and remove all cabling from the bottom of the display. 2. Clear a work surface and prepare it to allow space for the monitor. 3. Place a soft cover over the work surface to prevent scrateches or other damage to the monitor display. 4.
Overview 2. Overview 2.1.
Overview 2.2. Display Overview 1 No 2 3 3 4 5 Item 6 Description 1 Audio jack Connect to an external speaker. 2 USB ports Connect to remote control USB receiver or USB device (for playback of Ultra-D formatted content). 3 HDMI ports Connect to the HDMI device. 4 LAN port Connect to the RJ45 cable for internet software update. 5 Power socket Connect a power cord. 6 Power switch Turn on or off the display.
Overview 2.3. Remote Control Overview 1 2 7 8 3 9 4 10 11 5 12 6 13 14 15 No Item Description 1 Home Press to display or hide the OSD. 2 Up Navigates and changes settings in the OSD. 3 Left Navigates and changes settings in the OSD. 4 Down Navigates and changes settings in the OSD. 5 Back Press to return to the previous level or exit the OSD menu. 6 Previous @ < # '+ ` { @ mode.
Overview No Item Description 11 Conversion Press to display the CONVERSION menu (OSD). 12 3D Depth Press 3D Depth ~ factor. 13 Next @ < = # '+ ` { @ 14 Play/Pause @ # '+ ` { @ (Currently no support this function) 15 Release button Press to release the battery cover.
Setup 3. Setup 3.1. Setting up the Remote Control The remote control comes with one 3V lithium battery (CR2025). The battery is pre-installed in the remote control. To begin using the remote control, remove the plastic tab from the battery compartment. Changing the Battery 1. Press and lift up the battery cover.
Setup 2. Remove the old battery. 2 1 3. Insert the new battery with the positive terminal facing up. 4. Angle the battery cover into the remote and insert it. 5. Flip down to close the battery cover. 1 2 CAUTION: ; Use only a 3V lithium battery (CR2025). ; Dispose of used batteries according to local ordinance regulations. ; Remove the battery when not using the display for prolonged periods.
Setup Install Remote Control USB Receiver Pairing the Remote Control 1. Connect the USB receiver to the seeCube Glasses-Free 3D. 2. Press Right and Back buttons on the remote control 3 minutes.
Setup 3.2. Connecting the Display Connecting to HDMI Device Real-Time Conversion Real-Time conversion mode converts 2D or 3D stereoscopic video from the HDMI input into the Ultra-D format for display on the monitor. This process adds depth to the video, allowing the Ultra-D display to produce a 3D viewing experience without requiring the viewer to wear 3D glasses. A variety of video formats are supported. See “Video Input Limitations” on page 36 for information.
Setup Connecting A USB Device Load & Play Load & Play is a feature that lets you play back pre-converted content # '+ \# '+ K? = ] @ > ? < < # '+ in a black screen.
Setup 3. Press OK STOP ULTRA-D PLAYBACK. 4. Press OK to return to Real Time Conversion mode. If the system does not recognize any of pre-converted Ultra-D content, Y # '+ " Conversion mode. > # < @ > < J ? function cycles from the beginning.
Setup Connecting the Audio Device An external speaker may be connected via the 3.5mm stereo jack. Connecting to Ethernet < $ not intended for accessing streaming content or other data.
Setup 3.3. Powering on the Display 1. Connect the power cord to the display and the other end to a wall outlet. 2. Turn on the power switch.
On-Screen Display Menu 4. On-Screen Display Menu This section introduces the On-screen Display (OSD) menus and < functions. 4.1. Main Menu The main menu is available by pressing the HOME button on the @ ' MAIN MENU INPUT CONVERSION PICTURE PREFERENCES DEVICE STATUS INFO Label Description INPUT Press OK to enter the INPUT menu and select an input source. See “Input Menu” on page 18.
On-Screen Display Menu Label Description DEVICE STATUS Press OK to enter the DEVICE STATUS menu to view display information. See “Device Status Menu” on page 29. INFO Press OK to enter the INFO menu to display brand information. See “Info Menu” on page 30. 4.2. Input Menu The INPUT menu allows you to select the input source for display on the monitor. To select the type of source input: 1. Press HOME on the remote control. 2. @ INPUT. 3. Press OK to enter the source option.
On-Screen Display Menu Label Description ULTRA-D PLAYBACK / STOP ULTRA-D PLAYBACK Start or stop Load & Play of content from a USB storage device. BYPASS Stop Real Time Conversion and bypass the conversion process so the currently selected video input is displayed unprocessed. Menu interface is disabled while in BYPASS mode. To return to the Real Time Conversion mode, press BACK on the remote control. 4.3. Conversion Menu The CONVERSION menu allows you to select the desired 2D or 3D conversion mode.
On-Screen Display Menu Mode Menu The MODE menu allows you to select the 2D or 3D input source. It also allows you to watch 2D as 2D without applying any conversion to Ultra-D. To select the type of mode: 1. Press HOME on the remote control. 2. @ MODE. 3. Press OK to select the method. 2D TO ULTRA−D SIDE−BY−SIDE TO ULTRA−D TOP−BOTTOM TO ULTRA−D 2D AS 2D Label Description 2D TO ULTRA-D Convert 2D video to Ultra-D.
On-Screen Display Menu 4.4. Picture Menu The PICTURE menu allows you to adjust the depth factor, depth offset, brightness, and contrast properties of the video source. To select the type of property: 1. Press HOME on the remote control. 2. @ PICTURE. 3. Press OK to select the method. DEPTH FACTOR DEPTH OFFSET BORDERS BRIGHTNESS CONTRAST Label Description DEPTH FACTOR Press OK ? ~ depth factor (total amount of depth). The default value is 100.
On-Screen Display Menu Borders Menu The BORDERS menu allows you to setup the 3D depth settings. To navigate to the BORDERS menu: 1. Press HOME on the remote control. 2. From the MAIN menu, select PICTURE and press OK. 3. @ BORDERS and press OK. 4. # < BORDER FACTOR TOP BORDER BOTTOM BORDER LEFT BORDER RIGHT BORDER Label Description BORDER FACTOR Press OK to reset the 3D depth to the factory preset values.
On-Screen Display Menu 4.5. Preferences Menu The PREFERENCES menu allows you to select certain utility functions. To select a setting menu: 1. Press HOME on the remote control. 2. @ PREFERENCES. 3. Press OK to select the method. FACTORY RESET NETWORK MODE : DHCP UPGRADE Label Description FACTORY RESET Press OK to reset all functions to factory preset values. NETWORK MODE Press OK to enter the NETWORK MODE menu. See “Network Mode Menu” on page 24.
On-Screen Display Menu Network Mode Menu The NETWORK MODE menu allows you to setup the network settings. To select the network setting type: 1. Press HOME on the remote control. 2. From the MAIN menu, select PREFERENCES and press OK. 3. @ NETWORK MODE and press OK. 4. # < DHCP MANUAL Label Description DHCP Press OK to use the DHCP settings. Your network environment must be DHCP enabled.
On-Screen Display Menu $ < $ < network settings. 1. @ @ ? >? < $ DNS settings. 2. Press OK to enter a setting. NETWORK CONFIGURATION IP ADDRESS 192 . 168 . 1 . 158 SUBNET MASK 255 . 255 . 255 . 0 GATEWAY 192 . 168 . 1 . 1 DNS 192 . 168 . 1 . 1 SAVE CANCEL 3. @ ~ < 4. Press OK to enter. NETWORK CONFIGURATION IP ADDRESS 192 .
On-Screen Display Menu Upgrade Software The following section demonstrates how to perform the software upgrade procedure. CAUTION: Do not disconnect or power down the display at any time during the upgrade process to prevent damage or corruption to the $ The Upgrade Software procedure requires a network connection with Internet access. 1. Press HOME on the remote control. 2. From the MAIN menu, select PREFERENCES and press OK. 3. @ UPGRADE and press OK.
On-Screen Display Menu If there are no updates available, a System is up-to-date screen displays. System is up−to−date When a new upgrade version is available, you are asked to initiate the download. 4. Press OK to start the download process. Upgrade version mim8974−eng.git.20151021.
On-Screen Display Menu Once the download is complete, you will need to reboot the display to initiate the installation process. 5. Press OK to reboot and install the new upgrade version. Downloaded version mim8974−eng.git.20151021.190452 ...
On-Screen Display Menu 4.6. Device Status Menu The DEVICE STATUS menu lists information regarding the display’s hardware and software state. It is only for display. The information is < < 1. Press HOME on the remote control. 2. @ DEVICE STATUS. 3. Press OK to display the DEVICE STATUS menu. BSP Version: 1.2.19 Build Version: msm8974eng.git.20150827.113616 Model Number: msm8974 Serial Number: 222020206251500085 Firmware Version: V2.
On-Screen Display Menu Label Description HDMI Input Status Display the current input signal resolution from the active HDMI input. The information displays available resolution, Unknown for unrecognized resolution formats, and No HDMI Input if an HDMI signal is not detected. HDMI Input Port 1 Displays the current signal status of HDMI port 1: ; Connected if an HDMI source is detected. ; Disconnected if an HDMI source is not detected. ; Active if port 1 is the currently selected input source.
Troubleshooting 5. Troubleshooting This section lists known issues with the software release. Future software releases may resolve these issues. Question: Flashes and corrupted image during mode switch. Answer: During a mode switch the system restarts the video capture stack, but the trigger for this process relies on invalid images being sent through the system which means the image $ $ ' > the new HDMI signal.
Troubleshooting Question: Video plays black, then blinks. Answer: This is a known issue. Either unplug and plug the HDMI input cable (HDMI In 1) and try again, or power down (turn off) the monitor, wait 5 seconds, then power up (turn on) the monitor. Question: Video mode switch is slow. Answer: This is a known issue which will be resolved in a future software update. Mode switches can take anywhere from 20 seconds to over a minute. Question: Board boots up to black screen. Answer: This is a known issue.
Troubleshooting black lines. Answer: This shows up as fringing around objects and is especially visible in dark areas of the video. Power down (turn off) the monitor, wait 5 seconds, then power up (turn on) the monitor to resolve this.
FAQ 6. FAQ This section contains frequently asked questions and answers. Question: I’m trying Load & Play but every time I play a pre ! [ $ ` { @ > < # '+ \# '+ K $ = ] # '+ \# '+ ? $ * = but may also be “.
7. 7.1. Display 10-bit, 16.7 million colors Visible Screen Size 3840 x 2160@60Hz 4:4:4 Power Supply 100-240 V, 50/60 Hz Power Consumption 6A Supported Video Resolutions ; ; ; ; ; ; ; ; ; ; ; ; ; Connectors ; HDMI x 2 ; USB x 2 ; 3.5mm audio input jack Aspect Ratio 16:9 Brightness Up to 450 cd/m2 Contrast Ratio 4000:1 Viewing Angle 178° horizontal, 178° vertical Weight 71.14 kg (156.84 lbs) Dimensions (W x H x D) 147 x 85 x 9.5 cm (57.
7.2. Preset Modes 7.3. HDMI Timing 7.4.
Signal rendering results in a slight delay in the display of the signal and may be apparent when gaming. It is recommended to use the BYPASS mode when playing games to eliminate the lag time from broadcast to display. The device automatically detects the input signal format. When a supported format is detected, the device automatically adjusts for best use of the detected signal format. Industry Canada statement: This device complies with ISED's licence-exempt RSSs.