
User's Manual


Chapter 2
16 OL-30544-01
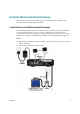
Connect the Wireless Residential Gateway
The following installation procedure ensures proper setup and configuration for the
residential gateway.
1 Choose an appropriate and safe location to install the residential gateway (close
to a power source, an active cable connection, your PC-if using high-speed
Internet, and your telephone lines-if using VoIP). For assistance, refer to Where Is
the Best Location for My Wireless Residential Gateway? (on page 11).
WARNING:
To avoid personal injury, follow the installation instructions in the exact
order shown.
Wiring and connections must be properly insulated to prevent electrical
shock.
Disconnect power from the residential gateway before attempting to
connect to any device.
2 Power off your PC and other networking device; then, unplug them from the
power source.
3 Connect the active RF coaxial cable from your service provider to the coax
connector labeled CABLE on the back of the residential gateway.
Note: To connect a TV, DHCT, set-top, or VCR from the same cable connection,
you will need to install a cable signal splitter (not included). Always check with
your service provider before using a splitter as a splitter may degrade the signal.
4
Connect your PC to the residential gateway using one of the following methods:
Ethernet Connection. Connect one end of an Ethernet cable to the Ethernet
port on your PC, and connect the other end to the
Ethernet
port on the back
of the residential gateway.
Wireless Connection. Make sure that your wireless device is powered up.
You will need to associate your wireless device with the residential gateway
once the residential gateway is operational. Follow the directions provided
with your wireless device for associating with a wireless access point. Make
sure that either the
2.4G
or the
5G
indicator is ON.
5
Locate the AC power cord provided with your residential gateway. Connect the
barrel connector end of the power cord into the power input on the back of the
residential gateway. Then, plug the other end of the power cord into an AC
outlet.
The residential gateway will perform an automatic search to locate and sign on
to the broadband data network. This process may take up to 2-5 minutes. The
residential gateway will be ready for use when the Power, US/DS, and Online
LEDs on the front panel of the residential gateway stop blinking and remain on
continuously.
6 Plug in and power on your PC and other home network devices. If one or more
of these devices uses wireless networking, the 2.4G or 5G LED on the residential
gateway should be on or blinking.