
User's Manual
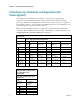

Table Of Contents
- Notice à l’attention des installateurs de réseaux câblés
- Mitteilung für CATV-Techniker
- Aviso a los instaladores de sistemas CATV
- IMPORTANT SAFETY INSTRUCTIONS
- Power Source Warning
- Ground the Product
- Protect the Product from Lightning
- Verify the Power Source from the On/Off Power Light
- Eliminate AC Power/Mains Overloads
- Provide Ventilation and Select a Location
- Operating Environment
- Protect from Exposure to Moisture and Foreign Objects
- Service Warnings
- Check Product Safety
- Protect the Product When Moving It
- United States FCC Compliance
- Introducing the DOCSIS Wireless Residential Gateway
- Purpose
- Installing the DOCSIS Wireless Residential Gateway
- Introduction
- Operation of Front Panel Indicators
- Introduction
- Troubleshooting the DOCSIS Wireless Residential Gateway
- Frequently Asked Questions
- How Do I Configure TCP/IP Protocol?
- How Do I Renew the IP Address on My PC?
- What if I Don't Subscribe to Cable TV?
- How Do I Arrange for Installation?
- How Does the Wireless Residential Gateway Connect to My Computer?
- After My Wireless Residential Gateway Is Connected, How Do I Access the Internet?
- Can I Watch TV and Surf the Internet at the Same Time?
- Common Troubleshooting Issues
- Tips for Improved Performance
- Frequently Asked Questions
- Introduction
- Customer Information
- Introduction
- Index
Frequently Asked Questions
OL-30 545 -01
23
To get a DNS server address automatically using DHCP, click Obtain DNS
server address automatically, and then click OK.
To specify a DNS server address, click Use the following DNS server
addresses, and then, in the Preferred DNS server and Alternate DNS server
boxes, type the addresses of the primary and secondary DNS servers.
9 To change advanced DNS, WINS, and IP settings, click Advanced.
10 When you are finished, click OK.
11 Try to access the Internet. If you cannot access the Internet, contact your service
provider for further assistance.
Configuring TCP/IP on Window s XP Sy stems
1 Click Start, and depending on your Start menu setup, choose one of the
following options:
If you are using the Windows XP Default Start Menu, select Connect to,
choose Show all connections, and then go to step 2.
If you are using the Windows XP Classic Start Menu, select Settings, choose
Network Connections, click Local Area Connection, and then go to step 3.
2 Double-click the Local Area Connection icon in the LAN or High-Speed Internet
section of the Network Connections window.
3 Click Properties in the Local Area Connection Status window.
4 Click Internet Protocol (TCP/IP), and then click Properties in the Local Area
Connection Properties window.
5 Select both Obtain an IP address automatically and Obtain DNS server address
automatically in the Internet Protocol (TCP/IP) Properties window, and then
click OK.
6 Click Yes to restart your computer when the Local Network window opens. The
computer restarts. The TCP/IP protocol is now configured on your PC, and your
Ethernet devices are ready for use.
7 Try to access the Internet. If you cannot access the Internet, contact your service
provider for further assistance.
Configuring TCP/IP on Macintosh Sy stems
1 Click the Apple icon in the upper-left corner of the Finder. Scroll down to
Control Panels, and then click TCP/IP.
2 Click Edit on the Finder at the top of the screen. Scroll down to the bottom of the
menu, and then click User Mode.
3 Click Advanced in the User Mode window, and then click OK.
4 Click the Up/Down selector arrows located to the right of the Connect Via
section of the TCP/IP window, and then click Using DHCP Server.
5 Click Options in the TCP/IP window, and then click Active in the TCP/IP
Options window.