
User's Manual
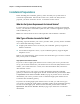

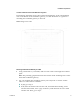
Table Of Contents
- Notice à l’attention des installateurs de réseaux câblés
- Mitteilung für CATV-Techniker
- Aviso a los instaladores de sistemas CATV
- IMPORTANT SAFETY INSTRUCTIONS
- Power Source Warning
- Ground the Product
- Protect the Product from Lightning
- Verify the Power Source from the On/Off Power Light
- Eliminate AC Power/Mains Overloads
- Provide Ventilation and Select a Location
- Operating Environment
- Protect from Exposure to Moisture and Foreign Objects
- Service Warnings
- Check Product Safety
- Protect the Product When Moving It
- United States FCC Compliance
- Introducing the DOCSIS Wireless Residential Gateway
- Purpose
- Installing the DOCSIS Wireless Residential Gateway
- Introduction
- Operation of Front Panel Indicators
- Introduction
- Troubleshooting the DOCSIS Wireless Residential Gateway
- Frequently Asked Questions
- How Do I Configure TCP/IP Protocol?
- How Do I Renew the IP Address on My PC?
- What if I Don't Subscribe to Cable TV?
- How Do I Arrange for Installation?
- How Does the Wireless Residential Gateway Connect to My Computer?
- After My Wireless Residential Gateway Is Connected, How Do I Access the Internet?
- Can I Watch TV and Surf the Internet at the Same Time?
- Common Troubleshooting Issues
- Tips for Improved Performance
- Frequently Asked Questions
- Introduction
- Customer Information
- Introduction
- Index

Installation Preparations
OL-30 545 -01
12
Location and Dimensions of the Wall-Mounting Slots
The following illustration shows the location and dimensions of the wall-mounting
slots on the bottom of the residential gateway. Use this illustration as a guide for
mounting the residential gateway to the wall.
Note: Image not to scale.
Mounting the Residential Gateway on a Wall
1 Using a drill with a 3/16-inch bit, drill two holes at the same height and 4 inches
apart.
Note: The preceding graphic illustrates the location of the mounting holes on the
back of the residential gateway.
2 Are you mounting the residential gateway into a drywall or concrete surface
where a wooden stud is available?
If yes, go to step 3.
If no, drive the anchor bolts into the wall, and install the mounting screws
into the anchor bolts; leave a gap of about 1/4-inch between the screw head
and the wall. Then, go to step 4.