EN Instructions for use ES Instrucciones de uso FR Notice d’emploi book U.S.A.
1 2 B A 3 1 2 3 C D E F NO OK
4 A B C 3 4 3 2 4 1 5 E D 5 5 6 7 6 A 1 2 B STOP
7 A B 2 1 8 C A 9 D B
10 11 D C A C B 12 B A 1 2 3 C 3 4
13 A D B D B C 14 15 C D F A B E
16 17 2 1 18
19 A B 1 3 2 2 20 3 B A 21 A B C D
22 23 F E A B 2 2 1 24 1 A B
25 D C E 26 G F 27 I H L
28 29 M N B A 30 C D
31 A GM B D C 2 1 Ganciomatic System 32 3 2 1 33
34 35 A B C D Book E 1dx) SPST7372D* 1sx) SPST7372S* 2) SPST7302N SPST7302KN 3) SPST7357NPEG 4) SPST6232* 5) SAPI7255* 6) SPST7255N 7) ARPI0635L32NGR 8) SPST7309N 9) MUCI5P26N 10) SAPI7297N 11) ITPABONA* 12) SPST7263N 13) SPST7261N 14) SAPI7303N 15) SAPI7251NN 16) MMST0087N SPST7303N MMRA0007 MMCA0007L30 17) SPST7323N MMVI0526 18) SPST7351N MMVA0260N 19) SPST7373N 20) MMVI0526 21) SPST7301* 22) ASPI0152L31 23) SAPI7087N 24) ERSHBK00-NY01RT01 25dx) MME
Book 1 2 26 27 22 7 4 5 28 23 3 8 21 6 20 17 19 18 24 13 12 9 14 15 16 25 10 - 14 - 11
EN_English THE CHILD’S BODY IS CLEAR OF ALL MOVING PARTS. _ ALL OPERATING AND ASSEMBLY PROCEDURES SHOULD BE PERFORMED BY AN ADULT. _ DO NOT LIFT THE STROLLER BY GRIPPING THE FRONT BAR. THE FRONT BAR IS NOT DESIGNED TO WITH STAND LOADS. _ ENSURE THAT THE STROLLER IS OPENED CORRECTLY AND LOCKED IN POSITION OF USE. _ CHECK TO MAKE SURE THAT THE CAR SEAT OR THE BABY CARRIAGE IS CORRECTLY FASTENED TO THE STROLLER (WHERE APPLICABLE).
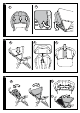
INSTRUCTIONS FOR USE them to the arm rests (Fig.c). 9• Fasten the baby safe elastic bands sideways to the seat on both sides, as shown in the figure.Baby Safe mounted correctly. 10•IMPORTANT: ensure the canopy is properly buttoned: onto both sides of the stroller's backrest (Fig. c) and on the inside of the handlebar (Fig. d). 11• HOOD: to assemble the hood, fasten the hood's side attachments onto the sockets until they click (Fig.a). The hood has: - a fabric loop, for tying toys (Fig.b).
• ADJUSTING THE FOOTREST: the footrest can be adjusted to 2 positions. To lower the footrest, push the two little side levers downwards and lower the footrest at the same time. To raise the footrest, push it upwards until it clicks. 18• ADJUSTING THE BACKREST: the backrest can be reclined into 8 positions. To lower the backrest, lift the handle and lower the backrest at the same time. Block it in the desired position. To raise the backrest, lift the handle and raise the backrest at the same time.
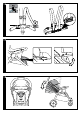
30• Insert the lining's elastic into the groove and stretch it from inside to fasten it (fig_c). Insert the rigid strap into its grooves until it clicks into place. Check it is securely fastened by pulling it (fig_d). - Button the hood onto the stroller's backrest (Fig.10c), on both sides and inside the handle (Fig.10d). GANCIOMATIC SYSTEM The Ganciomatic System is the quick practical system that enables you to attach the Primo Viaggio Tri-Fix car seat to the stroller in just one step.
ES_Español PUNTOS COMPLETO. _ Le agradecemos haber elegido un producto Peg-Pérego. ADVERTENCIA _ IMPORTANTE: LEER ATENTAMENTE ESTAS INSTRUCCIONES Y CONSERVARLAS PARA UNA FUTURA UTILIZACIÓN. _ SI NO SE SIGUEN ESTAS INSTRUCCIONES, SE PODRÍA ARRIESGAR LA SEGURIDAD DEL NIÑO. _ DISEÑADO PARA UN NIÑO CON UN PESO MÁXIMO DE 20 KG Y UNA ALTURA MÁXIMA DE 110 CM. LA CESTILLA HA SIDO REALIZADA PARA SOPORTAR UN PESO MÁXIMO DE 5 KG.
AVISO ESTE PRODUCTO CUMPLE O NEBASA CON TODOS LOS REQUISITOS ESTABLECIDOS POR LA NORMA ASTM F833 Y ULTERIORES REVISIONES. COMPONENTES DEL ARTÍCULO Verificar el contenido del embalaje y, por cualquier reclamación, contactar con el servicio de asistencia. _ La silla de paseo BOOK CLÁSICA se compone de: chasis, 2 ruedas traseras, barra frontal, cesto, portabebidas.
ambos lados en el sentido de la flecha; para aflojarla, hacer lo contrario. 15• Para regular la altura de los cinturones de seguridad es necesario desenganchar las dos hebillas de la parte posterior del respaldo. Tirar de los tirantes (flecha a) hasta desenganchar las hebillas e introducirlas en las ranuras del respaldo (flecha b). Sacar los tirantes del saco (flecha c) e introducirlos en la ranura más adecuada (flecha d); enganchar las dos hebillas detrás del respaldo (flecha e).
respaldo como indica la figura 15_a / 15_b; - ejercer presión en los orificios y quitar el saco lateral, a ambos lados (fig_m); - Desabroche la capota desde ambos lados del respaldo de la sillita (ilustración 10 C) y dentro del manillar (ilustración 10 d). _ quitar el saco por arriba (fig_n).
periódicamente las partes de plástico con un paño húmedo sin usar solventes u otros productos similares. Mantener secas todas las partes de metal para prevenir la oxidación. Mantener limpias todas las partes móviles (dispositivo de regulación, de enganche, ruedas...) quitando el polvo o la arena y, en caso necessario, engrasarlas con aceites ligeros. LIMPIEZA DEL PROTECTOR DE LLUVIA: lavar con una esponja con agua y jabón, sin usar detergentes.
COMPLÈTE. _ AVERTISSEMENT: NE JAMAIS LAISSER L’ENFANT SANS SURVEILLANCE. _ TOUJOURS ACTIONNER LES FREINS LORSQUE LE PRODUIT EST A L’ARRET. _ POUR ÉVITER DE GRAVES BLESSURES LORS DU RÉGLAGE DU PRODUIT, S’ASSURER QUE LES MEMBRES DE L’ENFANT NE SONT PAS EN CONTACT AVEC DES PIÈCES EN MOUVEMENT. _ L’ENSEMBLE DES PROCÉDURES DE MONTAGE ET D’UTILISATION DOIT ÊTRE EFFECTUÉ PAR UN ADULTE _ NE PAS SOULEVER LA POUSSETTE PAR LA BARRE FRONTALE. ELLE N’A PAS ÉTÉ CONÇUE POUR SUPPORTER DES CHARGES.
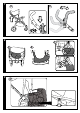
le pied les leviers situées sur les roues arrière (Fig.b). Pour débloquer les freins, agir dans le sens inverse. A l’arrêt, utiliser toujours les freins. 7• PORTE-BOISSONS : Il peut être appliqué sur le côté gauche ou droit de la poussette, grâce au crochet présent sur les deux côtés du châssis. Pour appliquer le porte-boissons, le fixer jusqu’au déclic. (Fig.a). RÉGLAGE POIGNÉES : la hauteur des poignées est réglable en 4 positions.
l’extérieur (Fig. b). Quand on enlève la barre frontale, mettre les embouts de protection fournis avec pour fermer les accoudoirs du châssis. 21• FERMETURE : pour fermer la poussette, il est préférable que les roues avant soient fixes, fermer la capote et décrocher le siège-auto s’il est accroché.
- incliner entièrement le dossier (fig_a) ; - soulever les deux ailettes en les décrochant des velcros et les réunir (fig_b) ; - relever les fixations Ganciomatic du châssis (fig_c) ; - Pour faciliter la fixation du Car Seat, nous conseillons de fermer la capote (12 a1); - positionner le siège-auto vers la maman et appuyer vers le bas jusqu’au déclic, (fig_d) ; - Vérifier que le siège-auto ou la nacelle sont correctement fixés sur le châssis. - Soulever le dossier de la poussette à la hauteur maximale.
PEG PEREGO U.S.A. Inc. 3625 INDEPENDENCE DRIVE FORT WAYNE INDIANA 46808 phone 260 482 8191 fax 260 484 2940 Call us toll free: 1 800 671 1701 Conforms to ASTM F833 Safety Standards book PEG PEREGO S.p.A. VIA DE GASPERI 50 20862 ARCORE MB ITALIA tel. 0039 039 60881 fax 0039 039 615869/616454 Servizio Post Vendita - After Sale: tel. 0039 039 6088213 fax: 0039 039 3309992 PEG PEREGO CANADA Inc.