
Install Instructions
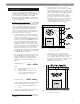


7
BOILER PLACEMENT & ASSEMBLY
A. PACKAGED BOILER
1. Remove the crate top and sides and remove any
loose cartons.
2. Lift the boiler from the crate pallet. Move the boiler to
the location determined in Chapter 1: Pre-installation.
3. Proceed to Chapter 3: Piping the Boiler.
B. KNOCKDOWN BOILERS – SPLIT BLOCK
ASSEMBLY MODELS 64-07 TO 64-12
1. The boiler sections and base on Model 63-03 to 63-06
are factory assembled. If the boiler is 63-03 through
63-06 begin assembly as described in step 2.C,
Knockdown Boilers: Assembled Blocks.
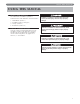
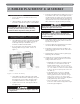
2. Move each block of cast iron sections off of the
shipping pallets and support them as shown in
Figure 2.1.
3. Clean nipple ports using a wire brush. Make certain
there are no burrs around the outside edge of the ports.
If necessary, remove any burrs on the edges using a
round file (be careful not to score the nipple port).
4. Spread a thin coat of TFE TITE Nipple Sealant in
the nipple ports.
5. Insert the push nipples into the nipple ports of one of
the split block ends. Make sure the nipples are clean
and free of burrs. Use a block of wood to protect the
surface of the nipple while setting the nipple into the
nipple port with a hammer. Assure that the nipple is
firmly seated in the nipple port before proceeding.
6. Apply silicone sealant to the rope groove to hold the
rope in place during assembly. Press 1/2" diameter
rope into the rope groove.
7. Assure the nipples are perpendicular to the sections
and that the blocks are aligned properly.
8. Insert draw rods through the lugs provided on the
mating intermediate sections. Use 5/8" draw rods as
shown in Figure 2.1.
9. Before starting to draw the sections together, apply
lubricating oil to the threads.
10. Tighten the hex nuts and draw the boiler sections
together evenly until the small pads on each of the
mating sections are in contact:
·
Periodically measure the gap at all four corners
of the section to make sure the sections are
drawing together evenly – gaps measured at
all four corners should not vary more than
1/8". Turn wrench no more than 3-4 times before
moving to the next nut (this equates to about an
1/8" draw-up).
·
Using similar torque on each nut, gradually
increase the torque as the sections are drawn
closer together. Maximum allowable torque
on the draw rod nuts is 80 foot-pounds.
Typically only 30 to 60 foot-pounds is required to
pull together evenly drawn sections.
·
If one corner resists moving, loosen the draw
rods on the other corners to help pull the subject
corner into proper alignment.
2. BOILER PLACEMENT & ASSEMBLY
Never apply nipple sealer on the nipples. Apply only
in nipple ports.
NOTICE
Be careful not to damage the burner tray when
removing the boiler from the pallet. If necessary,
remove the burner tray before moving the boiler.
NOTICE
Figure 2.1: Block Assembly
Never hit the nipple directly with a hammer. This will
damage the nipple and cause leaks.
NOTICE
If the nipple is not fully seated in the nipple port,
damage to the nipple may occur when the sections
are drawn together.
NOTICE