User Manual
Manuals
Brands
Peerless Manuals
Boilers
63-03 - 74,000 BTU Output Standing Pilot Knockdown Residential Steam Boiler (Nat Gas)
1
2
3
4
5
6
7
8
9
10
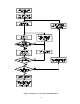
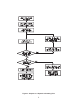
Figure 3:
Sequence of Operation Standing Pilot
5
1
...
2
3
4
5
6
7
...
...
12