
Installation User Manual
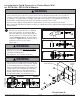

Visit the Peerless Web Site at www.peerless-av.com
ISSUED: 03-23-09 SHEET #:055-9260-8 04-25-13
8 of 9
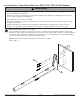
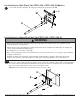
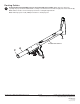
Slide carriage (B) over wall arm (A) and adjust to the desired projector throw distance as shown. Lock carriage
(B) into place using four M5 x 10 mm screws (D).
B
A
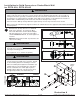
Assembly of Adjustment Tube
Installing PRGS projector mount to wall arm assembly: Attach PRGS projector mount (J) to carriage (B) using
two 1/4-20 phillips screws (H) and two fl at washers (I) as shown below.
D
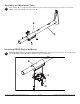
Installing PRGS Projector Mount
B
2
3
H
I
J