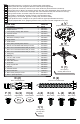
PRSS-455 MAX 50 lb (22.
WARNING ENG - This product is designed to be installed on wood joist/beam, solid concrete, or truss ceilings. Hardware is included for wood joist/beam, solid concrete, and truss ceiling installation. Before installing make sure the supporting surface will support the combined load of the equipment and hardware. Weight of projector shall not exceed maximum load capacity. This suspended ceiling plate is intended to support projector mounts only. Screws must be tightly secured.
AVVERTENZA ITL - Questo prodotto è indicato per l’installazione su trave/traversa di legno, calcestruzzo solido o soffitti a capriata. Sono compresi i dispositivi di fissaggio per l’installazione su trave/traversa di legno, calcestruzzo solido e soffitto a capriata. Prima di iniziare l’installazione, accertarsi che la superficie di supporto sia in grado di sorreggere il carico combinato unità/dispositivi di fissaggio. Il peso del proiettore non deve superare la capacità massima di carico.
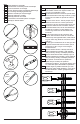
ENG ESP FRN DEU NEL ITL ČEŠ SLK POR TÜR Symbols Símbolos Symboles Symbole Symbolen Simboli Symboly Symboly Símbolos Semboller ENG ESP FRN DEU Do not overtighten screws. No apriete de más los tornillos. Ne pas trop serrer les vis. Ziehen Sie die Schrauben nicht zu fest an. Draai de schroeven niet te strak aan. Non stringere troppo le viti. Šrouby neutahujte příliš silně. Skrutky neuťahujte príliš silno. Não apertar demasiado os parafusos. Vidaları gereğinden fazla sıkmayın.
ENG ESP FRN DEU NEL ITL ČEŠ SLK POR TÜR Tools Needed for Assembly. Herramientas necesarias para el ensamblaje. Outils nécessaires au montage. Für den Zusammenbau erforderliche Werkzeuge. Voor montage benodigd gereedschap. Attrezzi necessari per l’assemblaggio. Nástroje potřebné k montáži. Nástroje potrebné na montáž. Ferramentas necessárias para a montagem. Montaj İçin Gerekli Aletler. 5/32" (4mm) ENG To properly tighten screws: Tighten until screw head makes contact, then tighten another 1/2 turn.
ENG ESP FRN DEU NEL ITL ČEŠ SLK POR TÜR Parts (Before beginning, make sure you have all parts shown below). Piezas (antes de iniciar, asegúrese de tener todas las piezas siguientes). Pièces (avant de commencer, assurez-vous d’avoir toutes les pièces illustrées ci-dessous). Teile (Achten Sie vor Beginn der Arbeiten darauf, dass alle unten abgebildeten Teile vorhanden sind). Onderdelen (hoort u zich ervan te overtuigen dat u alle onderdelen hebt, die hieronder te zien zijn).
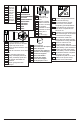
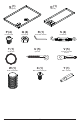
N (1) O (1 ) ceiling tray P (4 ) 1/4"-20 screw T (1 ) 20' tie wire W (1) flush mount tube filler tray Q (4) 1/4"-20 nut R (1) 4mm allen wrench U (5) eye bolt X (1) M5 x 10mm penta pin 7 S (4) turnbuckle V (5) eye bolt concrete anchor Y (1 ) M5 x 1" driver 2013-09-10 #:056-9072-1
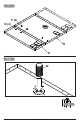
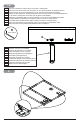
1 P (4) Q (4) N O 1a W 2 8 2013-09-10 #:056-9072-1
1b ENG ESP FRN DEU NEL ITL ČEŠ SLK POR TÜR Align slot of extension column with one of holes in ceiling plate. Alinee la ranura de la columna de extensión con uno de los agujeros de la placa de techo. Alignez la fente de la colonne d'extension sur un des trous de la plaque de plafond. Richten Sie den Schlitz der Verlängerungssäule mit einem der Löcher in der Deckenplatte aus. Lijn de sleuf in verlengbuis uit met één van de gaten in plafondplaat.
3 ENG In cases where 24" (610mm) x 48" (1219mm) ceiling tiles are used, cut one tile in half and add another 24" (610mm) ceiling runner in order to make a 24" (610mm) x 24" (610mm) section. ESP En casos en los que se utilicen placas de techo de 24" (610 mm) x 48" (1219 mm), corte una placa por la mitad y añada otro canal guía de 24" (610 mm) para crear una sección de 24" (610 mm) x 24" (610 mm).
4 ENG ESP FRN DEU NEL ITL ČEŠ SLK POR TÜR Wood joist/beam Vigueta de madera Solive de bois Holzbalken Houten dwarsbalk Travetto di legno Dřevěný nosník Drevený nosník Trave de madeira Ahşap kiriş 4a ENG ESP FRN DEU NEL ITL ČEŠ SLK POR TÜR Concrete Ceiling Techo de concreto Plafond en béton Betondecke Plafond van beton Soffitto in calcestruzzo Betonový strop Betónový strop Teto em betão Beton tavan 4b 11 ENG ESP FRN DEU NEL ITL ČEŠ SLK POR TÜR Truss Ceiling Techo de cerchas Plafond à ossature apparen
4a WARNING ENG • When installing Peerless mounts on a wood joist or beam verify that the joists or beams are a minimum of 2" x 4" nominal size. When installing to wood joist or beam position the mounting holes so when the tie wires are attached and taut the optimal angle is 15°. Unit may be mounted at an angle up to 45° if necessary. ADVERTENCIA SPN - Al instalar los soportes de Peerless en viguetas / vigas de madera verifique que las mismas tengan un tamaño mínimo de 2" x 4".
4a-1 4a-2 ENG Mark mounting holes on stud center lines. ESP Marque los orificios de montaje en las líneas centrales del montante. FRN Marquez les trous de fixation le long de la ligne médiane du montant. DEU Markieren Sie die Montagelöcher auf den Ständer-Mittellinien. NEL Markeer montagegaten op het midden van de balken. ITL Contrassegna i fori di montaggio sulle linee centrali dei montanti. ČEŠ Na střední linii stěny vyznačte montážní otvory. SLK Na stredné čiary steny vyznačte montážne otvory.
4b WARNING ENG • When installing Peerless mounts on a concrete ceiling, the ceiling must be at least 8" thick with a minimum compressive strength of 2000 psi. Never attach concrete expansion anchors to concrete covered with plaster, drywall, or other finishing material. When installing to concrete ceiling position the mounting holes so when the tie wires are attached and taut the optimal angle is 15°. Unit may be mounted at an angle up to 45° if necessary.
4b-1 ENG ESP FRN DEU NEL ITL ČEŠ SLK POR TÜR Mark mounting holes. Marque los orificios de montaje. Marquez les trous de fixation. Markieren Sie die Montagelöcher. Markeer montagegaten. Contrassegna I fori di montaggio. Vyznačte montážní otvory. Vyznačte montážne otvory. Marque os furos de montagem. Montaj deliklerini işaretleyin. 4b-2 ENG Drill mounting holes into supporting surface (1.5" (38 mm) minimum depth required).
5 ENG Cut tie wire into four pieces of equal length. If space between the true ceiling and suspended ceiling is more than 36" (914mm), additional wire (12 gauge annealed, steel, black) will be needed. Twist wire around itself at least six times as tightly as possible. Tie wires must support entire load, adjust turnbuckles to tension after all equiptment is attached. ESP Corte el cable de seguridad en cuatro secciones del mismo largo.
U (4) T V (4) T T ENG ESP FRN DEU NEL ITL ČEŠ SLK POR TÜR x6 17 2013-09-10 Tighten. Apretar. Serrer. Anziehen. Aandraaien. Stringere. Utáhněte. Utiahnite. Apertar. Sıkmak.
6-1 ENG ESP FRN DEU NEL ITL ČEŠ SLK POR TÜR C 4mm wrench 6-2 A F Loosen. Afloje. Desserrez. Lösen. Losdraaien. Allentare. Uvolnit. Uvoľniť. Desaperte. Gevşetin. ENG Rotate mount at least three full turns onto UL listed EXT, AEC or ALU series extension column (sold separately). ESP Rote la unidad, por lo menos, tres vueltas completas en la columna de extensión serie EXT, AEC o ALU clasificadas por UL (vendidas por separado).
7-1 B C 4mm wrench ENG ESP FRN DEU NEL ITL ČEŠ SLK POR TÜR Loosen. Afloje. Desserrez. Lösen. Losdraaien. Allentare. Uvolnit. Uvoľniť. Desaperte. Gevşetin. 7-2 ENG ESP FRN DEU NEL ITL ČEŠ SLK POR TÜR Position feet of adapter bracket over mounting holes. Coloque las patas del soporte adaptador sobre los agujeros de montaje. Placez les pattes du support adaptateur sur les trous de fixation. Positionieren Sie die Füße der Adapterhalterung über den Montagelöchern.
7-3 x3 ENG Screws must get at least three full turns and fit snug. ESP Los tornillos tienen que dar, por lo menos, tres vueltas completas y quedar ajustados. FRN Il faut effectuer au moins trois tours de vis complets et bien serrer les vis. DEU Schrauben sind mindestens drei volle Umdrehungen einzudrehen und müssen fest anliegen. NEL De schroeven moeten ten minste drie hele slagen worden aangedraaid en stevig vastzitten. ITL Girare tre volte le viti che devono risultare aderenti.
ENG It is the responsibility of the installer to ensure that the projector is properly ventilated per manufacturer's requirements. ESP El instalador es responsable de asegurarse de que el proyector tenga una ventilación adecuada. FRN Il incombe à l'installateur de s'assurer que le projecteur est correctement ventilé. DEU Die für die Montage zuständige Person ist dafür verantwortlich, dass der Projektor ausreichend belüftet ist.
9-1 9-2 ENG ESP FRN DEU NEL ITL ČEŠ SLK POR TÜR 9-3 ENG ESP FRN DEU NEL ITL ČEŠ SLK POR TÜR Optional security screw. Tornillo de seguridad opcional. Vis de sécurité facultative. Optionale Sicherheitsschraube. Optionele veiligheidsschroef. Vite di sicurezza opzionale. Volitelný bezpečnostní šroub. Voliteľná bezpečnostná skrutka. Parafuso de segurança opcional. İsteğe bağlı güvenlik vidası. Tighten. Apretar. Serrer. Anziehen. Aandraaien. Stringere. Utáhněte. Utiahnite. Apertar. Sıkmak.
10 ENG ESP FRN DEU NEL ITL ČEŠ SLK POR TÜR C Cable management: adjust pitch then route cables as shown. Manejo de cables: ajuste la inclinación y acomode los cables, como se muestra. Réglez l'angle d'inclinaison puis acheminez les câbles comme illustré. Kabelführung: stellen sie die neigung ein und verlegen sie dann die kabel wie abgebildet. Kabelbeheer: pas de hoek naar wens aan en routeer dan de kabels zoals afgebeeld. Gestione dei cavi: regolare il passo, quindi inserire i cavi come mostrato.
11-2 C 4mm wrench ENG Loosen, adjust, tighten. ESP Afloje, ajuste, apriete. FRN Desserrez, réglez, puis serrez. DEU Lösen, einstellen, anziehen. NEL Losdraaien, aanpassen, aandraaien. ITL Allentare, regolare, stringere. ČEŠ Uvolnit, nastavit, přitáhnout. SLK Uvoľniť, nastaviť, pritiahnuť. POR Desaperte, ajuste, aperte. TÜR Gevşetin, ayarlayın, sıkın. F F +15° +20° -20° -15° 11-3 C 4mm wrench +/- 10° ENG Loosen, adjust, tighten. ESP Afloje, ajuste, apriete. FRN Desserrez, réglez, puis serrez.
LIMITED FIVE-YEAR WARRANTY Peerless Industries, Inc. (“Peerless”) warrants to original end-users of Peerless® products will be free from defects in material and workmanship, under normal use, for a period of five years from the date of purchase by the original end-user (but in no case longer than six years after the date of the product's manufacture). At its option, Peerless will repair or replace, or refund the purchase price of, any product which fails to conform with this warranty.
BESCHRÄNKTEN FÜNFJÄHRIGEN GARANTIE Peerless Industries, Inc. („Peerless”) übernimmt gegenüber den ursprünglichen Endnutzern von Peerless®-Produkten die Gewährleistung, dass diese unter normalen Einsatzbedingungen für fünf Jahre ab Datum des Kaufs durch den ursprünglichen Endnutzer (aber in keinem Fall länger als sechs Jahre nach Herstellungsdatum des Produkts) frei von Material- und Verarbeitungsfehlern sind.
OMEZENÁ PĚTILETÁ ZÁRUKA Peerless Industries, Inc. (“Peerless”) zaručuje původním koncovým uživatelům výrobků Peerless®, že budou bez vad na materiálu a provedení, za podmínky běžného používání, po dobu pěti let od data nákupu původním koncovým uživatelem (ale v žádném případě ne déle než šest let po datu výroby výrobku). Společnost Peerless dle své volby opraví nebo vymění, anebo proplatí cenu nákupu jakéhokoliv výrobku, který nebude v pořádku ve stavu, který tato záruka pokrývá.
BEŞ YILLIK SINIRLI GARANTİ Peerless Industries, Inc. (bundan sonra “Peerless” olarak anılacaktır) Peerless® ürünlerinde normal kullanım koşulları altında orijinal son kullanıcının satın alma tarihinden itibaren beş yıl süreyle (ama her halükarda ürünün üretim tarihinden itibaren en fazla altı yıl süreyle) malzeme ve işçilik arızaları olmayacağını orijinal son kullanıcılara garanti eder.