
Installation Instruction Manual

7 of 7
ISSUED: 1-17-11 SHEET #: 125-9179-2 07-31-12
Desktop Mounting Surface Lock down Installation
1
© 2011 Peerless Industries, Inc. All rights reserved.
Peerless is a registered trademark of Peerless Industries, Inc. Other parties’ marks are the property of their respective owners.
Figure. 1.1
Wii™
B
J
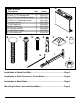
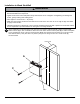
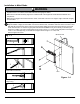
Place lock down plate (A) onto mounting surface as a template. Level, and mark the center of four rectangular
mounting holes. Drill four 5/16” (8 mm) dia. holes through desktop mounting surface. Secure using four carriage
bolts (B) though lock down plate (A
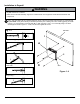
Secure two 1/4-20 x 1 3/4” carriage bolts (B) using two 1/4-20 nylock nuts (J
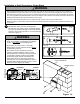
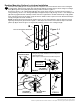
Using remaining 1/4-20 x 1 3/4” carriage bolts (B), hand tighten slope nut (F) through 1/4-20 x 1 3/4" carriage bolt
(BF) upside-
F) as shown in detail 2. Insert a open box wrench between both slope
nuts (F) and tighten as shown in detail 3.
NOTE: Avoid jamming both slope nuts (F
F
plastic cap (GB).
G
B
FIG 1.2
Detail 3
TIGHTENING
SLOPE NUT (F)
F
5/8" OPEN BOX
WRENCH
TIGHTENING
SLOPE NUT (F)
B
B
F
Detail 1
Detail 2
F
BOTTOM OF DESK
BOTTOM OF DESK
NOTE: Avoid jamming both slope nuts (G) together,
used for tightening.
After slope nut is secure remove bottom slope nut.
LEAVE SPACE
IN BETWEEN
SLOPE NUTS
A