
Installation Instruction Manual

5 of 7
ISSUED: 1-17-11 SHEET #: 125-9179-2 07-31-12
1
components.
recommended.
WARNING
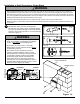
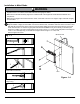
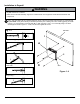
Installation to Metal Studs
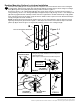
I) clockwise to wedge it against
inside walls of metal stud.
Push into hole.
Pivot end of toggler (I).
Slide plastic cap forward while pulling back
Break off excess.
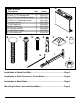
I
1
2
3
4
5
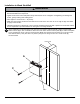
g. 1.3
drill
1/2"
hole
I
I
I
I
D
A
I
Figure. 1.4
wall plate (A), and mark the center of the two mounting holes. Make sure that the mounting holes are on the stud
center lines. Drill two 1/2" holes through drywall and metal studs. NOTE: It may be necessary to drill 5/32" pilot
holes prior to drilling 1/2" holes. Install togglers (I
1/4-20 x 1.5" screws (D) using 4 mm allen wrench (H
and then tighten all screws.
Wii™