ª Operating Guide
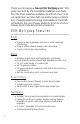
Contents: Introduction ....................................................................................... 3 Features ............................................................................................. 4 Body..................................................................................... 4 Electronics ............................................................................ 4 Neck..................................................................................... 4 Hardware ..........
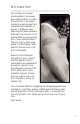
Introduction For as long as I’ve been playing guitar, I’ve always been searching for a certain feel and tone...I’ve experimented by tearing apart and reassembling hundreds of guitars in different ways searching for these qualities. Although I’ve ruined a lot of great guitars by having done this, I have learned what it takes to make a truly great guitar. The Wolfgang®, after years of trial and error, (for me) is that guitar.
Thank you for buying a Peavey EVH Wolfgang guitar. This guitar was built by the most skilled craftsmen and made from the finest materials available. As with all of our musical equipment, we have built our guitars using a combination of leading-edge technology and traditional handcrafted methods. Ask your Peavey dealer for a full list of other Peavey musical equipment and accessories.
Construction Body The body of this instrument is constructed of select hardwoods chosen specifically for tonal qualities as well as for natural beauty and weight characteristics. The carved top and offset, asymmetrical body design offer comfort, proper balance and maximum playing ease. Cream or black edge binding is also added to accent the body. Neck The select birdseye maple neck is crafted to provide unmatched rigidity and freedom from warpage.
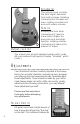
Volume (2) The volume knob controls the total signal delivered from both pickups. Rotating clockwise will increase volume; rotating counterclockwise will reduce volume. 1 Tone (3) 2 3 4 Rotating the tone knob clockwise will result in more treble (higher frequencies) and a brighter tonality; rotating counterclockwise will reduce the amount of treble. Output Jack (4) The output jack accepts standard guitar patch cords. (We recommend high-quality Peavey “shielded” patch cords.
easy access torsion rod adjustment wheel located at the end of the neck. This wheel can be adjusted with a hex wrench or small screwdriver. Just insert the tool into the adjustment wheel and rotate accordingly. 1. Tune the instrument to standard (A-440) pitch. 2. Fret the sixth string (E) at the first and last frets. 3. Check for clearance between the string and the eighth fret. 4. Clearance should be no less than .005" and no more than .015". 5.
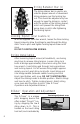
String Retainer Bar (1) 1 2 The string retainer bar is used to provide the proper amount of downward string pressure over the locking topnut. This should be adjusted only low enough to keep the strings in contact with the surface of the locking topnut, which will prevent the strings from going sharp in pitch after tightening the locking topnut. Locking Topnut (2) (at headstock) With the supplied 3mm hex wrench, loosen the three locking topnut screws to allow the strings to pass through the string slots.
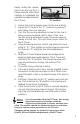
set screw simply sliding the mechanism in (for E) or out (for D). Please read the instructions carefully to understand the operation and adjustment of the D-Tuner. “D” position 1. Loosen the locking topnut screw for the low-E string. 2. Adjust the D-Tuner to the “D” position by pulling it back (away from the tremolo). 3. Turn the fine-tuning adjustment screw for the low-E string counterclockwise until it stops. Then, turn the fine-tuning adjustment screw clockwise approximately one full turn.
Tremolo Bridge Height Bridge height may be adjusted by means of the bridge pivot bolts. Turn the pivot bolts clockwise to reduce bridge height. Turn the pivot bolts counterclockwise to increase bridge height. tremolo Bridge Tension The tension of the tremolo bridge is set by adjusting the spring tension screws that hold the spring claw in place. To gain access to the spring tension screws and spring claw, remove the spring cover on the back of the guitar.
CAUTION: Loosen all string tension before installing or removing tension springs. Tremolo springs are designed for high tension. Extreme care should be taken when installing and removing these springs. Tremolo Arm The tremolo arm is inserted and screwed into the tremolo arm socket on the bridge plate. This assembly can be adjusted to control the amount of torque required to rotate the tremolo arm. Some players prefer the tremolo arm to stay in place when used.
String Intonation Accurate string intonation settings ensure that your instrument will play in tune at any point on the neck. Although “perfect intonation” is an impossibility with a fretted instrument, the proper adjustments will maximize the accuracy of individual notes up and down the neck. Intonation is set by comparing the pitch of an open string to the pitch of the same string when played one octave higher at the 12th fret.
4. Play the first (E) string open and compare it to the pitch of the same string when it is played at the 12th fret. These notes should sound the same (actually, there is an octave difference). 5. Using a 2.5mm hex wrench for the tremolo or a small, flat blade screwdriver for the fixed bridge, adjust the string saddle so that both the fretted and open notes are the same. If the fretted note is sharper than the open note, the vibrating length of the string must be increased.
For optimum performance, strings should be changed approximately once a month, or after about every twentyfour hours of playing. Some players prefer to change strings more often. Finish Your instrument has a polyester/urethane finish that is both durable and weather-resistant, but requires care. Regular cleaning with Peavey guitar polish is recommended. Between polishes, the instrument should be wiped with a dry, soft cloth. Accessories Peavey offers a full line of accessories for your instruments.
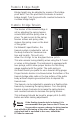
WARNINGS All amplification accessories, microphones, mixers, etc., must be properly grounded and should be utilized with a 3-wire mains system in order to prevent electrical shock. Do not come into contact with other electrical apparatus when playing (or touching) your instrument.
ESPAÑOL Gracias por comprar una guitarra Wolfgang EVH de Peavey. Esta guitarra fue construida por los artesanos más habilidosos y los mejores materiales disponibles. Al igual que todos nuestros equipos de música, hemos fabricado nuestras guitarras combinando una tecnología de vanguardia con métodos artesanales tradicionales. Solicite a su distribuidor Peavey una lista completa de los equipos de música y accesorios de Peavey.
Componentes mecánicos • Dispositivos de afinación Schaller® con botones de efec to perlado o color crema • Conjunto de trémolo de doble bloqueo con la licencia de Peavey/Floyd Rose® o conjunto de puente fijo con pieza de cola de tono y parada automáticos • Afinador D (disponible sólo en el modelo con trémolo) • Piezas mecánicas con acabado cromado Construcción Cuerpo El cuerpo de este instrumento está construido con madera dura seleccionada, elegida específicamente por sus cualidades tonales así como por s
retroalimentación cuando se ejecuta con volumen muy alto y ofrecer mejor respuesta tonal. Controles Interruptor selector de fonocaptores (1) 1 Este interruptor de tres posiciones permite seleccionar las diferentes combinaciones de los fonocaptores.
Ajustes Este instrumento ha sido ajustado cuidadosamente en la fábrica de Peavey para estar entonado con precisión y simplificar el uso. Sin embargo, su manera personal de tocar y sus requerimientos quizás exijan realizar ajustes adicionales. El distribuidor autorizado Peavey puede realizar estos cambios, pero con un poco de cuidado y si cumple estrictamente las siguientes instrucciones, usted puede tratar de hacerlos por su cuenta.
Puente del trémolo El sistema del trémolo de doble bloqueo con la licencia de Peavey/Floyd Rose® está formado por una tuerca superior de bloqueo, abrazaderas en el puente de bloqueo y una placa de acero para el puente con un bloque de inercia de bronce macizo que ofrecen estabilidad de afinación, sostenimiento y respuesta tonal máximos. Este sistema de trémolo ha sido ajustado cuidadosamente para lograr una afinación precisa, facilitar su uso y simplificar el cambio de tonos.
de las cuerdas a través de las ranuras. Afine y apriete los tornillos de la tuerca de bloqueo hasta que estén firmes. NO APRIETE LOS TORNILLOS EXCESIVAMENTE. Instalación de las cuerdas Después de aflojar los tornillos de la tuerca superior (en el clavijero), utilice dispositivos de afinación para aflojar las cuerdas. Afloje los pernos de bloqueo de las cuerdas en el puente aproximadamente tres vueltas usando la llave hexagonal de 3 mm.
2. Para ajustar el afinador D en la posición “D”, llévelo hacia atrás (aléjelo del trémolo). 3. Gire el tornillo de ajuste de afinado preciso para la cuerda E baja hacia la izquierda, hasta que se detenga. Luego, gire el tornillo de ajuste de afinado preciso aproximadamente una vuelta completa hacia la derecha. Esto permitirá que el afinador D se desplace correctamente. 4. Use el dispositivo de afinación para estirar y afinar nue vamente la cuerda E baja en “D”.
Altura del puente del trémolo La altura del puente puede ajustarse mediante los pernos de giro del puente. Gire los pernos hacia la derecha para reducir la altura del puente. Gírelos hacia la izquierda para aumentar la altura. Tensión del puente del trémolo La tensión del puente del trémolo se regula ajustando los tornillos de tensión del resorte que sujetan la mordaza del resorte en su lugar.
tensión de las cuerdas que afectará la afinación del resto de las cuerdas. En la caja encontrará un perno de bloqueo para las cuerdas adicional, que puede usar si extrae el afinador D. PRECAUCIÓN: Afloje todas las cuerdas antes de colocar o retirar los resortes de tensión. Los resortes del trémolo fueron diseñados para resistir gran tensión. Tenga mucho cuidado cuando instale y extraiga estos resortes.
cuerdas es necesario bajar la pieza de cola (girando el tornillo hacia la derecha), mientras que para reducir la tensión se debe llevar la pieza de cola hacia arriba (girando el tornillo hacia la izquierda). Entonación de las cuerdas Las configuraciones precisas para la entonación de las cuerdas aseguran que su instrumento se mantendrá afinado en todas las posiciones del cuello.
la nota que se toca pulsando la cuerda contra el traste. Para que este procedimiento resulte más fácil y exacto, recomendamos usar uno de los diversos tipos de afinadores para guitarras electrónicas que se venden en las tiendas de instrumentos musicales. 1. Asegúrese de los ajustes de la varilla de torsión y altura de las cuerdas sean precisos y de que las cuerdas sean nuevas. 2. Afine el instrumento en el tono normal (A-440). 3.
Temperatura y humedad Es importante proteger su instrumento de cambios extremos o bruscos de temperatura o humedad. Guárdelo en el estuche cuando no lo use. Cuerdas Este instrumento tiene cuerdas de alta calidad Wolfgang EVH de Peavey. La limpieza frecuente de las cuerdas con un limpiador específico prolonga su duración. La suciedad y la transpiración tienden a acumularse en la parte inferior de las cuerdas; por lo tanto, resulta necesario deslizar un paño entre ellas y el diapasón.
PRECAUCIONES Conecte correctamente a tierra todos los accesorios de amplificación, los micrófonos, las mezcladoras, etc. y use un sistema de red de suministro eléctrico de 3 cables para evitar descargas eléctricas. Evite el contacto con otros aparatos eléctricos cuando ejecuta (o toca) su instrumento.
FRANÇAIS Nous vous remercion pour l’achat de cette guitare Peavey EVH Wolfgang Special. Cette guitare a été construite par les artisans les plus qualifiés à partir des meilleurs matériaux. Comme pour tous nos instruments et amplificateurs, ces guitares ont été construites en utilisant technologies de pointe et méthode manuelles traditionnelles. Demandez à votre revendeur Peavey une liste complète des équipements et accessoires Peavey.
•D-Tuner™ (sur les modèles équippés d’un vibrato uniquement) •Accastillage chromé Construction Corps Le corps de cette instrument a été réalisé avec des bois spécialement sélectionnés pour leur qualités sonores, leur beauté et leur poids. La table sculptée et le design asymétrique de cette guitare assurent un confort, un équilibre et une playabilité optimum. Un contour Crème ou noir est réalisé pour souligner ses forme.
• Haut = Micro chevalet • Centre = Micros en par allèle • Bas = Micro manche 1 Volume (2) Le contrôle de volume agit sur le signal des deux micros. En le tournant dans le sens horaire, on augmente le volume; en le tournant dans le sens contraire, on le réduit. 2 3 4 Tonalité (3) En tournant le bouton dans le sens horaire, on augmente la réponse aiguë (hautes fréquences) et le son est plus brilliant; en le tournant dans le sens inverse, on la réduit.
Tige de Renfort (1) Tous les manches de guitare ont une légère courbure concave évitant aux cordes de friser sur les frettes. Cet instrument possède un molette de réglage de tige de renfort d’accès aisé à l’extrémité du manche. Elle peut être réglée à l’aide d’une clé à six pans ou d’un petit tournevis. Insérez simplement l’outil dans la molette et tournez. 1 1. Accorder l’instrument (La-440). 2. Fretter la sixième corde (Mi) à la première et dernière case. 3.
Barre de Rétension des Cordes (1) 1 2 Cette barre est utilisée afin que les cordes appliquent une pression suffisante sur le sillet à blocage. Elle doit être ajustée de manière à ce que les cordes restent toujours en contact avec la surface du sillet. Ainsi, les cordes resteront accordées aprés vissage du sillet à blocage. Sillet à Blocage (2) (sur la crosse) Avec la clef à six pans creux fournie, dévissez les trois vis de serrage pour permettre aux cordes de passer librement.
fine-tuners Position Mi Vis de Réglage Position Ré 1. Desserrez la vis correspondant à la corde de Mi du sillet à blocage. 2. Placez le D-Tuner en position “Ré” en le tirant. 3. Tournez le fine-tuner de la corde de Mi dans le sens anti-horaire au maximum puis tournez d’un tour le dans le sens horaire. 4. A l’aide des mécaniques, accordez le bourdon en Ré. Serez la vis du sillet et ajuster la note avec le fine-tuner. 5.
Tension du Vibrato La tension du vibrato se règle en ajustant les vis de fixation de la plaque maintenant les ressorts. Pour y avoir accès, il est nécessaire de dévisser la plaque de protection située au dos de la guitare Selon les spécifications d’Edward, le vibrato est réglé pour reposer sur la surface de la caisse, assurant un sustain maximum. Il n’est donc possible que de diminuer la hauteur des notes.
orientation par rapport à l’axe des cordes peut être modifiée. Certains musiciens préfèrent que la tige reste fixe lorsqu’elle est utilisée. Il est possible d’effectuer ce réglage en maintenant le contre-écrou situé sur le vibrato avec la clef 12mm fournie et en vissant la barre fermement. Si vous désirez que la tige pivote librement, dévissez le boulon situé à l’extrémité du trou du vibrato. vous pouvez y accéder par la cavité des ressorts au dos de la guitare.
corde vibrante est modifiée jusqu’à ce que les deux notes soient identiques. On modifie cette longueur en déplaçant les pontet en avant ou en arrière, selon que la note frettée est trop haute ou trop basse par rapport à la note de la corde. Ce rŽglage doit toujours •tre effectuŽ avec des cordes neuves. Des probl•mes dÕintonation peuvent survenir avec des cordes usŽes. Il peut •tre difficile pour une oreille non habituŽe de comparer la note frettŽe et la note ˆ vide.
Entretien de Votre Instrument L’EVH Wolfgang est un instrument de haute qualité construit à partir des meilleurs matériaux et avec les méthodes de production les plus modernes. Avec un minimum d’attention, elle vous assurera une playabilité maximum pendant de nombreuses années. Température and Humidité Il est important de protéger votre instrument contre toute variation soudaine de température ou d’humidité. Il est conseillé de ranger votre guitare dans son étui entre chaque utilisation.
ATTENTION Tous les matériels d’amplification, microphones, mixeurs, etc doivent être reliés à la terre et utiliser un cordon d’alimentation à trois conducteurs afin d’éviter tout risque de choc électrique. N’entrez pas en contact avec tout autre appareil électrique lorsque vous jouez (ou touchez) votre instrument.
DEUTSCH Vielen Dank, daß Siesich für den Kauf einer Peavey EVH Wolfgang Gitarre entschieden haben. Diese Gitarre wurde von Fachleuten gebaut, die nur das beste Material, das man für Geld bekommen kann, verarbeitet haben. Wie bei all unserem anderen Equipment haben wir auch beim Bau unserer Gitarren eine Kombination von leading-edge Technologie und traditioneller Handarbeit eingebracht. Fragen Sie Ihren Peavey-Händler nach einer Liste unseres musikalischen Equipments und Zubehörs.
Hardware ® • Schaller Tuning-Mechanik mit pearloid or creame-farbigen Knöpfen ® • Peavey/Floyd Rose lizensierte, double-locking TremoloEinheit oder Tune-O-Matic/Stop Tailpiece fixed Bridge (Seitenhalterbrücken-Kombination) • D-Tuner™ (nur beim Tremolo-Model erhältlich) • Verchromte Hardware-finish Konstruktion Body/Korpus Der Korpus dieses Instruments ist aus ausgewählten Harthölzern hergestellt, die speziell für die Tonqualität, aber auch ihrer Natürlichkeit wegen ausgesucht wurden.
Controls/Regler Pickup Wahlschalter (1) 1 Mit diesem 3-Stufenschalter können Sie verschiedene Pickup-Kombinationen wählen. • Up = Bridge Pickup • Center = beide Pickups • Down = Neck Pickup 2 3 Lautstärke (2) Der Lautstärke-Regler kontrolliert alle Signale die von den Pickups kommen.Im Uhrzeigersinn gedreht, erhalten Sie Lautstärke, bei einer Drehung entgegen dem Uhrzeigersinn reduzieren Sie die Lautstärke.
Bitte lesen Sie sich diese Bedienungsanleitung durch, bevor Sie irgendwelche Einstellungen an Ihrer Gitarre vornehmen. Halsstab (1) 1 1. 2. 3. 4. 5. 6. Alle Gitarrenhälse haben eine leichte Krümmung, damit die Saiten nicht mit den Bünden in Berührung kommen. Dieses Instrument ermöglicht Ihnen einen leichten Zugriff auf das Halsstab-Einstellrad, welches sich am Ende des Halses befindet. Dieses Rad kann mit einem Schraubenschlüssel oder einem kleinen Schraubenzieher eingestellt werden.
Bespielbarkeit entwickelt. Um dieses Gerät richtig einzustellen, müssen Sie sich zuerst mit der Bedienungsanleitung vertraut machen. Die Saiten sind an der locking Topnut und der Brücke geklemmt, die Ihnen während dem Spielen die bestmögliche Einstellung gewährleistet. Akurate Tremolo-Einstellung ist auch ein Resultat von genauer Balance zwischen der Saitenspannung und der Tremolo-Federspannung. Diese Gitarre wurde ab Werk mit Peavey Wolfgang Gitarrensaiten bestückt.
Klemmsattel. Überstehende Saitenlängen schneiden Sie ungefähr 2,5 cm hinter den Klemmschrauben des Tremolos ab. Führen Sie das Saitenende in das Böckchen und ziehen Sie die Schrauben an. BITTE DIE SCHRAUBEN NICHT ÜBERDREHEN. Stellen Sie die Feinstimmschrauben auf mittlere Position ein. Dehnen Sie die Saiten und stimmen Sie diese neu. Drehen Sie den Klemmsattel wieder zu, dehnen Sie die Saite noch einmal und beschäftigen Sie sich dann mit dem Feinstimmung.tuning.
5. Schieben Sie den D-Tuner mit leichtem Druck an die Brücke heran. Der D-Tuner steht jetzt in der “E”-Position. Die Feinstimmschraube sollte jetzt oben auf der glatten Fläche des D-Tuners positioniert sein. 6. Prüfen Sie die Stimmung der tiefen E-Saite. 7. Wenn die tiefe E-Saite nicht gestimmt ist, benutzen Sie bitte den beigefügten 1.5mm Imbusschlüssel, um die gesetzte Schraube an dem D-Tuner einzustellen.
Tremolo Federspannung Die Federspannung der Tremelo Brücke wird eingestellt, indem Sie die Federspannungsschraube, die die Federkralle in Position hält, drehen. Um an die Federspannungsschraube und Federkralle heranzukommen,müssen Sie den Deckel auf der Rückseite der Gitarre entfernen. Nach Edward’s Spezifikationen ist das Tremolo System so eingestellt, daß es für maximales Sustain and Klang auf dem Korpus aufliegt. So kann nur nach unten tremoliert werden.
ACHTUNG: Lockern Sie alle Saitenspannungen, bevor Sie Tremolofeder einbauen oder herausnehmen. Tremolofedern sind fŸr hohe Spannungen entwickelt. Wenn Sie VerŠnderungen vornehmen mšchten, tun Sie dies sehr vorsichtig. Tremolo-Arm Der Tremolo-Arm ist in die Tremolo Armfassung auf der Grundplatte eingelassen und verschraubt. An dieser Einheit kann die Vorspannung, die den Tremolo-Arm lockert oder festsetzt, eingestellt werden. Viele Gitarristen bevorzugen den Tremolo-Arm fester eingestellt.
Saiten-Intonation Die genaue Einstellung der SaitenIntonation garantiert Ihnen, daß Ihr Instrument an jedem Punkt des Halses gespielt, stimmt. Die Intonation wird eingestellt, indem man die Tonhöhe einer offenen Saite mit der Tonhöhe derselben Saite, die jedoch eine Oktave höher gegriffen am 12ten Bund gespielt wird, vergleicht. Die Saitenlänge der Saite wird verändert, indem man den Sattel entweder vor oder zurückstellt.
2. Stimmen Sie das Instrument zu Standard (A-440) Tonhöhe. 3. Halten Sie die Gitarre in einer normalen Spielhaltung oder plazieren Sie die Gitarre auf eine saubere, flache Ebene, so daß der Korpus mit der Arbeitsfläche in Berührung ist. Der geringste Druck am Hals beeinflußt die Einstellungen. 4. Spielen Sie die tiefe (E) Saite offen und vergleichen Sie die Tonhöhe der gleichen Saite wenn sie am 12ten Bund gegriffen wird.
Temperatur und Feuchtigkeit Es ist wichtig, daß Ihr Instrument keinen extremen Witterungsbedingungen ausgesetzt wird. Bitte bewahren Sie Ihre Gitarre nur im Koffer auf, wenn Sie sie nicht spielen. Saiten Ihre Gitarre wurde mit Qualitäts-Saiten (Peavey EVH Wolfgang)bestückt. Bei regelmäßiger Reinigung mit einem Saitencleaner halten die Saiten viel länger. Schmutz und Schweiß setzen sich an der Unterseite der Saite ab, so daß es ratsam ist, wenn Sie mit einem Lappen die Saiten abziehen.
WARNUNGEN Sämtlicher Verstärker-Zubehör, Mikrofone, Mischer etc. muß richtig geerdet sein und sollte mit einem 3-Weg-System ausgestattet sein, um einen elektrischen Schock zu vermeiden. Kommen Sie nicht mit anderen Apparturen in Berührung, wenn Sie Ihr Instrument spielen oder anfassen. Die Metallstücke dieses Instrumentes sind richtig geerdet, es ist dennoch möglich, einen elektrischen Schlag zu bekommen, wenn Sie mit anderen Geräten in Berührung kommen, die nicht richtig geerdet sind.
NOTES: 53
NOTES: 54
NOTES: 55
Peavey Guitar One-Year Limited Warranty/Remedy PEAVEY ELECTRONICS CORPORATION (“Peavey”) warrants this guitar to be free from defects in material and workmanship for a period of one year from date of purchase. PROVIDED‚ however‚ that this limited warranty is extended only to the original retail purchaser and is subject to the following conditions. Conditions‚ Exclusions‚ and Limitations of Limited Warranty This limited warranty shall be void and of NO EFFECT if: 1.
This limited warranty is in lieu of any and all warrantiesâ expressed or impliedâ including but not limited toâ implied warranties of merchantability and fitness for a particular use; providedâ howeverâ that if the other terms and conditions necessary to the existence of the expressed limited warrantyâ as hereinbefore statedâ have been complied withâ implied warranties are not disclaimed during the one-year period from date of purchase of this product.
The legendary 5150® sound of Edward Van Halen is now available in both stack and combo. With Rhythm and Lead channels voiced personally by Edward Van Halen, the 5150 120 watt top features all-tube pre- and power amps. Combined with 5150 Straight and 5150 Slant cabinets, this stack supplies big, muscular tone at any volume level. Months of rigorous testing, many combinations of speaker voicing and cabinet construction were scrutinized and discarded before the ultimate combination emerged.
Look for our other products and Accessories at your local Peavey dealer.
P E A V E Y 7 1 1 ©1998 E L E C T R O N I C S C O R P O R A T I O N A S t r e e t · M e r i d i a n ‚ M S 3 9 3 0 1 · U S A phone: (601)483-5365 · fax: (601)486-1278 80301829 Printed in USA 3/98