
User Manual


7. How to Set the Probe Attenuation Coefficient
The probe has several attenuation coefficients, which will influence the vertical scale factor of the oscilloscope.
If it is required to change (check) the set value of the probe attenuation coefficient, press the function menu
button of the channels used, then push down the selection button corresponding to the probe till the correct set
value is shown.
This setting will be valid all the time before it is changed again.
Note: The attenuation coefficient of the probe in the menu is preset to 10X when the oscilloscope
is delivered from the factory.
Make sure that the set value of the attenuation switch in the probe is the same as the menu selection of the
probe in the oscilloscope.
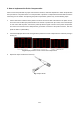
The set values of the probe switch are 1X and 10X (see Fig. 7).
Fig. 7 Attenuation Switch
Note: When the attenuation switch is set to 1X, the probe will limit the bandwidth of the
oscilloscope in 5MHz. If it is needed to use the whole bandwidth of the oscilloscope, the
switch must be set to 10X.
8. How to Implement Auto-calibration
The auto-calibration application can make the oscilloscope reach the optimum condition rapidly to obtain the
most accurate measurement value. You can carry out this application program at any time, but when the range
of variation of the ambient temperature is up to or over 5°C, this program must be executed.
For the performing of the self-calibration, all probes or wires should be disconnected with the input connector
first. Then, press the “8 (UTILITY)” button to call out the FUNCTION menu; push down the F3 menu selection
button to choose the option “Auto calibration”; finally, run the program after confirming that everything is ready
now.
-128-