
User Manual
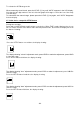
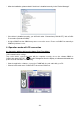


To activate the AUTO-range mode:
When measuring sound levels, press the LEVEL (7) key until “AUTO” appears in the LCD display.
Note that the two digit number to the left of the bar graph will change to reflect the low of the newly
selected range.
To switch back the manual range, please press the LEVEL (7) key again, until “AUTO” disappears
from the display.
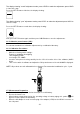
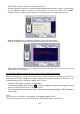
3.5. Initial device setup with SETUP button
Setting time and date
Press and hold SETUP-button while power on the device. When TIME -symbol displays then loosen
SETUP- button and the meter will be under time adjustment mode, at the time the display will show
the date as following:
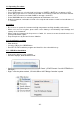
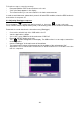
Press the SETUP button second time, the display showing:
The display showing “minute” adjustment mode, press LEVEL to make the adjustment, press HOLD
to leave the setup.
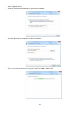
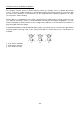
Press SETUP button third time, the display showing:
The display showing “hour” adjustment mode, press LEVEL to make the adjustment, press HOLD to
leave the setup.
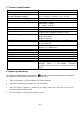
Press the SETUP button fourth time, the display showing:
The display showing “date” adjustment mode, press LEVEL to make the adjustment; press HOLD to
leave the setup.
Press the SETUP button fifth time, the display showing:
-20-