
User Manual


- 87 -
WiFi connection to the PC
Connect to the PC as a WiFi access point:
You can set the oscilloscope as a W-LAN access point so that you do not need an existing W-LAN to
connect the oscilloscope to a PC via W-LAN. The PC must support WiFi (W-LAN).
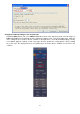
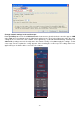
1. Press the Utility key and select LAN Set under Function in the lower menu. Set this for WiFi under Type
to WIFI-AP and confirm with Set in the lower menu.
2. Select Set in the lower menu and then SSID. Now you can specify a name for the W-LAN network using
the keyboard that appears or leave the default name.
3. In the right-hand menu, use Enscription to select whether you want to assign a password to the W-LAN
network. Open means that you do not need a password. Under WPA or WEP the encryption is activated
and you need a password. You can set this under Password in the right-hand menu, whereby you can
use a soft keyboard for the entry (8 - 32 letters).
4. Select the port under IP:PORT in the right-hand menu. Use the M rotary knob or the touch screen for
this. The IP is fixed when used as an access point and cannot be changed. Here it is 192.168.1.1. Turn
the M-rotary knob to change the PORT number, which is currently set to 3000.
5. After selecting ON under Status, the access point is active and a symbol is shown in the upper right
corner of the display.
6. Select Save Set in the lower menu to save the settings you have made.
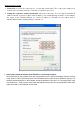
7. Open the WiFi connection on the PC. Select the WiFi created by the oscilloscope via the access point
and enter the selected password.
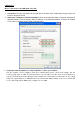
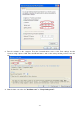
8. Run the software on the computer. From the Communications menu, select Ports-settings. Set the
"Connect using" option to LAN. Enter the IP 192.168.1.1 and set the same port that you have set in the
unit.