
User Manual


- 80 -
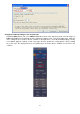
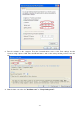
AC/DC current measurement
Measure a current below 400mA as follows:
1. Press the DMM button on the front of the unit. Then press Current in the lower menu several times to
switch between ACA (alternating current) and DCA (direct current).
2. Connect the black test lead to the COM socket and the red test lead to the mA socket.
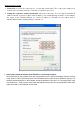
3. Select Configure in the lower screen menu, then switch to mA in the right menu.
4. Switch off the circuit to be tested and discharge all capacitors still present in the circuit.
5. Disconnect the circuit under test and connect the black test lead to the open end of the disconnected
lead facing the load and the red test lead to the other open end of the disconnected lead facing the
voltage source. If this has been reversed, a negative "-" sign is displayed.
6. Switch the circuit on again and read the current value in the measuring display.
7. Disconnect the circuit under test and discharge any remaining capacitors in the circuit before
reconnecting the disconnected line.
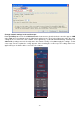
Measure a current above 400mA to 10A as follows:
1. Press the DMM button on the front of the unit. Then press Current in the lower menu several times to
switch between ACA (alternating current) and DCA (direct current).
2. Connect the black test lead to the COM socket and the red test lead to the 10A socket.
3. Select Configure in the lower screen menu, then switch to 10A in the right menu.
4. Switch off the circuit to be tested and discharge all capacitors still present in the circuit.
5. Disconnect the circuit under test and connect the black test lead to the open end of the disconnected
lead facing the load and the red test lead to the other open end of the disconnected lead facing the
voltage source. If this has been reversed, a negative "-" sign is displayed.
6. Switch the circuit back on and read the current value in the measuring display.
7. Disconnect the circuit under test and discharge any remaining capacitors in the circuit before
reconnecting the disconnected line.
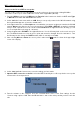
Resistance measurement:
1. Press the DMM button on the front of the unit. Then press R in the lower menu several times to switch
between resistance, diode and capacitance until R is highlighted.
2. Connect the black test lead to the COM socket and the red test lead to the V/Ω/C socket.
3. Connect the test probes to the (voltage-free) electrical conductor to be measured and read the
measured value in the digital display of the multimeter window.
Note: Never perform a resistance measurement on a live conductor to avoid damaging the unit.
Diode measurement:
1. Press the DMM button on the front of the unit. Then press R in the lower menu several times to switch
between resistance, diode and capacitance until is highlighted.
2. Connect the black test lead to the COM socket and the red test lead to the V/Ω/C socket.
3. Connect the red test probe to the anode of the diode and the black test probe to the cathode of the
diode. The cathode is marked here with a ring around the body. Read the measured value in the digital
display of the multimeter window.