
User Manual


- 76 -
User generated waveforms
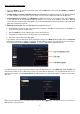
1. Press the AFG key to open the generator menu. Select Arb in the lower menu, then Others and New to
enter waveform creation.
2. Set the number of points of the waveform: Select Points in the right-hand menu, then turn the M knob
to set the number or use the touch screen field. You can create a waveform with 2 to 8192 points.
3. Set interpolation: For Intrpl, select On/Off in the right-hand menu to connect the points of the waveform
to be adjusted in an increasing/decreasing manner or to insert them without connection. Without
connection, the voltage between the points is not automatically adjusted and only jumps to the new value
when the next point is reached.
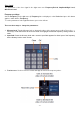
4. Edit waveform points: Select Edit Points in the right-hand menu:
Under Point, select the point of the waveform you want to edit. Only as many points are available as
you have selected for the waveform.
Select Voltage to set the voltage value of the selected point.
Repeat these steps for all necessary points of your waveform.
Save the created waveform with Save.
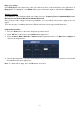
If you want to save the waveform in the internal memory, press Memory in the right menu until Internal
is displayed (default if no USB is connected). Turn the M-turn control or use the touch screen function to
select a memory location USER0 to USER31. Then press Save in the right-hand menu.
If a USB memory is connected and you want to save the waveform to it, select Memory and then USB. The
unit lists the folders on the USB memory. Select a folder with the M knob to scroll up and down the list. To
change to the folder, select Change Dir in the right-hand menu. Select this again to change to the parent
directory.
Enter the file name via the soft keyboard and confirm it with the key. The waveform is now saved as a
BIN file in the selected folder.