YOUVI trivum Bridge Kurzanleitung | Getting started | Notice abrégée DE | EN | FR V 1.0.
Impressum Produkt Artikelnummer YOUVI trivum Bridge PNX31-10008 In diesem Dokument erwähnte Produktnamen können Marken oder eingetragene Marken der jeweiligen Eigentümer sein. Diese sind nicht ausdrücklich durch „™“ und „®“ gekennzeichnet. © PEAKnx GmbH Otto-Röhm-Straße 69 64293 Darmstadt Deutschland www.peaknx.com info@peaknx.com Dokumentversion: 1.0.1 Datum: 07.01.
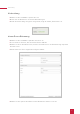
Welche Funktionen werden über die Sound-Widgets gesteuert? Welche Funktionen werden über die Sound-Widgets gesteuert? Über das Sound-System-Widget binden Sie folgende Funktionen Ihrer trivum-Anlage an: ▪ trivum-Playlists ▪ trivum-Favoriten ▪ Zonen-Wiedergabe Player ▪ Lautstärke anpassen, stummschalten ▪ Play/Pause, nächster Song, vorheriger Song ▪ Wiedergabemodus: Wiederholen, zufällig Playlisten und Favoriten ▪ Über die Reiter „Playlisten“ und „Favoriten“ werden Titel, die Sie in der trivum-App Ihren Favo
Installation Wenn Sie auf die jeweilige Zone tippen, öffnet sich der entsprechende Player im Widget. Über den „Zurück“-Button gelangen Sie wieder zur Gruppenübersicht: Installation ▪ ▪ ▪ ▪ Öffnen Sie YOUVI Dashboard und gehen Sie auf „trivum installieren“. Unter Mehr > Lizenz können Sie die verbleibenden Tage Ihrer Testlizenz einsehen. Zur unbegrenzten Nutzung erwerben Sie die Bridge bitte im PEAKnx Shop. Wählen Sie das trivum-Symbol auf der Dashboard-Seite an, um die Bridge zu öffnen.
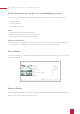
Vorbereitung Vorbereitung ▪ Wählen Sie die Schaltfläche „Verbinden“ an. ▪ Geben Sie die IP-Adresse der trivum-Anwendung an. ▪ Wurde die Verbindung erfolgreich hergestellt, zeigt der Status „Verbunden“ an. trivum-Zonen-Erkennung ▪ Wählen Sie die Schaltfläche „Geräte erkennen“ an. ▪ Es erscheint ein Fenster, das alle trivum-Zonen auflistet. ▪ Wählen Sie über die Häkchen aus, welche Sound-Zonen in die Visualisierung importiert werden sollen.
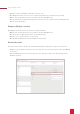
Gruppen-Widget erstellen ▪ ▪ ▪ ▪ Wählen Sie die Schaltfläche „Geräte erstellen“ aus. Die Widgets werden in den vorher selektierten Räumen der Visualisierung erstellt. Öffnen Sie die Visualisierung und schalten Sie den Edit-Mode an. Durch Anwählen des Dashboard-Symbols können Sie die separaten Zonen-Widgets dem Dashboard hinzufügen. Gruppen-Widget erstellen Ein Widget mit allen Zonen erstellen Sie folgendermaßen: ▪ Öffnen Sie die Visualisierung und schalten Sie den Edit-Mode an.
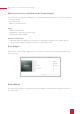
YOUVI trivum Bridge, Getting started YOUVI trivum Bridge Getting started EN 7
Legal notes Product Item number YOUVI trivum Bridge PNX31-10008 The product names mentioned in this document may be brands or registered trademarks of their respective owners. These are not explicitly labeled with “™” or “®”. © PEAKnx GmbH Otto-Röhm-Strasse 69 64293 Darmstadt Germany www.peaknx.com info@peaknx.com Document version: 1.0.1 Date: 07.01.
Which functions are controlled by the Sound widgets? Which functions are controlled by the Sound widgets? You can use the sound system widgets to connect the following functions of your trivum system: ▪ trivum playlists ▪ trivum favorites ▪ Music selection by zone Player ▪ Adjust volume, mute ▪ Play/Pause, next song, previous song ▪ Play mode: repeat, shuffle Playlists and Favorites: ▪ Titles that you have added to your favorites or assigned to playlists in the trivum app are selected for the player using
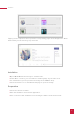
Installation Tapping on the respective zone opens the corresponding player in the widget. The “Back” button takes you back to the group overview: Installation ▪ ▪ ▪ ▪ Open YOUVI Dashboard and go to “Install trivum”. Under More > License, you can view the remaining days of your trial license. For unlimited use, please purchase the bridge in the PEAKnx Shop. Select the trivum icon on the Dashboard page to open the bridge. Preparation ▪ Select the “Connect” button..
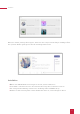
Detect trivum zones Detect trivum zones ▪ ▪ ▪ ▪ Select the “Discover devices” button. A window appears that lists all trivum zones. Use the check marks to select which zones should be imported into the visualization. Clicking on a zone will show more properties: ▪ ▪ ▪ ▪ Select the appropriate room and a different icon if needed. Select the “Create devices” button. The widgets will be created in the previously selected rooms of the visualization. Open the visualization and switch on the edit mode.
Creating a Group widget ▪ By selecting the Dashboard icon, you can add the separate zone widgets to the dashboard. Creating a Group widget You create a widget with all zones as follows: ▪ Open the visualization and turn on the edit mode. ▪ Switch to the Dashboard page of the visualization. ▪ Select “+ Sound System” and “trivum”. ▪ The group widget will be created on the dashboard.
Pont YOUVI trivum, Notice abrégée YOUVI Basic Notice abrégée Pont YOUVI trivum Notice abrégée FR 13
Mentions légales Produit Référence Pont YOUVI trivum PNX31-10008 Les noms de produits mentionnés dans ce document peuvent être des marques commerciales ou des marques déposées de leurs propriétaires respectifs. Elles ne sont pas expressément marquées par « ™ » et « ® ». © PEAKnx GmbH Otto-Röhm-Straße 69 64293 Darmstadt Allemagne www.peaknx.com info@peaknx.com Version du document : 1.0.1 Date : 07.01.
Quelles fonctions sont contrôlées par les widgets sonores ? Quelles fonctions sont contrôlées par les widgets sonores ? Vous connectez les fonctions suivantes de votre système trivum via le widget du système audio : ▪ Listes de lecture trivum ▪ Les favoris de trivum ▪ Lecture de zone Joueur ▪ Régler le volume, couper le son ▪ Lecture/Pause, chanson suivante, chanson précédente ▪ Mode de lecture : répétition, aléatoire Listes de lecture et favoris ▪ Les onglets Listes de lecture et Favoris sont utilisés pou
Installation Si vous tapez sur la zone concernée, le joueur correspondant s’ouvre dans le widget. Le bouton « arrière » vous ramène à l’aperçu du groupe : Installation ▪ ▪ ▪ ▪ Ouvrez le tableau de bord YOUVI et allez dans « Installer trivum ». Sous Plus > Licence, vous pouvez voir les jours restants de votre licence d’essai. Pour une utilisation illimitée, veuillez acheter le pont dans la boutique PEAKnx. Sélectionnez l’icône trivum sur la page Tableau de bord pour ouvrir le pont.
Détection de zone trivum Détection de zone trivum ▪ ▪ ▪ ▪ Sélectionnez le bouton « Détecter les dispositifs ». Une fenêtre s’affiche et répertorie toutes les zones trivum. Utilisez les coches pour sélectionner les zones sonores à importer dans la visualisation. En cliquant sur une zone, d’autres propriétés s’affichent : ▪ Sélectionnez la pièce appropriée et, si nécessaire, une autre icône. ▪ Sélectionnez le bouton « Créer des dispositifs ».
Créer un widget de groupe ▪ Ouvrez la visualisation et activez le mode d’édition. ▪ En sélectionnant l’icône du tableau de bord, vous pouvez ajouter les widgets de zones distinctes au tableau de bord. Créer un widget de groupe Pour créer un widget avec toutes les zones, procédez comme suit : ▪ Ouvrez la visualisation et activez le mode d’édition. ▪ Passez à la page du tableau de bord de la visualisation. ▪ Sélectionnez « + Système Sonore » et « trivum ».
www.peaknx.