
User's Manual

Communication
Systems Inc.
PDI-P19LCDC Quick Start Guide
Page 8 of 12
Better Solutions Are Within Reach™ INSTALLATION INSTRUCTIONS
PDi Communication Systems, Inc. 40 Greenwood Lane Springboro, Ohio 45066 USA PH +1-937-743-6010 FX +1-937-743-5664
Document Number: PD196I126R1.DOC
Product Accessories
(Not Included with TV)
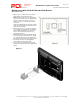
75mm VESA Wall Mount PD168-005
Patient Remote Control PD108-421
(*For TV’s without DVD module)
Programming Remote Control PD108-420 ¼” to 6-Pin Jumper Cable PD106-416
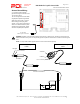
Patient Remote Control PD108-427
(*Remote comes with DVD module)
¼” to ¼” Jumper Cable PD106-417
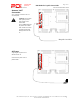
Programming
The remote control (PD108-420) is used to perform all setup operations for the TV.
NOTE: The following instructions assume you have correctly mounted the TV, wired an external pillow speaker, connected an RF
coax cable signal, and powered the TV on.
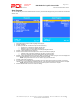
Channels
The TV offers three different programmable Service Levels (Free, Basic, and Premium). Only one Service Level is available at a
time.
1. Press the SETUP button on the remote control.
2. Press ▲ or ▼ to highlight Channels.
3. Press ► to enter the Channels sub-menu.
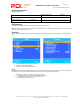
Signal
Four different tuning types are available depending upon the healthcare facility’s signal type. Selection of the correct signal type is
required for the TV to recognize all possible channels and before any channel programming can begin.
1. From the Channels menu, press ▲ or ▼ to highlight Signal.
2. Press ◄ or ► to select Air, Cable STD, Cable IRC, or Cable HRC.
NOTE: Most hospitals use the Cable STD signal style.
3. Go to Auto Programon the next page.