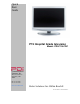
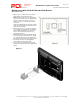
Quick Start Guide P19 Hospital Grade television Model: PDI-P19LCDC Communication Systems, Inc. 40 Greenwood Lane Springboro, Ohio 45066 PH: 937-743-6010 FX: 937-743-5664 http://www.pdiarm.com Better Solutions Are Within Reach® Document Number: PD196I126R1.
Communication Systems Inc. Better Solutions Are Within Reach™ PDI-P19LCDC Quick Start Guide Page 2 of 12 INSTALLATION INSTRUCTIONS WARNINGS To reduce the risk of electric shock, DO NOT perform any servicing other than what is contained in the operating instructions, unless you are qualified to do so.
Communication Systems Inc. Better Solutions Are Within Reach™ PDI-P19LCDC Quick Start Guide Page 3 of 12 INSTALLATION INSTRUCTIONS CONDENSATION Moisture may condense on the lens if placed in a steamy or very humid room or if moved from a cold environment to a warm one. If moisture appears inside this unit, it may not operate normally. In this case, unplug the power cord and wait for about 1 hour to let it dry. CAUTION: DO NOT defeat the safety of the polarized or grounding-type plug.
Communication Systems Inc. Better Solutions Are Within Reach™ PDI-P19LCDC Quick Start Guide Page 4 of 12 INSTALLATION INSTRUCTIONS FCC, Copyright, Disclaimer, and Trademarks FCC This equipment has been tested and found to comply with the limits for a Class B digital device, pursuant to part 15 of the FCC Rules. These limits are designed to provide reasonable protection against harmful interference when the equipment is operated in a residential or commercial installation.
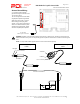
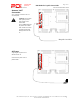
Communication Systems Inc. Better Solutions Are Within Reach™ PDI-P19LCDC Quick Start Guide Page 5 of 12 INSTALLATION INSTRUCTIONS Wall Mounting With PD168-005 Standard Wall Bracket (Not supplied with TV) 1. Refer to Figure 1. Select a location on the wall approximately 5 inches below the ceiling. NOTE: DO NOT locate AC, Across-Room Wiring, and CATV Signal outlets below the Wall Bracket’s location as it will cause clearance issues and interfere with the TV’s cabinet when mounted to the bracket.
Communication Systems Inc. Better Solutions Are Within Reach™ PDI-P19LCDC Quick Start Guide Page 6 of 12 INSTALLATION INSTRUCTIONS Across Room Wiring A ¼” stereo style pillow speaker (pendant control) jack is located on the TV’s connector panel. This TV is designed to work with either a digital pillow speaker that generates digital-style control codes or a singlebutton analog (switch-style) pillow speaker.
Communication Systems Inc. Better Solutions Are Within Reach™ PDI-P19LCDC Quick Start Guide Page 7 of 12 INSTALLATION INSTRUCTIONS Antenna “ANT” Connection An “F” style jack is located on the TV’s connector panel. CAUTION: Some hospital cable systems provide power voltage on the coaxial cable. This TV is NOT designed to be powered via a coaxial cable. DO NOT connect to a powered coaxial cable. Damage will result to the TV.
Communication Systems Inc.
Communication Systems Inc. Better Solutions Are Within Reach™ PDI-P19LCDC Quick Start Guide Page 9 of 12 INSTALLATION INSTRUCTIONS Auto Program The TV automatically scans each available channel for activity. Channels that display activity are memorized into the selected Service Level. 1. 2. 3. 4. 5. 6. 7. 8. 9. After setting Signal, press ▲ or ▼ to highlight Auto Program. Press ► to select it. On Mode, press ◄ or ► to select the scope of channel scanning.
Communication Systems Inc. Better Solutions Are Within Reach™ PDI-P19LCDC Quick Start Guide Page 10 of 12 INSTALLATION INSTRUCTIONS Cloning and Firmware Cloning allows quick programming of a TV. You can also upload to the latest version of firmware. Firmware and Cloning instructions can be found on the PDi Communication web site: http://www.pdiarm.com/support/ Click on the Firmware and Driver link and follow the on-screen instructions to find your TV model. PDi Communication Systems, Inc.
Communication Systems Inc. Better Solutions Are Within Reach™ PDI-P19LCDC Quick Start Guide Page 11 of 12 INSTALLATION INSTRUCTIONS DVD Module Operation WARNING: AC power supply must be disconnected before installing the DVD Player. Failure to do so will cause irreversible damage to the TV. DVD Module Installation Refer to the illustration below and follow the procedures below to install the DVD Module onto the LCD TV. 1. Plug one end of the cable into the DVD module and the other end to the LCD TV.
Communication Systems Inc. Better Solutions Are Within Reach™ PDI-P19LCDC Quick Start Guide Page 12 of 12 INSTALLATION INSTRUCTIONS Disc Playback Patients may use a compatible pillow speaker or a user remote (PD108-427). NOTE: Some pillow speakers may not have all the DVD control functions that are listed below. (Consult the pillow speaker manual for the model that will be attached to this unit.) 1. Use the TV/AV button on the TV, pillow speaker (if available) or remote to select the DVD mode. 2.