
User Manual


Erwin XL slope building Instruction August 2018
www.pcm.at 13
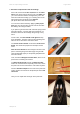
11. Fixing of the wing
When attaching the wings, make sure that the connector
will not be postponed again.
First, push the connector into the first wing half as far
as possible. Note, that the shorter part of the connector
should disappear inside the wing. Then, push the
fuselage onto the connector and finally the 2nd wing
half.
Close the gap between wings and fuselage with adhesive
tape. By this way, the wing halves are fixed to the
fuselage.
12. Check list before starting:
1. Check centre of gravity (the angle of attack is pre-set)
2. Check rudders:
Do rudders move in the correct direction?
Check the greatest swings of the rudders
All control surfaces are continuously connected to the wing along the hinge line.
3. Check reception:
Leave the antenna inside the radio control and go away from the glider up to a distance of
about 60m. The rudders should not tremble.
2,4 Ghz: depending on radio controller (f.e. reduce transmission power)
13. Attention, Erwin XL is sensitive to heat!
Pay attention, that Erwin XL does not heat up! That means,
- don’t let the model lie in the car, when the sun is heating up the car.
- don’t let the model lie in the sun too long. Protect wing and elevator with bags, if you don’t fly.
- Avoid all other possibilities to heat up Erwin XL.
The model is heated up to 50° during production, but in the sun the model can easily reach higher
temperatures. During flight the model is sufficiently cooled by the airstream.
This sensitiveness is high shortly after production / purchase and will get less gradually.