
User's Manual
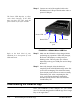
Table Of Contents
- Introduction
- Getting Started
- Making a Measurement
- Technical Specifications
- Functions Measured
- General Characteristics
- Physical Characteristics
- Data Communication Characteristics
- Electrical Characteristics
- Adaptor Resonances and Frequency Responses
- Reference Values
- Typical Measurement Ranges
- Frequency Weighting Curves
- Fa (Flat 0.4 Hz to 100 Hz)
- Fb (Flat 0.4 Hz to 1260 Hz) Frequency Weighting
- Fc (Flat 6.3 Hz to 1260 Hz), Wh, and Wf Frequency Weighting.
- Wm, Wc, and Wd Frequency Weightings
- We, Wj, and Wk Frequency Weighting
- Wg Frequency Weighting (Defined in BS6841:1987)
- Wm (Whole Body) Frequency Weighting
- Typical Measurements Ranges
- Standards Met
- Glossary
- RMS Acceleration
- RMS Acceleration in Decibels
- Allowed Exposure Time
- Energy Equivalent RMS Acceleration
- Running RMS Acceleration LINEAR
- Running RMS Acceleration EXPONENTIAL
- Vibration Dose Value
- Maximum Transient Vibration Value
- Minimum Transient Vibration Value
- Long Term Maximum Peak
- Short Term Maximum Peak
- Long Term Crest Factor
- Short Term Crest Factor
- Summed Instantaneous Acceleration
- Regulatory Compliance Statement
2-4 Connecting to a Wi-Fi Network HVM200 Manual
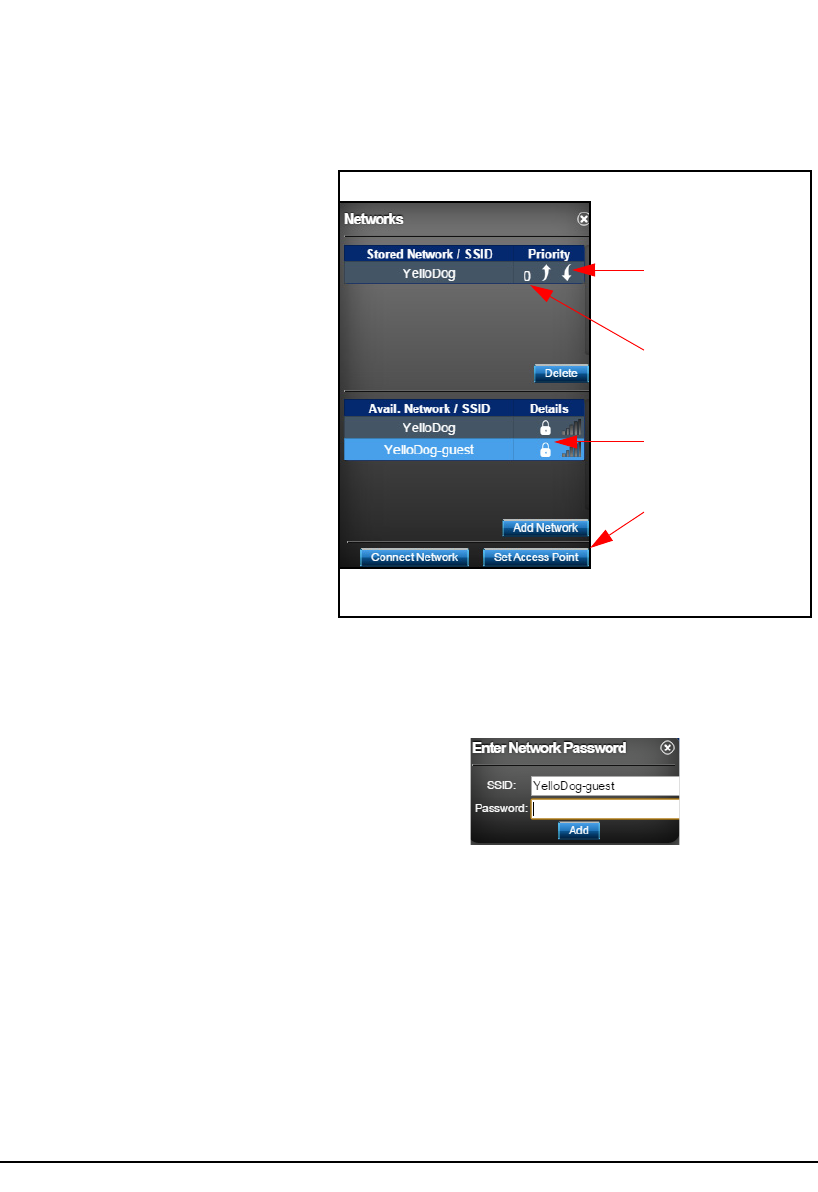
Step 4 If no stored networks appear in the Networks
dialog box, select an available network and click
Add Network.
If you have already entered a
password and a stored network
appears, select it and click Connect
Network.
FIGURE 2-5 Networks Settings
Larson Davis recommends using
secure Wi-Fi networks with your
HVM200 meter.
Step 5 Enter the network password, if required, and click
Add.
With multiple stored networks, you
can establish a connection order by
assigning a priority number to the
network. An automatic connection is
first made to the network with the
highest priority. If multiple stored
networks have the same priority
number, an automatic connection is
made with the network displayed
higher on the list.
FIGURE 2-6 Enter Network Password
Step 6 Select the stored network and click Connect.
Step 7 Assign a connection priority value for the
network, if needed.
Step 8 If no network is available, click Set Access Point.
This enables the HVM200 to transmit and receive
data through Wi-Fi to your mobile device.
Click the up or down
arrow to raise or lower
the priority of the
network connection.
Secure network requires
password.
Higher numerical values
establish higher priority
in connection sequence.
If no network is
available, click to
transmit and receive data
through Wi-Fi from the
HVM200 to a mobile
device.