
Reference Manual
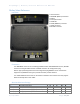
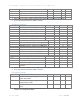


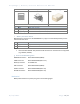


Table Of Contents
- Table of Contents
- Introduction
- Before Installation
- 1. Create your PayRange Operator Account
- a. Go to http://manage.payrange.com.
- b. Sign up for a customer account. If you already have a customer account, Sign in.
- c. Once logged in, click Create an Operator Account (may need to click Account first).
- d. Select Operator Sign up (at the bottom of the page), follow prompts to create your account.
- e. Setup ACH for payment with your bank routing and account number.
- f. Issue free vend code for installation tests.
- 2. Setup for Your Machine Installers
- a. Download and install the PayRange app.
- b. Load funds to the app with a credit/debit card, or issue free vend code.
- c. Prepare additional point of sale material such as table tents, location flyers, and location posters. These can be downloaded free at https://www.payrange.com/resources.
- d. Provide necessary tools and supplies
- i. BluKey Select device
- ii. Keypad Harness for the machine
- iii. Harness for card reader (if machines are equipped with card readers)
- iv. Room key and necessary building access cards
- v. Operator (Installer / Service) key for the machine
- vi. Smartphone, tablet or connected laptop with PayRange app
- vii. Installer login & password into Operator Account
- 1. Create your PayRange Operator Account
- Installation Steps
- 1. Disconnect power from the machine
- 2. Open machine cabinet
- 3. Connect Keypad Harness to Machine Keypad and Machine Control
- 4. Connect configuration plug to CONF connector
- 5. Plug Keypad Harness into BluKey Select KEYPAD connector
- 6. Plug MDB Machine harness into BluKey Select MACHINE connector
- 7. Is Card Reader Present?
- 8. Does machine support CPD2?
- 9. Machine with no CPD2 support:Connect Card Reader to BluKey Select CARD connector
- 10. Machine with CPD1/CPD2 support:Connect Card Reader to BluKey Select MDB harness
- 11. Connect BluKey Select to Machine MDB connector
- 12. Power up the machine (leave the machine door/panel open)
- 13. BluKey Select should power up and turn on solid blue LED
- 14. Configure BluKey Select
- 15. Power off the machine
- 16. Place wires and BluKey Select inside the machine
- 17. Close machine door/panel
- 18. Power up the machine
- 19. Verify machine operation
- 20. Place PayRange stickers on the machine
- BluKey Select Device Configuration
- 1. Register BluKey Select device (using website)
- a. Login with your operator account to the Manage website at https://manage.payrange.com
- b. Click DEVICES > Register in the left panel
- c. Enter device Serial number and Pin (from BluKey Select back label)
- d. Enter Display name (it will be shown in the app to customers)
- e. Enter other relevant information (laundry/machine type, location name, address, etc.)
- f. Optionally: upload picture of the machine number sticker to the “Picture” field (if picture is not uploaded, a standard machine number picture will be shown in the app)
- g. If there is a PayRange decal for the machine, attach the decal to the machine. If there is a scan to pay QR code, enter Scan to Pay number from the decal
- h. Click the Register button to complete device registration
- 2. Register BluKey Select device (using mobile app)
- a. Open PayRange app, Sign In with your operator account (if not logged in)
- b. Click on the hamburger menu (top left), select Operator Mode > Register Device
- c. Enter device Serial number and Pin (from BluKey Select back label), or click camera icon and scan the barcode
- d. Enter Display name (usually it is a number from machine sticker for customer)
- e. Enter other relevant information (machine type, location name, address, etc.)
- f. Note: Picture of the machine will be automatically generated.
- g. If there is a PayRange decal for the machine, attach the decal to the machine. If there is a scan to pay QR code, enter Scan to Pay number from the decal
- h. Click the Register button to complete device registration
- i. Proceed to section “Configure BluKey Select device for payment (using website)” below
- 3. Configure BluKey Select device for payment (using website)
- a. Login with your operator account to the Manage website at https://manage.payrange.com
- b. Enter device Serial number (from BluKey Select back label) into search box at the top, click Search > Search Device
- c. Click on the Device ID in search results to open Device view
- d. Click Edit Device
- i. Click Update
- 1. Register BluKey Select device (using website)
- BluKey Select Reference
- Regulatory Approval
- Troubleshooting / Light Codes
- Appendix B: BluKey Select Firmware Upgrade
- Contacting PayRange Support
- Document History

PayRange | BluKey Select™ Reference Manual
6/29/2021 Page 13 | 21
2. Determined according to JEDEC Standard JESD22-C101, Field-Induced Charged-Device Model
Test Method for Electrostatic-Discharge-Withstand Thresholds of Microelectronic Components.
3. Determined according to JEDEC Standard JESD78, IC Latch-Up Test.
RF Specifications
Symbol
Description
Min.
Max.
Unit
Notes
F
RF
RF Frequency range (Bluetooth 4.1)
2402
2483.5
MHz
P
RFO
RF Output power
4.91
dBm
S
RFI
RF Sensitivity (at 0.1% BER)
TBD
dBm
Connector Pinouts
a. “MACHINE” (MDB in) Connector (6-pin)
“MACHINE” connector is suitable for powering BluKey Select from 24V AC, 12VDC and other
low-voltage power supplies and has inputs for low-voltage signals.
“MACHINE”
Connector
BluKey Select
Cable / Mating part
Molex 22-05-3061 (KK254)
Molex 0022013067
Pin
Name
Notes
1
MDB_COM
MDB data common
2
MDB_TXD
MDB transmit data (BKSelect input)
3
MDB_RXD
MDB receive data (BKSelect output, Sniff input)
4
(NC)
5
MDB_GND
MDB power supply common
6
MDB_V
MDB power supply
b. “CARD” (MDB out) Connector (6-pin)
“CARD” connector is to support additional card reader.