
Integration Guide
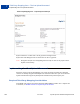

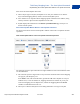
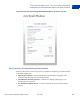
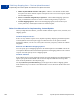
Table Of Contents
- PayPal Payments Standard Integration Guide
- Contents
- Preface
- Single-Item Payments – Buy Now Buttons
- Getting Started With Buy Now Buttons
- The Checkout Experience With Buy Now Buttons
- Begin – Buyers are Ready to Purchase Your Item on Your Website
- 1 – Buyers Enter Their Billing Information, or They Log In to PayPal
- 2 – Buyers Confirm Their Transaction Details Before Paying
- 3 – Buyers View and Print Their PayPal Payment Confirmations
- End – Buyers Receive Payment Authorization Notices by Email
- Enhancing the Checkout Experience With Buy Now Buttons
- Managing Buy Now Transactions
- Advanced Features of Buy Now Buttons
- Creating Advanced Buy Now Buttons on the PayPal Website
- The Basic Steps for Using the Button Creation Tool With Buy Now Buttons
- Saving Buy Now Buttons in Your PayPal Account
- Tracking Inventory and Tracking Profit and Loss
- Adding Advanced Features to Buy Now Buttons With HTML Variables
- Generating Code for Payment Buttons and Email Payment Links
- Protecting HTML Code for Payment Buttons
- Step 1 – Specifying Basic Features of Your Buy Now Button
- Step 2 – Tracking Inventory With Your Buy Now Button
- Step 3 – Adding Advanced Features to Your Buy Now Button
- Copying and Pasting the Buy Now Code
- Avoiding Problems With Pasted HTML Code
- Sample HTML Code for Buy Now Buttons
- Sample HTML Code for a Basic Buy Now Button
- Sample Code for a Buy Now Button With Product Options
- Sample Code for a Buy Now Button With Product Options With Prices
- Sample Code for a Buy Now Button With Product Options as a Text Box
- Sample HTML Code for a Buy Now Button that Prompts for Quantities
- Sample HTML Code for a Buy Now Button With Discounts
- Sample URL Code for a Buy Now Email Payment Link
- Creating Buy Now Buttons with JavaScript Disabled
- Contribution Payments – Donate Buttons
- Getting Started With Donate Buttons
- The Checkout Experience With Donate Buttons
- Begin – Donors are Ready to Contribute on Your Website
- 1 – Donors Enter Their Billing Information or They Log In to PayPal
- 2 – Donors Confirm Their Contribution Details Before Paying
- 3 – Donors View and Print Their PayPal Contribution Confirmations
- End – Donors Receive Contribution Authorization Notices by Email
- Enhancing the Checkout Experience With Donate Buttons
- Managing Contributions
- Creating Advanced Donate Buttons on the PayPal Website
- The Basic Steps for Using the Tool With Donate Buttons
- Saving Donate Buttons in Your PayPal Account
- Adding Advanced Features to Donate Buttons With HTML Variables
- Generating Code for Payment Buttons and Email Payment Links
- Protecting HTML Code for Payment Buttons
- Step 1 – Specifying Basic Features of Your Donate Button
- Step 2 – Saving Your Donate Button in Your PayPal Account
- Step 3 – Adding Advanced Features to Your Donate Button
- Copying and Pasting the Donate Code
- Avoiding Problems With Pasted HTML Code
- Sample HTML Code for Donate Buttons
- Creating Donate Buttons with JavaScript Disabled
- Recurring Payments – Subscribe Buttons
- Getting Started with Subscribe Buttons
- The Checkout Experience with Subscribe Buttons
- Managing Subscriptions
- Tracking Subscription Transactions
- How Billing Cycles and Recurring Payments Work
- Downloading Subscriber Lists
- Canceling Individual Subscriptions
- Canceling Multiple Subscriptions at One Time
- Suspending Subscriptions
- Editing a Subscription Profile
- End-of-Term Messages Sent Through Instant Payment Notification
- Advanced Features of Subscribe Buttons
- Offering Trial Periods and Introductory Rates with Subscribe Buttons
- Limiting the Number of Billing Cycles with Subscribe Buttons
- Offering Product Options with Subscribe Buttons
- Working with Modify Subscription Buttons
- Working with Unsubscribe Buttons
- Generating Usernames and Passwords with Subscribe Buttons
- Reattempting Failed Recurring Payments with Subscribe Buttons
- Creating Advanced Subscribe Buttons on the PayPal Website
- The Basic Steps for Using the Tool with Subscribe Buttons
- Saving Subscribe Buttons in Your PayPal Account
- Tracking Inventory and Profit and Loss for Subscribe Buttons
- Adding Advanced Features to Subscribe Buttons with HTML Variables
- Generating Code for Subscribe Buttons and Email Payment Links
- Protecting HTML Code for Subscribe Buttons
- Step 1 – Specifying Basic Features of Your Subscribe Button
- Step 2 – Tracking Inventory and Profit and Loss with Your Subscribe Button
- Step 3 – Adding Advanced Features to Your Subscribe Button
- Copying and Pasting the Subscribe Code
- Avoiding Problems with Pasted HTML Code
- Using the Button Creation Tool for an Unsubscribe Button
- Sample HTML Code for Subscribe Buttons
- Sample HTML Code for a Basic Subscribe Button
- Sample HTML Code for a Subscribe Button with Trial Periods
- Sample HTML Code for a Subscribe Button with Limits on Billing Cycles
- Sample HTML Code for Subscribe Buttons with Product Options
- Sample HTML Code for a Modify Subscription Button
- Sample HTML Code for an Unsubscribe Button
- Sample HTML Code for a Subscribe Button with Password Management
- Sample HTML Code for a Subscribe Button That Reattempts Payments
- Sample URL Code for Subscribe Email Payment Links
- Creating Subscribe Buttons with JavaScript Disabled
- Recurring Payments – Automatic Billing Buttons
- Getting Started with Automatic Billing Buttons
- The Checkout Experience with Automatic Billing Buttons
- Managing Automatic Billing Agreements
- Creating Advanced Automatic Billing Buttons on the PayPal Website
- Basic Steps in the Button Creation Tool for Automatic Billing Buttons
- Saving Automatic Billing Buttons in Your PayPal Account
- Tracking Inventory and Profit and Loss for Automatic Billing Buttons
- Adding HTML Variables to Automatic Billing Buttons
- Generating Code for Automatic Billing Buttons and Email Payment Links
- Protecting HTML Code for Automatic Billing Buttons
- Step 1 – Specifying Basic Features of Your Automatic Billing Button
- Step 2 – Tracking Inventory for Your Automatic Billing Button
- Step 3 – Adding Advanced Features to Your Automatic Billing Button
- Copying and Pasting the Automatic Billing Code
- Avoiding Problems with Pasted Automatic Billing Code
- Sample HTML Code for Automatic Billing Buttons
- Recurring Payments – Installment Plan Buttons
- Getting Started with Installment Plan Buttons
- The Checkout Experience with Installment Plan Buttons
- Managing Installment Plans
- Creating Advanced Installment Plan Buttons on the PayPal Website
- Basic Steps in the Button Creation Tool for Installment Plan Buttons
- Saving Installment Plan Buttons in Your PayPal Account
- Tracking Inventory and Profit and Loss for Installment Plan Buttons
- Adding HTML Variables to Installment Plan Buttons
- Generating Code for Installment Plan Buttons and Email Payment Links
- Protecting HTML Code for Installment Plan Buttons
- Step 1 – Specifying Basic Features of Your Installment Plan Button
- Step 2 – Tracking Inventory for Your Installment Plan Button
- Step 3 – Adding Advanced Features to Your Installment Plan Button
- Copying and Pasting the Installment Plan Code
- Avoiding Problems with Pasted Installment Plan Code
- Sample HTML Code for Installment Plan Buttons
- The PayPal Shopping Cart – Add to Cart and View Cart Buttons
- Getting Started With The PayPal Shopping Cart
- The Checkout Experience With the PayPal Shopping Cart
- Begin – Buyers Add Your Items to the PayPal Shopping Cart
- 1 – Buyers Enter Their Billing Information or They Log In To PayPal
- 2 – Buyers Confirm Their Transaction Details Before Paying
- 3 – Buyers View and Print Their PayPal Payment Confirmations
- End – Buyers Receive Payment Authorization Notices by Email
- Enhancing the Checkout Experience With Add to Cart Buttons
- Managing PayPal Shopping Cart Transactions
- Using Email Notices to Track PayPal Shopping Cart Transactions
- Using Recent Activity to Track PayPal Shopping Cart Transactions
- Using Transaction History to Track PayPal Shopping Cart Transactions
- Using Downloadable History Logs to Track PayPal Shopping Cart Transactions
- Using Instant Payment Notification to Track PayPal Shopping Cart Transactions
- Advanced Features of Add to Cart Buttons
- Creating Advanced PayPal Shopping Cart Buttons on the PayPal Website
- The Basic Steps for Using the Tool With Add to Cart Buttons
- Saving Add to Cart Buttons in Your PayPal Account
- Tracking Inventory and Tracking Profit and Loss
- Adding Advanced Features to Add to Cart Buttons With HTML Variables
- Pricing Items in Multiple Currencies
- Working with View Cart Buttons
- Generating Code for Payment Buttons and Email Payment Links
- Protecting HTML Code for Payment Buttons
- Step 1 – Specifying Basic Features of Your Add to Cart Button
- Step 2 – Tracking Inventory With Your Add to Cart Button
- Step 3 – Adding Advanced Features to Your Add to Cart Button
- Copying and Pasting the Add to Cart Code
- Using the Button Creation Tool for a View Cart Button
- Avoiding Problems With Pasted HTML Code
- Sample HTML Code for Add to Cart Buttons
- Sample HTML Code for a Basic Add to Cart Button
- Sample HTML Code for Add to Cart Buttons With Product Options
- Sample HTML Code for Add to Cart Buttons that Open the Shopping Cart in the Merchant Window
- Sample HTML Code for Add to Cart Buttons that Continue Shopping on the Current Merchant Webpage
- Sample HTML Code for Add to Cart Buttons with Discounts
- Sample HTML Code for View Cart Buttons
- Creating PayPal Shopping Cart Buttons with JavaScript Disabled
- Third-Party Shopping Carts – The Cart Upload Command
- Securing Your PayPal Payments Standard Buttons
- Creating Protected Payment Buttons on the PayPal Website
- Saving Payment Buttons in Your PayPal Account
- Reconciling Payments Manually Through Transaction History
- Reconciling Payments Through Instant Payment Notification
- Protecting Payment Buttons by Using Encrypted Website Payments
- Blocking Unprotected and Non-encrypted Website Payments
- Using Your PayPal Account Profile
- Co-Branding the PayPal Checkout Pages
- Tailoring the Checkout Experience
- Automatic Calculation of Sales Tax
- Displaying the Sales Tax that PayPal Calculates During Checkout
- Accessing Your Sales Tax Rates in Your Account Profile
- Setting Up Domestic Sales Tax Rates
- Setting Up International Sales Tax Rates
- Resolving Overlapping Sales Tax Rates
- Editing or Deleting Sales Tax Rates
- Overriding Sales Tax Calculations on Individual Transactions
- Automatic Calculation of Shipping Charges (U.S. Merchants Only)
- Displaying the Shipping Charges that PayPal Calculates During Checkout
- Shipping Regions
- Shipping Methods
- Shipping Rate Bases
- Shipping Rate Tables
- Shipping Rates and Currencies
- Adding Shipping Rates for the First Time
- Adding Shipping Methods by Using a Wizard
- Viewing, Editing, and Adding Shipping Rates
- Viewing the Configuration of an Existing Shipping Method
- Editing the Configuration Settings of an Existing Shipping Method
- Deleting Shipping Methods
- Examples of Rate Bases and Shipping Calculations
- Overriding Shipping Calculations on Individual Transactions
- Automatic Calculation of Shipping Charges (non-U.S. Merchants Only)
- Language Encoding Your Data
- Using Authorization & Capture
- Issuing Refunds
- Testing Payment Buttons in the PayPal Sandbox
- HTML Form Basics for PayPal Payments Standard
- Form Attributes – ACTION and METHOD
- Hidden Input Variables
- Specifying the Kind of Payment Button – cmd
- Variations on Basic Variables
- Using HTML Variables With Saved Payment Buttons
- Filling Out FORMs Automatically with HTML Variables
- Overriding Addresses Stored With PayPal
- Instant Payment Notification – notify_url
- HTML Variables for PayPal Payments Standard
- Technical HTML Variables
- HTML Variables for Individual Items
- HTML Variables for Payment Transactions
- HTML Variables for Shopping Carts
- HTML Variables for Recurring Payments Buttons
- HTML Variables for Displaying PayPal Checkout Pages
- HTML Variables for Filling Out PayPal Checkout Pages Automatically
- HTML Variables for the Instant Update API
- Address Handling (U.S. Merchants Only)
- Countries and Regions Supported by PayPal
- Currencies Supported by PayPal
- Index

PayPal Payments Standard Integration Guide June 2012 329
Third-Party Shopping Carts – The Cart Upload Command
Implementing the Instant Update API With the Cart Upload Command
7
PayPal Review Your Payment Page With Shipping Options, Insurance, and Tax
Best Practices for Implementing Instant Update
PayPal recommends its list of best practices as a checklist for completing your implementation
of the Instant Update API.
Meet the pre-requisites – Provide individual item details instead of aggregate order
amounts to take advantage of the Instant Update API.
Streamline the checkout experience – Eliminate the shipping options page in your
standard checkout experience.
Use the default callback timeout – Use the recommended 3-second callback response
timeout.