
Integration Guide
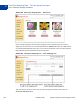

Table Of Contents
- Website Payments Standard Integration Guide
- Contents
- Preface
- Single-Item Payments - Buy Now Buttons
- Getting Started With Buy Now Buttons
- The Checkout Experience With Buy Now Buttons
- Begin - Buyers are Ready to Purchase Your Item on Your Website
- 1 - Buyers Enter Their Billing Information or They Log In to PayPal
- 2 - Buyers Confirm Their Transaction Details Before Paying
- 3 - Buyers View and Print Their PayPal Payment Confirmations
- End - Buyers Receive Payment Authorization Notices by Email
- Enhancing the Checkout Experience With Buy Now Buttons
- Managing Buy Now Transactions
- Advanced Features of Buy Now Buttons
- Creating Advanced Buy Now Buttons on the PayPal Website
- Sample HTML Code for Buy Now Buttons
- Sample URL Code for a Buy Now Email Payment Link
- Contribution Payments - Donate Buttons
- Getting Started With Donate Buttons
- The Checkout Experience With Donate Buttons
- Begin - Donors are Ready to Contribute on Your Website
- 1 - Donors Enter Their Billing Information or They Log In to PayPal
- 2 - Donors Confirm Their Contribution Details Before Paying
- 3 - Donors View and Print Their PayPal Contribution Confirmations
- End - Donors Receive Contribution Authorization Notices by Email
- Enhancing the Checkout Experience With Donate Buttons
- Managing Contributions
- Creating Advanced Donate Buttons on the PayPal Website
- Sample HTML Code for Donate Buttons
- Recurring Payments - Subscribe Buttons
- Getting Started With Subscribe Buttons
- The Checkout Experience With Subscribe Buttons
- Begin - Subscribers Are Ready to Sign Up on Your Website
- 1 - Subscribers Enter Their Billing Information or They Log In to PayPal
- 2 - Subscribers Confirm Their Subscription Details Before Signing Up
- 3 - Subscribers View and Print Their Subscription Confirmations
- End - Subscribers Receive Subscription Authorization Notices by Email
- Enhancing the Checkout Experience With Subscribe Buttons
- Managing Subscriptions
- Advanced Features of Subscribe Buttons
- Offering Trial Periods and Introductory Rates With Subscribe Buttons
- Limiting the Number of Billing Cycles With Subscribe Buttons
- Offering Product Options With Subscribe Buttons
- Working With Modify Subscription Buttons
- Working With Unsubscribe Buttons
- Generating Usernames and Passwords With Subscribe Buttons
- Reattempting Failed Recurring Payments With Subscribe Buttons
- Creating Advanced Subscribe Buttons on the PayPal Website
- Sample HTML Code for Subscribe Buttons
- Sample HTML Code for a Basic Subscribe Button
- Sample HTML Code for a Subscribe Button With Trial Periods
- Sample HTML Code for a Subscribe Button With Limits on Billing Cycles
- Sample HTML Code for Subscribe Buttons With Product Options
- Sample HTML Code for a Modify Subscription Button
- Sample HTML Code for an Unsubscribe Button
- Sample HTML Code for a Subscribe Button With Password Management
- Sample HTML Code for a Subscribe Button That Reattempts Payments
- Sample URL Code for Subscribe Email Payment Links
- The PayPal Shopping Cart - Add to Cart and View Cart Buttons
- Getting Started With The PayPal Shopping Cart
- The Checkout Experience With the PayPal Shopping Cart
- Begin - Buyers Add Your Items to the PayPal Shopping Cart
- 1 - Buyers Enter Their Billing Information or They Log In To PayPal
- 2 - Buyers Confirm Their Transaction Details Before Paying
- 3 - Buyers View and Print Their PayPal Payment Confirmations
- End - Buyers Receive Payment Authorization Notices by Email
- Enhancing the Checkout Experience With Add to Cart Buttons
- Managing PayPal Shopping Cart Transactions
- Using Email Notices to Track PayPal Shopping Cart Transactions
- Using Recent Activity to Track PayPal Shopping Cart Transactions
- Using Transaction History to Track PayPal Shopping Cart Transactions
- Using Downloadable History Logs to Track PayPal Shopping Cart Transactions
- Using Instant Payment Notification to Track PayPal Shopping Cart Transactions
- Advanced Features of Add to Cart Buttons
- Creating Advanced PayPal Shopping Cart Buttons on the PayPal Website
- Generating Code for Payment Buttons and Email Payment Links
- Protecting HTML Code for Payment Buttons
- Pricing Items in Multiple Currencies
- Working with View Cart Buttons
- Using the Button Creation Tool for Advanced Add to Cart Buttons
- Creating Advanced Add to Cart Buttons With JavaScript Disabled
- Avoiding Problems With Pasted HTML Code
- Sample HTML Code for Add to Cart Buttons
- Sample HTML Code for View Cart Buttons
- Third-Party Shopping Carts - The Cart Upload Command
- Securing Your Website Payments Standard Buttons
- Creating Protected Payment Buttons on the PayPal Website
- Saving Payment Buttons in Your PayPal Account
- Reconciling Payments Manually Through Transaction History
- Reconciling Payments Through Instant Payment Notification
- Protecting Payment Buttons by Using Encrypted Website Payments
- Blocking Unprotected and Non-encrypted Website Payments
- Using Your PayPal Account Profile
- The Account Profile
- Co-Branding the PayPal Checkout Pages
- Tailoring the Checkout Experience
- Automatic Calculation of Sales Tax
- Displaying the Sales Tax that PayPal Calculates During Checkout
- Accessing Your Sales Tax Rates in Your Account Profile
- Setting Up Domestic Sales Tax Rates
- Setting Up International Sales Tax Rates
- Resolving Overlapping Sales Tax Rates
- Editing or Deleting Sales Tax Rates
- Overriding Sales Tax Calculations on Individual Transactions
- Automatic Calculation of Shipping Charges (U.S. Merchants Only)
- Displaying the Shipping Charges that PayPal Calculates During Checkout
- Shipping Regions
- Shipping Methods
- Shipping Rate Bases
- Shipping Rate Tables
- Shipping Rates and Currencies
- Adding Shipping Rates for the First Time
- Adding Shipping Methods by Using a Wizard
- Viewing, Editing, and Adding Shipping Rates
- Viewing the Configuration of an Existing Shipping Method
- Editing the Configuration Settings of an Existing Shipping Method
- Deleting Shipping Methods
- Examples of Rate Bases and Shipping Calculations
- Overriding Shipping Calculations on Individual Transactions
- Automatic Calculation of Shipping Charges (non-U.S. Merchants Only)
- Blocking Certain Kinds of Payments
- Accessing Your Payment Receiving Preferences to Block Payments
- Blocking Payments From U.S. Payers Without a Confirmed Address
- Blocking Payments in Currencies That You Do Not Hold
- Blocking Payments from Payers With Non-U.S. PayPal Accounts
- Blocking Payments Initiated Through the Pay Anyone Subtab
- Blocking Payments by Credit Card Instead of Bank Account
- Blocking Payments Funded With eChecks
- Adding Your Credit Card Statement Name
- Allowing Multiple Users to Access Your PayPal Account
- Handling Multiple Currencies
- Language Encoding Your Data
- Using Authorization & Capture
- Issuing Refunds
- Testing Payment Buttons in the PayPal Sandbox
- HTML Form Basics for Website Payments Standard
- HTML Variables for Website Payments Standard
- Address Handling (U.S. Merchants Only)
- Country Codes
- Index

Third-Party Shopping Carts – The Cart Upload Command
Integrating PayPal with Third Party Shopping Carts
5
250 September 2008 Website Payments Standard Integration Guide
quantity_2; the third item with variables like item_name_3, amount_3, and
quantity_3; and so on.
IMPORTANT: The _x values must increment by one continuously in order to be recognized.
If you skip from item #1 to item #3 without defining an item #2, the third
item will be ignored.
The minimum required HTML for your post to PayPal looks similar to the following.
EXAMPLE 5.1 HTML for Passing Individual Item Detail to PayPal
<form action="https://www.paypal.com/cgi-bin/webscr" method="post">
<input type="hidden" name="cmd" value="_cart">
<input type="hidden" name="upload" value="1">
<input type="hidden" name="business" value="seller@designerfotos.com">
<input type="hidden" name="item_name_1" value="Item Name 1">
<input type="hidden" name="amount_1" value="1.00">
<input type="hidden" name="item_name_2" value="Item Name 2">
<input type="hidden" name="amount_2" value="2.00">
<input type="submit" value="PayPal">
</form>
Setting Currency in the Cart
All monetary variables (amount_x., shipping_x., shipping2_x, handling_x, tax_x.,
and tax_cart) are interpreted in the currency designated by the currency_code variable
posted with the payment. Because currency_code is not item-specific, there is no need to
append _
x to the currency_code variable name. If no currency_code variable is posted,
all monetary values default to U.S. Dollars.
Setting Tax on Individual Items
Use the tax_x variable to specify the tax for a particular item in the cart. For example, the
following line specifies that the tax on item 2 in the cart is 15 cents:
<INPUT TYPE="hidden" name="tax_2" value=".15">
Setting Shipping Charges on Individual Items
Use the weight_x and weight_unit variables to specify item weights if the merchant’s
profile-based shipping rates are based on weight. For example, the following lines specify the
weight of item 3 in the cart as 1.5 kg.
<INPUT TYPE="hidden" name="weight_3" value="1.5">
<INPUT TYPE="hidden" name="weight_unit" value="kgs">
Use the quantity_x variable if the merchant’s profile-based shipping rates are based on
quantity. For example, the following line specifies that the quantity for item 3 in the cart is 6.
<INPUT TYPE="hidden" name="quantity_3" value="6">