
Integration Guide

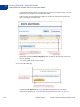
Table Of Contents
- Website Payments Standard Integration Guide
- Contents
- Preface
- Single-Item Payments - Buy Now Buttons
- Getting Started With Buy Now Buttons
- The Checkout Experience With Buy Now Buttons
- Begin - Buyers are Ready to Purchase Your Item on Your Website
- 1 - Buyers Enter Their Billing Information or They Log In to PayPal
- 2 - Buyers Confirm Their Transaction Details Before Paying
- 3 - Buyers View and Print Their PayPal Payment Confirmations
- End - Buyers Receive Payment Authorization Notices by Email
- Enhancing the Checkout Experience With Buy Now Buttons
- Managing Buy Now Transactions
- Advanced Features of Buy Now Buttons
- Creating Advanced Buy Now Buttons on the PayPal Website
- Sample HTML Code for Buy Now Buttons
- Sample URL Code for a Buy Now Email Payment Link
- Contribution Payments - Donate Buttons
- Getting Started With Donate Buttons
- The Checkout Experience With Donate Buttons
- Begin - Donors are Ready to Contribute on Your Website
- 1 - Donors Enter Their Billing Information or They Log In to PayPal
- 2 - Donors Confirm Their Contribution Details Before Paying
- 3 - Donors View and Print Their PayPal Contribution Confirmations
- End - Donors Receive Contribution Authorization Notices by Email
- Enhancing the Checkout Experience With Donate Buttons
- Managing Contributions
- Creating Advanced Donate Buttons on the PayPal Website
- Sample HTML Code for Donate Buttons
- Recurring Payments - Subscribe Buttons
- Getting Started With Subscribe Buttons
- The Checkout Experience With Subscribe Buttons
- Begin - Subscribers Are Ready to Sign Up on Your Website
- 1 - Subscribers Enter Their Billing Information or They Log In to PayPal
- 2 - Subscribers Confirm Their Subscription Details Before Signing Up
- 3 - Subscribers View and Print Their Subscription Confirmations
- End - Subscribers Receive Subscription Authorization Notices by Email
- Enhancing the Checkout Experience With Subscribe Buttons
- Managing Subscriptions
- Advanced Features of Subscribe Buttons
- Offering Trial Periods and Introductory Rates With Subscribe Buttons
- Limiting the Number of Billing Cycles With Subscribe Buttons
- Offering Product Options With Subscribe Buttons
- Working With Modify Subscription Buttons
- Working With Unsubscribe Buttons
- Generating Usernames and Passwords With Subscribe Buttons
- Reattempting Failed Recurring Payments With Subscribe Buttons
- Creating Advanced Subscribe Buttons on the PayPal Website
- Sample HTML Code for Subscribe Buttons
- Sample HTML Code for a Basic Subscribe Button
- Sample HTML Code for a Subscribe Button With Trial Periods
- Sample HTML Code for a Subscribe Button With Limits on Billing Cycles
- Sample HTML Code for Subscribe Buttons With Product Options
- Sample HTML Code for a Modify Subscription Button
- Sample HTML Code for an Unsubscribe Button
- Sample HTML Code for a Subscribe Button With Password Management
- Sample HTML Code for a Subscribe Button That Reattempts Payments
- Sample URL Code for Subscribe Email Payment Links
- The PayPal Shopping Cart - Add to Cart and View Cart Buttons
- Getting Started With The PayPal Shopping Cart
- The Checkout Experience With the PayPal Shopping Cart
- Begin - Buyers Add Your Items to the PayPal Shopping Cart
- 1 - Buyers Enter Their Billing Information or They Log In To PayPal
- 2 - Buyers Confirm Their Transaction Details Before Paying
- 3 - Buyers View and Print Their PayPal Payment Confirmations
- End - Buyers Receive Payment Authorization Notices by Email
- Enhancing the Checkout Experience With Add to Cart Buttons
- Managing PayPal Shopping Cart Transactions
- Using Email Notices to Track PayPal Shopping Cart Transactions
- Using Recent Activity to Track PayPal Shopping Cart Transactions
- Using Transaction History to Track PayPal Shopping Cart Transactions
- Using Downloadable History Logs to Track PayPal Shopping Cart Transactions
- Using Instant Payment Notification to Track PayPal Shopping Cart Transactions
- Advanced Features of Add to Cart Buttons
- Creating Advanced PayPal Shopping Cart Buttons on the PayPal Website
- Generating Code for Payment Buttons and Email Payment Links
- Protecting HTML Code for Payment Buttons
- Pricing Items in Multiple Currencies
- Working with View Cart Buttons
- Using the Button Creation Tool for Advanced Add to Cart Buttons
- Creating Advanced Add to Cart Buttons With JavaScript Disabled
- Avoiding Problems With Pasted HTML Code
- Sample HTML Code for Add to Cart Buttons
- Sample HTML Code for View Cart Buttons
- Third-Party Shopping Carts - The Cart Upload Command
- Securing Your Website Payments Standard Buttons
- Creating Protected Payment Buttons on the PayPal Website
- Saving Payment Buttons in Your PayPal Account
- Reconciling Payments Manually Through Transaction History
- Reconciling Payments Through Instant Payment Notification
- Protecting Payment Buttons by Using Encrypted Website Payments
- Blocking Unprotected and Non-encrypted Website Payments
- Using Your PayPal Account Profile
- The Account Profile
- Co-Branding the PayPal Checkout Pages
- Tailoring the Checkout Experience
- Automatic Calculation of Sales Tax
- Displaying the Sales Tax that PayPal Calculates During Checkout
- Accessing Your Sales Tax Rates in Your Account Profile
- Setting Up Domestic Sales Tax Rates
- Setting Up International Sales Tax Rates
- Resolving Overlapping Sales Tax Rates
- Editing or Deleting Sales Tax Rates
- Overriding Sales Tax Calculations on Individual Transactions
- Automatic Calculation of Shipping Charges (U.S. Merchants Only)
- Displaying the Shipping Charges that PayPal Calculates During Checkout
- Shipping Regions
- Shipping Methods
- Shipping Rate Bases
- Shipping Rate Tables
- Shipping Rates and Currencies
- Adding Shipping Rates for the First Time
- Adding Shipping Methods by Using a Wizard
- Viewing, Editing, and Adding Shipping Rates
- Viewing the Configuration of an Existing Shipping Method
- Editing the Configuration Settings of an Existing Shipping Method
- Deleting Shipping Methods
- Examples of Rate Bases and Shipping Calculations
- Overriding Shipping Calculations on Individual Transactions
- Automatic Calculation of Shipping Charges (non-U.S. Merchants Only)
- Blocking Certain Kinds of Payments
- Accessing Your Payment Receiving Preferences to Block Payments
- Blocking Payments From U.S. Payers Without a Confirmed Address
- Blocking Payments in Currencies That You Do Not Hold
- Blocking Payments from Payers With Non-U.S. PayPal Accounts
- Blocking Payments Initiated Through the Pay Anyone Subtab
- Blocking Payments by Credit Card Instead of Bank Account
- Blocking Payments Funded With eChecks
- Adding Your Credit Card Statement Name
- Allowing Multiple Users to Access Your PayPal Account
- Handling Multiple Currencies
- Language Encoding Your Data
- Using Authorization & Capture
- Issuing Refunds
- Testing Payment Buttons in the PayPal Sandbox
- HTML Form Basics for Website Payments Standard
- HTML Variables for Website Payments Standard
- Address Handling (U.S. Merchants Only)
- Country Codes
- Index

Recurring Payments – Subscribe Buttons
Creating Advanced Subscribe Buttons on the PayPal Website
3
146 September 2008 Website Payments Standard Integration Guide
– Add dropdown menu without prices – Select this checkbox to add a dropdown menu
of product options.
Enter a name for the dropdown menu, such as “Size”. For each menu option, enter a
name, such as “Small”, “Medium”, or “Large”.
Click the Done button to preview the effect in the Buyer’s View pane.
Click the Edit link to change the name and options of your dropdown menu. To remove
an option, clear the menu option name and click the Done button.
Click the Delete link to remove the dropdown menu from your button.
Click the Add another dropdown menu link to open a set of fields for another
dropdown menu of options without prices. You can add a maximum of 4 dropdown
menus, with a maximum of 10 options per menu.
– Add text field – Select this checkbox to add a text box in which buyers can enter option
information.
Enter a name for the text box, such as “Enter your size”.
Click the Done button to preview the effect in the Buyer’s View pane.
Click the Edit link to change the name of the text field.
Click the Delete link to remove the text box from your button.
Click the Add another text box link to open a a field for the name of another text box.
You can add a maximum of 2 text boxes.
For more information, see “Offering Product Options With Subscribe Buttons” on
page 134.
7. Customize the appearance and the language of your button (optional).
Click the Customize appearance link and do one of the following:
– PayPal button – Select this radio button to use a button image that is hosted by PayPal.
You can configure the size of the button, whether the button displays payment card logos,
and the country and language for the button text.
If you change the country, ensure the currency that you select in Step 8 below is
appropriate.
– Use your own button – Select this radio button to specify the URL of your own button
image that is not hosted by PayPal. Use your own button image if the buttons hosted by
PayPal do not fit the look of your website.
If your image is hosted securely, change the text box to begin with https//.
8. Set the terms of the subscription.
– Have PayPal create user names and passwords for customers – Select this checkbox
if you would like PayPal to generate usernames and passwords for your subscribers.
For more information, see “Generating Usernames and Passwords With Subscribe
Buttons” on page 139.
– Recurring amount to be billed – Enter the amount you want to bill subscribers for each
billing cycle. The amount is drawn from subscribers’ PayPal accounts at the beginning
of each cycle.