
Integration Guide
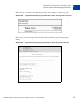
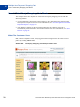
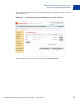
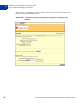
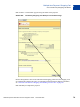
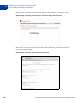
Table Of Contents
- Preface
- How Website Payments Standard Works
- Using Your Merchant Account Profile and Tools
- The Account Profile Summary
- Branding PayPal’s Payment Pages
- Streamlining Purchases with Website Payment Preferences
- Blocking Certain Kinds of Payment
- Adding Your Credit Card Statement Name
- Getting Customer Contact Telephone Numbers
- Language Encoding Your Data
- Multi-User Access to Your PayPal Account
- PayPal-Supported Currencies
- Issuing Refunds
- Single-Item Payment: Buy Now and Donations
- Multiple-Item Payment: Shopping Cart
- Encrypted Website Payments
- Testing in the PayPal Sandbox
- Website Payments Standard HTML FORM Basics
- Website Payments Standard HTML Variables
- Country Codes
- Index

Multiple-Item Payment: Shopping Cart
Button Factory for PayPal-Hosted Shopping Cart
4
72 November 2005 Website Payments Standard Checkout Integration Guide
Button Factory for PayPal-Hosted Shopping Cart
With the PayPal-hosted shopping cart, customers can make a single payment for multiple
items. With our shopping cart button factory, you can create a separate Add to Cart button for
each item and put the automatically generated HTML code for that button on your website
next to the item.
Use the following steps to create a shopping cart button, or if you are familiar HTML, you can
use the variables in Appendix A to code your own buttons.
1. Log in to your PayPal account at
https://www.paypal.com.
2. Enter the following URL:
https://www.paypal.com/us/cgi-bin/webscr?cmd=_cart-factory
3. Enter the details for the item.
– Item Name/Service (required): Enter the name of the item or service you wish to sell
– Item ID/Number: If you have an ID or tracking number for your item, enter it here. This
field will be displayed to your customers at the time of payment, and will be shown in
both the buyer’s and seller’s transaction details on the PayPal website
– Item Price (required): Enter the price of the item you wish to sell
– Currency (required): Choose the currency in which you would like this payment to be
denominated. This field defaults to the currency of your primary balance.
– Buyer’s Country: If you want the PayPal login or sign-up page to be displayed in a
certain language, select a country from the pull-down menu where that language is
spoken.
4. Choose an image for your button.
If you are going to be receiving payments from your website, choose the image for the button
you would like your customers to click to make their purchase. To display your own image,
enter the URL of the image’s location in the URL field.
NOTE: All items added to a PayPal shopping cart must be denominated in a single currency,
which is determined by the currency specified for the first item added to the Cart or by
the currency_code variable. Once a buyer adds one item to a cart, the buyer is not
allowed to add any items listed in other currencies to that cart. To change the currency,
customers must purchase the items in the first currency or remove all items from the
cart and add the items of the second currency. The best option is to list all of your items
in the same currency.
Adding More Details to the Button
If you do not have additional details to add to your button (such as sales tax, shipping, or your
logo), click Create Button Now and go to “Copy and Paste the Shopping Cart HTML” on
page 74. Otherwise, click Add More Options.