
Integration Guide
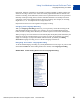
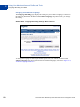
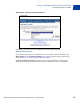
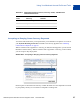

Table Of Contents
- Preface
- How Website Payments Standard Works
- Using Your Merchant Account Profile and Tools
- The Account Profile Summary
- Branding PayPal’s Payment Pages
- Streamlining Purchases with Website Payment Preferences
- Blocking Certain Kinds of Payment
- Adding Your Credit Card Statement Name
- Getting Customer Contact Telephone Numbers
- Language Encoding Your Data
- Multi-User Access to Your PayPal Account
- PayPal-Supported Currencies
- Issuing Refunds
- Single-Item Payment: Buy Now and Donations
- Multiple-Item Payment: Shopping Cart
- Encrypted Website Payments
- Testing in the PayPal Sandbox
- Website Payments Standard HTML FORM Basics
- Website Payments Standard HTML Variables
- Country Codes
- Index

Website Payments Standard Checkout Integration Guide November 2005 55
Using Your Merchant Account Profile and Tools
Multi-User Access to Your PayPal Account
2
Multi-User Access to Your PayPal Account
With Multi-User Access, you can set up multiple logins with different permissions for
business functions in your PayPal account, so employees have access only to the parts of your
account they need to do their work. For example, you can give your customer service
representatives their own login with limited permissions, so that they have the ability only to
view balances and make refunds but not the ability to edit profiles, send money, or withdraw
funds.
You can add up to seven separate logins to your account. You might want to establish a
separate username and password for each employee, and grant each user the minimum access
necessary. If an employee forgets or loses a password, you can log in and reset it.
NOTE: Remember to revoke the privileges of any employee that leaves your company.
To set up Multi-User Access:
1. Log in to your PayPal Business account.
2. Go to your Profile
3. Click Multi-User Access.
FIGURE 2.15 Multi-User Access Link in Account Profile Summary
4. Specify your Administrative Contact email address, which is the email address that
receives notifications about your account activity.
NOTE: You must confirm this email address before you can proceed.
5. For each login, specify a User ID, password, and which account privileges the user has
permission to use.