
Developer's Guide
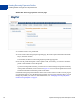
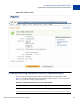
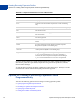
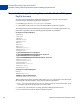
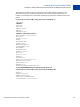
Table Of Contents
- Website Payments Pro Payflow Edition - Recurring Payments Developer’s Guide
- Preface
- Audience
- Where To Go For More Information
- Revision History
- Recurring Payments Overview
- Creating Recurring Payments Profiles
- Preparing to Create Recurring Payments Profiles
- Creating Profiles Through Your PayPal Account
- Creating Recurring Payments Profiles Programmatically
- Options for Creating a Recurring Payments Profile Programmatically
- Example: Creating a Recurring Payments Profile For Billing a Credit Card
- Example: Creating a Recurring Payments Profile For Billing a PayPal Account
- Deactivating and Reactivating Recurring Payments Profiles
- Canceling Recurring Payments Profiles
- Getting Recurring Payments Profile Details
- Billing the Outstanding Amount
- Updating Recurring Payments Profiles
- Recurring Payments Reference
- Index

Creating Recurring Payments Profiles
Creating Profiles Through Your PayPal Account
12 Payflow Recurring Payments Developer’s Guide
FIGURE 2.1 Recurring payments overview page
3. Click the Create a new profile link.
4. On the Create a Recurring Payment profile page, fill in all required information about the
buyer, and click continue.
If successful, the Review a Recurring Payment profile page appears.
5. Review the profile description. Click Update to edit, if necessary, or Cancel to cancel the
profile. Click Submit to create the profile.
Upon successful profile creation, you will receive a status message along with a summary
of the profile information, such as shown in Figure 2.2 .You can use the profile ID to locate
and obtain information about this profile in the future.
Click the Recurring Payments link either in the Tools section of the Account Overview page or
on your Profile page to view the Recurring payments overview page. From this page, you can
manage the profiles you create. For more information, see “Managing Recurring Payments
Profiles Through PayPal” on page 8.