
Developer's Guide

56 August 2012 PayPal Mobile Payments Developer Guide and Reference – iOS Edition
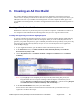
9. Name the file “Entitlements.plist” and click Finish.
This creates a copy of the default entitlements file within the project.
10. Select the new
Entitlments.plist file, uncheck the get-task-allow property, and save the
Entitlements.plist file.
11. Select the Target and open the Build settings inspector.
12. In the Code Signing Entitlements build setting, type the filename of the new
Entitlements.plist file, including the extension.
Do not specify a path unless you put the
Entitlements.plist file somewhere other than the top
level of the project.
13. Click Build.
14. Highlight the app located within the
Products sub-folder and select Reveal in Finder from the
Action popup.
15. Use the compress option in Finder to create a .
zip file that contains your application. Be sure to
compress only the
.app file only and not the entire build folder.
16. Provide this
.zip file to PayPal, along with the Distribution Provisioning Profile
(
.mobileprovision) file. You upload this file to x.com as an attachment when you submit your
application.
Notes
Saving the Private Key and Transferring It to Other Systems
It is critical that you save your private key somewhere for safekeeping in case you need to develop on
multiple computers or you decide to reinstall your system OS. Without your private key, you cannot
sign binaries in Xcode nor test your application on Apple devices.
When a CSR is generated, the Keychain Access application creates a private key on your login
keychain. This private key is tied to your user account and cannot be reproduced if lost. If you plan to
develop and test on multiple systems, you must import your private key to all of the systems on which
you work.
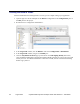
1. Open up the Keychain Access application and select the Keys category.
2. C
ONTROL+CLICK the private key associated with your iPhone Development Certificate, and then
click Export Items in the menu.
The private key is identified by the iPhone Developer: <First Name> <Last Name> public
certificate that is paired with it.
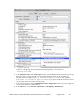
3. Save your key in the Personal Information Exchange (
.p12) file format.
4. When prompted, create a password to use when you import this key on another computer.
Result:
You can transfer this
.p12 file between systems by double-clicking the .p12 file to install it on a
system. When prompted, use the password that you entered in Step 4 above.