Mobile Payments Library Developer Guide and Reference – iOS Edition Last updated: Augst 2012
PayPal Mobile Payments Developer Guide and Reference – iOS Edition Document Number 10105.en_US-201208 © 2011 PayPal, Inc. All rights reserved. PayPal is a registered trademark of PayPal, Inc. The PayPal logo is a trademark of PayPal, Inc. Other trademarks and brands are the property of their respective owners. The information in this document belongs to PayPal, Inc. It may not be used, reproduced or disclosed without the written approval of PayPal, Inc. Copyright © PayPal. All rights reserved. PayPal S.
Contents Preface ............................................................................................................... 5 Purpose ........................................................................................................................ 5 Scope............................................................................................................................ 5 Revision History .....................................................................................................
Checkout Experience #2 – Goods or Services without Shipping ............................... 37 Checkout Experience #3 – Donations ........................................................................ 38 Checkout Experience #4 – Personal Send Money Payments .................................... 39 Checkout Experience #5 – Create Pin ....................................................................... 40 Checkout Experience #6 – Preapproval ................................................................
Preface The PayPal Mobile Payments Library provides secure, extensible, and scalable PayPal payment functionality to the Apple iPhone, iPod and iPad platforms. Purpose The PayPal Mobile Payments Library provides an easy way for you to integrate payments into your iPhone, iPod touch, and iPad applications. You can download the library from X.com and include it in your application. With the library, you need only a few lines of code to integrate the library into your application.
Version Date Published Description 1.0 October 2010 Added information on Adaptive Payments support, including “Refunds can be supported by manual refund using the PayPal account interface or by means of the RefundTransaction API. AdaptivePayments Refund API call is not supported for MPL-generated pay keys. More details and documentation are available at: https://cms.paypal.com/cms_content/US/en_US/files/develo per/PP_AdaptivePayments.pdf Simple, Parallel, and Chained Payments.” 0.
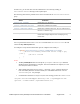
1. PayPal Mobile Payments Library This section provides details about the Mobile Payments Library API, and it provides instructions and examples for integrating the library with your iPhone application. Mobile Payments Library API Reference The flow of the library is: 1. Your application initializes the library. 2. The library creates a Pay with PayPal UIButton and returns it to you so you can place it on the screen. 3.
NOTE: The Mobile Payments Library binds specific devices to specific application IDs, for enhanced security. For each of your application IDs, you must use a different sandbox account for each of your devices or simulators. To switch a device or simulator to use a different sandbox account, go to the PayPal Sandbox website on your computer, select Profile > Mobile Applications, and then unbind the device from the application ID.
In either case, you need to make sure the initialization is successful by sending an initializationStatus message to the PayPal object. The following table lists the possible status values returned from the initializationStatus query: Status STATUS_NOT_STARTED Definition Initialization never attempted. STATUS_COMPLETED_SUCCESS Initialization completed successfully. STATUS_COMPLETED_ERROR Initialization completed with errors. The error is displayed in the device or simulator logs.
Parameter Description PayPalApplicationId: (Required) PayPal Application ID from X.com. For the Sandbox environment, you should use APP-80W284485P519543T. env: (Optional) Sets the PayPal server to Live, Sandbox, or None. Allowable values are: • ENV_LIVE (does not support simulators) • ENV_SANDBOX • ENV_NONE For details of the different servers, see “Enumerated Values in the Mobile Payments Library.
Parameter Description buttonTextType: (Optional) Determines whether the button displays “Pay with PayPal” or “Donate with PayPal”. The default value is BUTTON_TEXT_PAY. • BUTTON_TEXT_PAY • BUTTON_TEXT_DONATE Checkout Methods The library provides 2 methods that launch the PayPal Checkout experience. The Checkout method handles simple payments, which support single receivers of payments with one transaction.
For a complete list of languages supported by the library, please see the section “Localization Support in the Mobile Payments Library.” shippingEnabled Property This property lets buyers specify shipping addresses. With this property enabled, buyers choose from the shipping addresses in their PayPal account. The chosen shipping address is used then for the payment. If this property is disabled, the library does not display shipping options to the buyer.
There are two delegate functions, one for Simple Payments and one for Advanced Payments: -(PayPalAmounts *)adjustAmountsForAddress:(PayPalAddress const *)inAddress andCurrency:(NSString const *)inCurrency andAmount:(NSDecimalNumber const *)inAmount andTax:(NSDecimalNumber const *)inTax andShipping:(NSDecimalNumber const *)inShipping andErrorCode:(PayPalAmountErrorCode *)outErrorCode; -(NSMutableArray *)adjustAmountsAdvancedForAddress:(PayPalAddress const *)inAddress andCurrency:(NSString const *)inCurrency
paymentCanceled Method This method is called as soon as the buyer cancels the payment for any reason. The merchant app should store the fact that the payment was canceled (for later display), but should not perform any user interface updates. -(void)paymentCanceled; paymentFailed Method This method is called as soon as the library fails to complete a payment for any reason.
generated pay keys. More details and documentation are available at: https://cms.paypal.com/cms_content/US/en_US/files/developer/PP_AdaptivePayments.
Simple, Parallel, and Chained Payments Simple payments have a single recipient. Parallel and chained payments have multiple recipients and differ in the how the payments are split. Simple Payments Simple payments use the PayPalPayment object, which supports a payment to a single recipient. Parallel Payments Parallel payments allow you to make payments for any amount to 2 to 6 recipients. You create a parallel payment by making a payment with multiple recipients that has no primary recipient.
Chained Payments A chained payment is a payment from a sender that is indirectly parallel among multiple receivers. It is an extension of a typical payment from a sender to a receiver; however, a receiver, known as the primary receiver, passes part of the payment to other receivers, who are called secondary receivers. NOTE: Chained payments require a specific permission level on the part of the API caller and merchant.
Preapprovals The PayPal Mobile Payments Library lets you obtain authorization in advance from buyers for future payments to you without requiring buyers to authorize each payment individually. For example, you might use the library to establish preapproval agreements for subscriptions to mobile content, such as mobile streaming audio or video. Or, you might use the library to establish preapproval agreements for payments to gain access to higher levels of difficulty in mobile games.
special codes that buyers enter to authorize preapproved payments individually without logging in to PayPal. For example, you might have a mobile game that requires payment from buyers to enter a higher level of difficulty. You could take the payment, without notice, when the buyer enters the higher level. However, the buyer might dispute the payment later, despite the preapproval agreement and the automatic payment notice from PayPal.
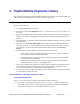
Method Sequence for Preapproval Checkout 20 August 2012 PayPal Mobile Payments Developer Guide and Reference – iOS Edition
Custom Objects in the Mobile Payments Library The Mobile Payments Library includes custom objects for passing information between the library and your application during checkout. PayPalAddress This object is passed to the PayPalPaymentDelegate in the AdjustAmounts method. Use this address to update the payment amount, tax, currency, and shipping values of the payment. Then, the buyer continues to check out with the new amounts.
PayPalPayment This object is passed to the library in the Checkout method. This object contains all the values for a payment. Property Description subTotal (Required) NSDecimalNumber* the amount of the payment (subtotal). paymentType (Optional) Purpose of payment. Defaults to TYPE_NOT_SET. paymentSubType (Optional) Subtype of the “TYPE_SERVICE” paymentType. Applicable only if you have been approved for special pricing plans. Defaults to SUBTYPE_NOT_SET.
PayPalAdvancedPayment This object is passed to the library in the AdvancedCheckout method. This object contains all the values for an advanced payment which can be used to create a parallel or chained payment (see discussion in “Refunds can be supported by manual refund using the PayPal account interface or by means of the RefundTransaction API. AdaptivePayments Refund API call is not supported for MPL-generated pay keys. More details and documentation are available at: https://cms.paypal.
Property Description paymentSubType (Optional) The payment subtype for a “SERVICES” type payment (see “Enumerated Values in the Mobile Payments Library”). Applicable only if you have been approved for special pricing plans. For any paymentType other than TYPE_SERVICE or if you have not been approved for special pricing plans, use SUBTYPE_NOT_SET as the paymentSubType.
PayPalInvoiceData This object is an optional parameter to a PayPalPayment or a PPReceiverPaymentDetails object. This object holds data regarding the tax shipping and a per-item breakdown of the items included in the payment. While this is an optional class, once it is added to a container, it must be populated with the following required fields. Property Description totalTax (Required) NSDecimalNumber * The tax amount for the payment.
PayPalReceiverAmounts This object is used in the dynamic amount calculation for Advanced Payment types. It is always contained in an array. Property Description amounts (Required) PayPalAmounts * specifying details about how much this receiver should receive. recipient (Required) The email address or phone number of this recipient.
NOTE: If the buttonTextType parameter is set to 'TEXT_DONATE,’ the word “Pay” in the above buttons is replaced by “Donate.” The language of the button also changes based on the language you pass into the setLang method or the auto detected language on the phone. PayPalPaymentType TYPE_NOT_SET TYPE_GOODS TYPE_SERVICE TYPE_PERSONAL NOTE: For Personal payment types, the PayPal Checkout experience differs slightly from other payment types.
PayPalPaymentStatus STATUS_COMPLETED: The payment has completed on the back end. STATUS_CREATED: The payment has been created but not completed. STATUS_OTHER: The payment success state is other than created or completed. PayPalAmountErrorCode AMOUNT_ERROR_NONE: No error occurred during dynamic amount calculation. AMOUNT_ERROR_SERVER: A connectivity or server error occurred during dynamic amount calculation. AMOUNT_ERROR_OTHER: A generic error occurred during dynamic amount calculation.
Country or Region Supported Locale Codes Germany de_DE en_DE Hong Kong zh_HK en_HK India en_IN Italy it_IT Japan ja_JP en_JP Mexico es_MX en_MX Netherlands nl_NL en_NL Poland pl_PL en_PL Singapore en_SG Spain es_ES en_ES Switzerland de_CH en_CH fr_CH Taiwan zh_TW en_TW United States en_US Library Support for the devices and OS versions. The Mobile Payments Library fully supports OS 4.0 as well as the Apple iPad.
• • • • • PayPalInvoiceItem.h PayPalPayment.h PayPalPreapprovalDetails.h PayPalReceiverAmounts.h PPReceiverPaymentDetails.h Also, the package contains a static library file: libPayPalMEP.a. 1. Open your Xcode project. 2. CONTROL+CLICK your project, and then select Add > Existing Files…. 3. Select the .h and .a files, and then click Add. NOTE: You need to add only the PayPalAmounts.h, PayPalReceiverAmounts.h and PayPalAddress.h files if you are using the Dynamic Amount Calculation feature.
Implementation File The following snippet shows a simplified version of the PaymentViewController and illustrates the library methods for an advanced parallel payment. For reference, see the demo application source. - (void)viewDidLoad { PayPalPaymentType paymentType = HARD_GOODS; //Get the PayPal Library button. //We will be handling the callback, //so we declare 'self' as the target. //We want a large button, so we use BUTTON_278x43.
tax = taxAmount[i]; shipping = shippingAmount[i]; details.invoiceData = [[[PayPalInvoiceData alloc] init] autorelease]; details.invoiceData.totalShipping = [NSDecimalNumber decimalNumberWithString:order]; details.invoiceData.totalTax = [NSDecimalNumber decimalNumberWithString:tax]; details.invoiceData.totalShipping = [NSDecimalNumber decimalNumberWithString:shipping]; details.description = description; details.recipient = [emails objectAtIndex:i]; details.
currentPayment.invoiceData = [[[PayPalInvoiceData alloc] init] autorelease]; currentPayment.invoiceData.totalTax = [NSDecimalNumber decimalNumberWithString: @”1.00”]; currentPayment.invoiceData.totalShipping = [NSDecimalNumber decimalNumberWithString: @”2.00”]; The PayPalPayment object is created and the properties are set. After the checkout method is called, the library releases the currentPayment object.
Dynamic Amount Calculation This method is called by the library when buyers choose a shipping address. The demo application calculates the tax based on the state of the shipping address, and then it passes the updated amounts to the library.
- (NSMutableArray *)adjustAmountsAdvancedForAddress:(PayPalAddress const *)inAddress andCurrency:(NSString const *)inCurrency andReceiverAmounts:(NSMutableArray *)receiverAmounts andErrorCode:(PayPalAmountErrorCode *)outErrorCode { NSMutableArray *returnArray = [NSMutableArray arrayWithCapacity:[receiverAmounts count]]; for (PayPalReceiverAmounts *amounts in receiverAmounts) { //leave the shipping the same, change the tax based on the state if ([inAddress.state isEqualToString:@"CA"]) { amounts.amounts.
2. The Checkout Experience with the Mobile Payments Library The following screen shots illustrate several different PayPal Checkout experiences that occur after buyers click the PayPal button that your application obtains from the library by using the getPayPalButton()method. NOTE: The checkout experience is in Portrait orientation only. Landscape orientation is currently not supported.
Checkout Experience #2 – Goods or Services without Shipping Payment type = Hard Goods or Services / Shipping = disabled In this case, shipping is not required (such as, manual pick up of goods or services). Shipping is disabled by a call to the disableShipping library method. Buyers enter their PayPal login credentials and directly pay by clicking Pay on the first screen. Buyers can review funding choices by clicking Review on the same page.
Checkout Experience #3 – Donations Payment type = Service / Button text = Donations / Shipping = enabled In the preceding experience, buyers make a donation to a charity or other cause. In this context, the charity or cause wants to leverage PayPal members’ addresses as mailing addresses for donation receipts. By enabling shipping in the library, buyers are presented with their primary mailing address, or they can choose another mailing address from the ones in their PayPal accounts.
Checkout Experience #4 – Personal Send Money Payments Payment type = Personal payments / Shipping = disabled In the preceding experience, PayPal members make personal payments to other PayPal members. There are no transaction fees when the transaction is funded by PayPal balance or by a bank account on file. The transaction carries a fee when it is funded by a credit or debit card. In some cases, senders choose who pays any fees – sender or recipient. In India and Germany, recipients always pay any fees.
Checkout Experience #5 – Create Pin In the preceding experience, a PayPal member has just completed a payment and does not currently have a PIN associated with their account. By following the on-screen instructions, the buyer can associate their account with a phone number and PIN for easier login in the future. Upon successful creation of the PIN, the buyer is returned to your application triggering the paymentSuccess() delegate callback.
Checkout Experience #6 – Preapproval In this experience, you executed the preapproval checkout method, as discussed under “Preapprovals” on page 18. Basic Preapproval Checkout Login Screen Agree and Pay Screen During a preapproval checkout, the buyer agrees to the terms of a preapproval agreement. The agreement authorizes you to take payments without requiring the buyer to log in to PayPal to authorize the payments individually.
Creating Preapproval PINs During Preapproval Checkout Depending on your business model, you may require buyers to create preapproval PINs during preapproval checkout. Preapproval PINs are special codes that buyers specify during checkout to let them consent quickly later to individual payments. If your preapproval agreements require PINs, PayPal displays the optional Create a code screen during preapproval checkout.
3. Submitting Your Application to PayPal Before you submit your application to Apple and distribute your mobile application publicly, you need an authorized application ID from PayPal. PayPal tests all mobile applications before issuing application IDs. Test your mobile application thoroughly in the PayPal Sandbox by using APP-80W284485P519543T as your test application ID. Then, submit your test application to PayPal. 1. Log in or sign up on PayPal’s developer website, x.com. 2.
A. Currencies Supported by PayPal PayPal uses 3-character ISO-4217 codes for specifying currencies in fields and variables. Currency Currency Code Australian Dollar Brazilian Real AUD BRL NOTE: This currency is supported as a payment currency and a currency balance for in-country PayPal accounts only.
B. Countries and Regions Supported by PayPal PayPal uses 2-character IS0-3166-1 codes for specifying countries and regions that are supported in fields and variables.
Country or Region Code Country or Region Code Eritrea Estonia Ethiopia Falkland Islands (Malvinas) Faroe Islands Fiji Finland France French Guiana French Polynesia French Southern Territories Gabon Gambia Georgia Germany Ghana Gibraltar Greece Greenland Grenada Guadeloupe Guam Guatemala Guernsey Guinea Guinea-Bissau Guyana Haiti Heard Island and McDonald Islands Holy See (Vatican City State) Honduras Hong Kong Hungary Iceland India Indonesia Iran, Islamic Republic of Iraq Ireland ER Isle of Man Israel
Country or Region Code Country or Region Monaco Mongolia Monstserrat Morocco Mozambique Myanmar Namibia Nauru Nepal Netherlands Netherlands Antilles New Caledonia New Zealand Nicaragua Niger Nigeria Niue Norfolk Island Northern Mariana Islands Norway Oman Pakistan Palau Palestinian Territory, Occupied Panama Papua New Guinea Paraguay Peru Philippines Pitcairn Poland Portugal Puerto Rico Qatar Reunion Romania Russian Federation Rwanda Saint Helena Saint Kitts and Nevis Saint Lucia MC Saint Pierre and Mi
Country or Region Code Country or Region Code Uganda Ukraine United Arab Emirates United Kingdom United States United States Minor Outlying Islands Ururguay Uzbekistan Vanuatu UG Venezuela Viet Nam Virgin Islands, British Virgin Islands, U.S.
C. Creating an Ad Hoc Build The Ad Hoc distribution method for iPhone apps allows for distribution of the build to internal or external sources. PayPal provides the Device ID values for PayPal’s devices. In the process below, you add PayPal’s devices to your Ad Hoc Provisioning Profile. You then compile the build, sign it with your Ad Hoc Provisioning Profile, and deliver the zipped build and the Ad Hoc Provisioning Profile to PayPal.
5. In the Common Name field enter your name. Ensure that the name entered matches the information that you submitted when you registered as an iPhone Developer. No CA (Certificate Authority) Email Address is required. The ‘Required’ message is removed after you complete the following step. 6. Select the Saved to Disk radio button and if prompted, select Let me specify key pair information and click Continue. 7. If you selected Let me specify key pair, specify a file name and click Save. 8.
Locating your Device ID 1. Connect your device to your Mac and open Xcode. 2. In Xcode, navigate to the Window drop-down menu and select Organizer. The 40 hex character string in the Identifier field is your device’s UDID. Adding Devices to the iPhone Developer Program Portal 1. Navigate to the Devices section of the Program Portal and click Add Device. 2. Enter a descriptive name for the device, as well as the UDID, and then click Submit.
1. Navigate to the App ID section of the Program Portal. 2. Click Add ID. 3. Enter a common name for your App ID. This is a name for easy reference and identification within the Program Portal. 4. Enter a Bundle Identifier in the free-form text field. PayPal recommends a reverse-domain-name-style string, such as com.domainname.applicationname. For application suites that share the same Keychain access, use a wild-card character in the Bundle Identifier, such as com.domainname.* or *.
Creating a Distribution Provisioning Profile To successfully build your application in Xcode for Ad Hoc distribution, you must create and download an Ad Hoc Distribution Provisioning Profile. 1. Navigate to the Provisioning section of the Program Portal. 2. Click the Distribution tab. 3. 4. 5. 6. 7. 8. 9. Select the Ad Hoc radio button. Enter the name for your Ad Hoc Distribution Provisioning Profile. Confirm that your iPhone Distribution Certificate has been created and is displayed.
Creating the Build in Xcode After the Distribution Provisioning Profile is created, you can compile and sign your application. 1. Open the project in Xcode and duplicate the Release configuration in the Configurations pane of the Info panel for the project. 2. Rename this new configuration “Distribution”. 3. In the Target Info window, click the Build tab and set the Configuration to Distribution. 4. In the Target Info window, navigate to the Build pane. 5.
The preceding example shows ‘iPhone Distribution: Example Corp, Inc.’ as the Distribution Certificate and ‘My App Store Distribution Provisioning Profile’ as its associated .mobileprovision file. 6. In the Properties Pane of the Target Info window, enter the Bundle Identifier portion of your App ID. If you used an explicit App ID, enter the Bundle Identifier portion of the App ID in the Identifier field. For example, enter com.domainname.applicationname if your App ID is A1B2C3D4E5.com.domainname.
9. Name the file “Entitlements.plist” and click Finish. This creates a copy of the default entitlements file within the project. 10. Select the new Entitlments.plist file, uncheck the get-task-allow property, and save the Entitlements.plist file. 11. Select the Target and open the Build settings inspector. 12. In the Code Signing Entitlements build setting, type the filename of the new Entitlements.plist file, including the extension. Do not specify a path unless you put the Entitlements.
Verifying a Successful Ad Hoc Distribution Build 1. Open the Build Log detail view and confirm the presence of the “embedded.mobileprovision” file. This takes you to the line in the build log that shows the provisioning profile was called successfully. Ensure that the embedded.mobileprovision file is located in the proper “Distribution” build directory and not a “Debug” or “Release” build directory. Also, make sure the destination path at the end of the build message is the app that you are building. 2.