
User Guide


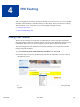


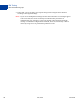
Table Of Contents

IPN Guide June, 2009 23
3
Identifying Your IPN Listener to
PayPal
After you implement and test your IPN listener, you make your listener known to PayPal by
specifying the listener’s URL in your account’s profile. Optionally, you can override the URL
to specify another listener for specific payments.
z Setting Up IPN Notifications on PayPal
z Dynamically Setting the Notification URL
Setting Up IPN Notifications on PayPal
After you implement and test your IPN listener, you identify the listener to PayPal by selecting
Instant Payment Notification Preferences from your account’s profile. You then specify
your listener’s URL and click the box to activate it.
Your listener must be located at the URL that you specify in the profile. Before you activate
your listener on PayPal, you should test the listener using the IPN simulator in the Sandbox.
The steps to set up your listener for Sandbox testing and to set up your listener for live
operation on PayPal are the same. The only difference is that you log into the Sandbox to set
up your listener for Sandbox testing and you log into PayPal to set up your listener for live
operation.
NOTE: Sandbox testing goes beyond simply using the IPN simulator. The IPN simulator only
sends IPN messages to a listener; it does not perform the complete operation; for
example, it does not complete a transaction. Sandbox testing involves performing the
same actions in the Sandbox as you expect to be performed when the listener goes
live.
After you log in, follow these instructions to set up your listener:
1. Click Profile on the My Account tab.
2. Click Instant Payment Notification Preferences in the Selling Preferences column.
3. Click Edit IPN Settings to specify your listener’s URL and activate the listener.
The following screen appears: