
Developer's Guide
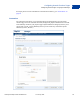

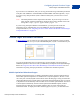
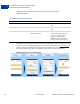
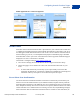
Table Of Contents
- Content
- Preface
- Introducing the Gateway Checkout Solutions
- Secure Token
- Configuring Hosted Checkout Pages
- Payflow SDK
- Sending a Simple Transaction to the Server
- Submitting Credit Card Transactions
- Obtaining an Internet Merchant Account
- About Credit Card Processing
- Credit Card Features
- Planning Your Gateway Integration
- Core Credit Card Parameters
- Submitting Account Verifications
- Submitting Authorization/Delayed Capture Transactions
- Submitting Balance Inquiry Transactions
- Submitting Card Present (SWIPE) Transactions
- Submitting Credit (Refund) Transactions
- Submitting Inquiry Transactions
- When To Use an Inquiry Transaction
- Required Parameters When Using the PNREF
- Inquiry Transaction Parameter String Using the PNREF
- Required Parameters When Using the CUSTREF
- Inquiry Transaction Parameter String Using the CUSTREF
- Required Parameters When Using the Secure Token
- Inquiry Parameter String Using the Secure Token
- Submitting Partial Authorizations
- Submitting Purchasing Card Transactions
- Submitting Reference Transactions (Tokenization)
- Submitting Sale Transactions
- Submitting Soft Merchant Information
- Submitting Voice Authorization Transactions
- Submitting Void Transactions
- Using Address Verification Service
- Using Card Security Code
- Information for the PayPal Acquirer
- Testing Transactions
- Transaction Responses
- Processors Requiring Additional Transaction Parameters
- American Express Additional Credit Card Parameters
- Elavon Additional Credit Card Parameters
- First Data Merchant Services Nashville, Additional Credit Card Parameters
- First Data Merchant Services North, Additional Credit Card Parameters
- Heartland, Additional Credit Card Parameters
- Litle Additional Credit Card Parameters
- Cielo Payments, Additional Credit Card Parameters
- Paymentech Salem (New Hampshire) Additional Credit Card Parameters for American Express
- PayPal Credit Card Transaction Request Parameters
- SecureNet Additional Credit Card Parameters for American Express
- Vantiv Additional Credit Card Parameters
- WorldPay Additional Credit Card Parameters
- TeleCheck Electronic Check Processing
- Payflow Header Parameters
- Submitting Purchasing Card Level 2 and 3 Transactions
- About Purchasing Cards
- About Program Levels
- About American Express Purchasing Card Transactions
- American Express Purchasing Card Transaction Processing
- Elavon (Formerly Nova) Purchasing Card Transaction Processing
- First Data Merchant Services (FDMS) Nashville Purchasing Card Transaction Processing
- First Data Merchant Services (FDMS) North Purchasing Card Transaction Processing
- First Data Merchant Services South (FDMS) Purchasing Card Transaction Processing
- Global Payments - Central Purchasing Card Transaction Processing
- Global Payments - East Purchasing Card Transaction Processing
- Heartland Purchasing Card Transaction Processing
- Litle Purchasing Card Transaction Processing
- Cielo Payments Purchasing Card Transaction Processing
- Paymentech Salem (New Hampshire) Purchasing Card Transaction Processing
- Paymentech Tampa Level 2 Purchasing Card Transaction Processing
- SecureNet Purchasing Card Transaction Processing
- TSYS Acquiring Solutions Purchasing Card Transaction Processing
- Vantiv Purchasing Card Transaction Processing
- WorldPay Purchasing Cards Transaction Processing
- VERBOSITY: Processor-Specific Transaction Results
- Country Codes
- Codes Used by FDMS South Only
- Additional Processor Information
- Payflow Link Migration
- Payflow Gateway MagTek Parameters
- Payflow Gateway FAQs

Configuring Hosted Checkout Pages
Configuring Hosted Pages Using PayPal Manager
3
42 07 January 2014 Gateway Developer Guide and Reference
On the Customize page, you can either change the design of your existing layout, or select and
customize a different layout. To make changes, double-click on the section of the template you
are trying to modify or the corresponding Click to Edit button for that section. In the pop-up
that appears, click the color selector to change the color, or enter the appropriate URL. The
customization options vary for the different Layouts. These options are described in greater
detail in the next section: Customizing Your Layout.
After making the changes, click one of the following buttons:
Preview - Preview the changes you have made to your layout before saving and publishing
it
Save and Publish - Save all the changes you have made and publish the updated layout.
Your buyers will see the updated payment page.
Cancel - Discard all the changes you have made in this session.
Undo Changes - Discard all changes you have made since the last time you saved the
layout. Your buyers will see the last saved layout.
NOTE: You must make all modifications (including changing layouts) within the same
session, otherwise all changes will be lost and you will have to redo your changes. If
the session times out, the design of the layout will remain at the version that was last
published.
NOTE: Payflow will ignore the cancel URL field that you entered in PayPal Manager if you
select layout template C. To force Payflow to use the cancel URL field with layout
template C, in PayPal Manager, add
DISPLAY_URL | before your cancel URL.
Example:
DISPLAY_URL | http://www.yoursite.com/home.php
Customizing Your Layout
You can customize the appearance of the Layout template that you selected on the customize
page. These customizations apply mostly to Layouts A and B. Layout C is embedded on a
page you host in an iFrame. So for Layout C, you already control the appearance of the page.
NOTE: These customizations are not applied to the mobile version of the hosted checkout
pages.
Header (Applicable to Layouts A and B) - You can change the following:
– Header height (Applicable to Layouts A and B)
– Header background color (Applicable to Layout B only)
– Header font type, size (Applicable to Layouts A and B)
– Header font color (Applicable to Layout B only)
– Swap between displaying the business name or the business logo image
– Edit business name in the header (Applicable to Layouts A and B)
– Position of the business name or the logo within the header (left, centered, right)
(Applicable to Layouts A and B)