
Integration Guide
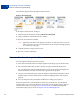
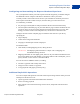


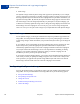
Table Of Contents
- Express Checkout Integration Guide
- Contents
- Preface
- Introducing Express Checkout
- Express Checkout Button and Logo Image Integration
- PayPal Name-Value Pair API Basics
- Implementing the Simplest Express Checkout Integration
- Testing an Express Checkout Integration
- Customizing Express Checkout
- Implementing the Instant Update API
- Immediate Payment
- Implementing Parallel Payments
- Handling Payment Settlements
- Handling Recurring Payments
- How Recurring Payments Work
- Recurring Payments Terms
- Options for Creating a Recurring Payments Profile
- Recurring Payments With Express Checkout
- Recurring Payments Profile Status
- Getting Recurring Payments Profile Information
- Modifying a Recurring Payments Profile
- Billing the Outstanding Amount of a Profile
- Recurring Payments Notifications
- Using Other PayPal API Operations
- Integrating giropay with Express Checkout

Introducing Express Checkout
Express Checkout Integration Steps
1
12 May 2010 Express Checkout Integration Guide
The following diagram shows the Express Checkout flow:
Express Checkout Flow
In the Express Checkout flow, the buyer:
1. Chooses Express Checkout by clicking Check out with PayPal
2. Logs into PayPal to authenticate his or her identity
3. Reviews the transaction on PayPal
NOTE: Optionally, (not shown in the diagram), the buyer can then proceed to review the
order on your site. You can also include other checkout steps, including upselling
on your Review Order page.
4. Confirms the order and pays from your site
5. Receives an order confirmation
Express Checkout Integration Steps
You can implement Express Checkout in 4 steps:
1. Place PayPal checkout buttons and PayPal payment mark images in your checkout flow.
2. For each PayPal button that you place, modify your page to handle the button click.
Use a PayPal Express Checkout API operation to set up the interaction with PayPal and
redirect the browser to PayPal to initiate buyer approval for the payment.
3. On your order confirmation page, obtain the payment authorization from PayPal and use
PayPal Express Checkout API operations to obtain the shipping address and accept the
payment.
4. Test your integration using the PayPal Sandbox before taking your pages live.
Because PayPal offers you the flexibility to control your checkout flow, you should first
understand how your current checkout flow works, then, become familiar with the Express
Checkout flow. Start by reviewing Express Checkout Flow. For additional background
information to help you get started, see Express Checkout Building Blocks.