
User's Manual


Page 4
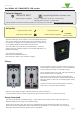
Image selection
The LCD reader will hold 4 images. These are selected automatically by the reader’s LED control wires. The
default image will display unless one of the three LED’s lines is individually active. In that case the corresponding
image (Access Granted, Access Denied or Enter PIN) will display. The supplied images are shown below.
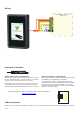
Plug the USB Net2Air bridge or Net2Air USB dongle into the PC.
Run the Image uploader software and it will detect the USB Net2Air device connected to the PC.
The PC will then detect and display any LCD units that are in range of the USB device
Detecting the LCD reader
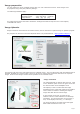
Select the LCD reader from the list of units detected and the image type that is to be updated. Make sure that the
orientation arrow is correct and then browse for the le to be uploaded.
Check that the image is correct and then click on the ‘Send Image’ button.
This will bring up a password security screen. The reader password is left blank when supplied but one can be
created if required.
The image will upload to the LCD reader in about 90 seconds and reports the progress on a Status bar.
Image download
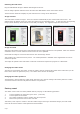
Changing the reader name
The name is stored within the reader. Select the reader, click the ‘Change LCD reader name’ button and you will
then need to enter the password (if set). The reader name can then be changed.
Changing the reader password
The password is stored within the reader itself. Select the unit, click the ‘Change LCD reader password ‘ button.
You will be asked to enter the old password and the new password.
Factory reset
The reader can be reset to a factory default state by carrying out the following operation:-
1. Connect together the yellow and green wires. (reset link)
2. Connect power to the reader.
3. The reader will beep 3 times to conrm the reset sequence.
4. Remove the power and remove the reset link.
This factory reset sequence results in the LCD reader images returning to the default images, the LCD reader
name will be cleared and the reader password will be blanked.