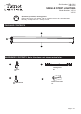
Sku Number: 348-0101 348-0102 SINGLE STRIP LIGHTING Model Number: V1514 V1516 Questions, problems, missing parts? Before returning to your retailer, call our customer service at 1-800-887-6326 Monday – Friday 9:00 a.m. – 5:00 p.m. CST PACKAGE CONTENTS A C B HARDWARE CONTENTS Note: Hardware not shown actual size.
SAFETY INFORMATION Please read and understand this entire manual before attempting to assemble, operate or install the product. WARNING ● Turn off electricity at main fuse box (or circuit breaker box) before beginning installation by removing fuse (or switching off circuit breaker). ● Be careful not to damage or cut the wire insulation (covering) during fixture installation. Do not permit wires to contact any surface having a sharp edge.
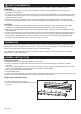
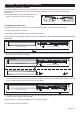
ASSEMBLY INSTRUCTIONS (continued) 2 LED Strip Aluminium Plate Set Screw Female Connector Male Connector Terminal Wire Grounding Wire Female Connector Male Connector Wire Connector Fixture Plate 2. Remove the set screws on each side and then detach the aluminum plate. Remove the hardware pack from fixture, unplug two connectors to separate the terminal wires and grounding wire inside the fixture plate(A). 3 Wire Connector A 3.
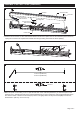
ASSEMBLY INSTRUCTIONS (continued) 5 Ceiling Outlet Box Wire Connector BB A Key hole slot 5. Pull out the source wires from the outlet box. Make wire connections using wire connectors as fo llows: ---Connect the hot wire (usually black insulation) from the fixture to the black wire from the power source. ---Connect the neutral wire (usually white insulation) from the fixture to the white wire from the power source.
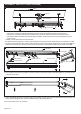
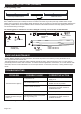
ASSEMBLY INSTRUCTIONS (continued) Connecting fixture to fixture The LED strip lighting fixtures can be connected together in series using the plastic connector, or linking cord included with this product. Maximum link up to 24pcs of 24" bar lights (#348-0101), or link up to 24pcs of 48" bar lights (#348-0102). 8. Remove the plastic plugs(C) from fixtures when you require to use plastic connectors or linking cord. 8 C The First Fixture C The Second Fixture A.
ASSEMBLY INSTRUCTIONS (continued) B. Using linking cord: Previously Installed Fixture Additional Fixture CC Using linking cord to connect two or more LED strip lighting fixtures: Each additional fixture (not included) should be mounted in the same way as the previously installed fixture except making wire connections. Once installed, attach the linking cord (12 inches) (CC) into the input receptacles between the previously installed fixture and the additional fixture.
FIVE-YEAR LIMITED WARRANTY: If, during normal use, this PATRIOT LIGHTING R lighting fixture breaks or fails due to a defect in material workmanship within five (5) years from the date of original purchase, simply bring this lighting fixture with the original sales receipt back to your nearest MENARDS R retail store.