
Installation Instructions


Page 3 of 4
ASSEMBLY INSTRUCTIONS (contiuned)
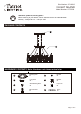
Spare Parts List:
The following parts are available for re-order if damaged or missing. Call us toll-free at 1-800-887-6326
Assembly Kit
4169MM (1 SET)
AA
BB
CC
DD
Glass Shade (B) (X3)
(9092AF)
EE
Loop Lock
X4
Chain
X2
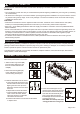
11. Turn on the power at the main fuse or circuit
breaker box.
10. Install 3 x 100W Max. Medium
Base Bulbs (not included).
Bulb Type A
Max.100W
(not included)
10
HH
GG
GG
AA
5
5. Determine length of chain(HH)
needed to achieve desired fixture
height. (To remove excess chain
section, use pliers to bend link open.)
- Weave the fixture wires and
fixture grounding wire through
the chain(HH) and the canopy.
- Connect the chain(HH) to the
loop and the top loop on the
mounting unit(AA) using the two
loop locks(GG).
- Thread the fixture wires and
fixture grounding wire through the
center of the mounting plate(AA).
6. Connect the smooth wire to black wire
(power), the ribbed wire to white wire
(neutral) with the wire connector(DD)
provided. Connect the copper wire on
the light fixture to the mounting
plate(AA) by securing it with the
preinstalled grounding screw, and then
connect it to the house grounding wire
with wire connector(DD).
Carefully put all the wires into outlet box.
7. Raise the upper canopy against the
ceiling with the screws located on
the mounting plate protruding from
the holes in the upper canopy,
secure it with two bolt nuts(FF).
8
Long Screw
X2
Short Mounting Screw
X2
9
9. Attach the glass shades to the
glass holders, and then secure
them with socket rings.
8. Take a suspension rod and hook
one end onto the small loop of the
lower canopy and hook another
end onto one ring located at a
corner of the inside frame.
Repeat with the other suspension
rods.
AA
FF
7
AA
6
Wire Connector
X3
TROUBLESHOOTING
CARE AND MAINTENANCE
● To clean, turn off and wipe with a damp, non-abrasive cloth.
1) The light does not come on at all:
a) Make sure the wall switch and circuit breaker are on.
b) Make sure the wiring is correct.
2) Fuse blows or circuit trips when light is turned on.
a) Check for crossed wires, ensure wiring is correct.
Mounting Plate
X1
FF
GG
HH
Hex Nut
X2
Bolt Nut
X2
Suspension Rod
Ring
DD