
Installation Instructions


ASSEMBLY INSTRUCTIONS
3
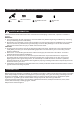
Outlet Box Screw
Outlet Box
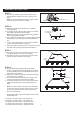
STEP 2:
a. Remove lock ball and Hex Nut from crossbar
assembly (AA).
b. Fit ceiling canopy (B) over the nipple on crossbar
assembly and secure with lock ball.
: The ceiling canopy should be snug against
the ceiling and the lock ball.
If not, adjust the length of the nipple on the crossbar
assembly by unscrewing the preassembled hex
nut.
Then, screw the nipple in or out of the crossbar
until the desired length is achieved.
Once the ceiling canopy is secure, remove the lock
ball and ceiling canopy and proceed to Step 3.
Note
?
?
?
lock ball
Hex Nut
Hex Nut and
Lock Washer
STEP 1:
a. Secure the crossbar (AA) to the outlet box (not
included) with outlet box screws. Tighten until
snug.
: The preassembled mounting nipple on the
crossbar should protrude outward.
Note
AA
B
AA
STEP 3:
a. Attach the hook on one end of the Arm (C) to the
loop at the bottom of the fixture body (E).
b. Attach the hook on one end of the Arm (C) to the
loop at the top of the fixture body (E).
Loop
Loop
Hook
Hook
E
C
E
DD
A
DD
B
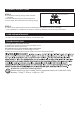
STEP 4:
a. Choose desired hanging length for the light
fixture. Suggested mounting height over a table
or island is 30 inches from the table/island top to
the bottom of the fixture.
b. Adjust the Fixture Chain (A) to the desired length,
removing links if needed.
c. Connect one end of the Fixture Chain (A) to the
canopy loop (B) with one Quick Link (DD).
d. Connect the other end of the Fixture Chain (A) to
the fixture loop with the remaining Quick Link
(DD).
: You may need to use pliers (not included)
to open the links of Fixture Chain (A). If so, put a
cloth over the Fixture Chain (A) to protect the
finish from the pliers.
Suggested chain length to hang fixture 30 inches
above table top:
8’ ceiling: 12 inches chain + (4) Quick links
9’ ceiling: 24 inches chain + (4) Quick links
10’ ceiling: 36 inches chain + (4) Quick links
11’ ceiling: 48 inches chain + (4) Quick links
12’ ceiling: 60 inches chain + (4) Quick links
Note
Fixture loop