
Installation Instructions
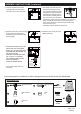


6. Attach the pine cones (E) to the
relative branches.
Page 3 of 4
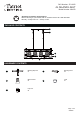
Spare Parts List:
The following parts are available for re-order if damaged of missing. Call our toll free at 1-800-887-6326.
Assembly Kit
6235MM (1 SET)
Mounting Strap Unit
X1
Mounting Screw
X2
Wire Connector
X3
AA BB
Finial
X1
DD
CC
EE
Loop Lock
X2
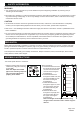
7. Unscrew the socket ring from the
glass holder. Secure the glass
shades (C) onto the glass holder
and tighten the glass shades (C)
with the socket ring.
Install 4pcs medium base bulbs
(ST or type A, not included).
See relamping label at socket
area or packaging for
maximum wattage allowed.
Turn on the power at fuse or
circuit box.
200609
7
C
Socket Ring
Medium base
bulb Max.60W
(not included)
Glass
Holder
Glass Shade
10175CS
Pine Cone
5133PC
6”Rod
3223RD
12”Rod
3224RD
5. Attach the plate (A) to the mounting
strap unit (AA) by inserting the
threaded pipe, then secure it with
the finial (DD).
3. Connect the plate (A) and the
loops (B) with loop locks (EE).
The same way on the other side.
A
AA
DD
5
AA
A
B
EE
3
ASSEMBLY INSTRUCTIONS (continued)
6
x 4
D
E
C
E
AA
CC
4
4. Connect the smooth wire from
the fixture (marked) to black
wire from the outlet box (power),
the ribbed wire from the fixture
(unmarked) to white wire from
the outlet box (neutral) with the
wire connectors (CC) provided.
Connect the copper wire on the fixture to the mounting
strap unit (AA) by securing it with the green ground
screw, then connect it to the house ground wire with
wire connectors (CC).
Carefully put all the wires into outlet box.