
Installation Instructions

210113
Turn off the power at fuse or circuit box
Turn on the power at fuse or circuit box
Installation Steps
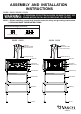
1. Remove the metal ring and plastic shade from ceiling pan by unscrewing the cap nuts.
2. Attach the two mounting screws to the outlet box, and screw them in 2 to 3 turns.
3. Pull out the source wires from the outlet box. Make wire connections using wire connectors (B) as follows:
---Connect the hot wire (black insulation) from the fixture to the black wire from the power source.
---Connect the neutral wire (white insulation) from the fixture to the white wire from the power source.
---Attach the fixture ground wire (bare wire) to the outlet box. Then connect it to the house ground wire
with the wire connector (B).
Carefully put the wires back into the outlet box.
4. Attach the ceiling pan to the outlet box by inserting two mounting screw (A) heads into the key holes, and
rotate the ceiling pan until it is locked in place, then secure the mounting screws (A) tightly.
5. Lay the plastic shade into metal ring, attach them up to the ceiling pan by inserting the threaded studs, then
secure them with cap nuts.
This fixture is dimmable with a forward phase electronic dimmer. Dimmers tested to be compatible with this
fixture are the Lutron: DVWCL-153PH, MACL-153MH, SCL-153PH, TGCL-153P.
If you are unfamiliar with electrical installations, it is recommended you have a qualified electrician for your
installations.
The following parts are available for re-order if damaged or missing.
Spare Parts List:
Assembly Kit
5782M (1 SET)
Cap Nut
5783CT for C0150&C0152
5784CT for C0151&C0153
Plastic Shade
9929PS for C0150&C0151
(1 PC)
Plastic Shade
9930PS for C0152&C0153
(1 PC)
Mounting Screw (A) Wire Connector (B)
A
B
C0150 / C0151
A: 16"
B: 3-1/2"
C0152 / C0153
A: 12"
B: 3-1/2"