
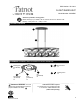
Installation Instructions

3
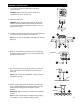
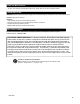
Turn off circuit breakers and wall switch to the fixture
supply line leads.
WARNING: Failure to disconnect power supply prior to
installation may result in serious injury.
ON
OFF
ON
OFF
ASSEMBLY INSTRUCTIONS
Unscrew decorative nuts (CC) and remove mounting plate (AA)
from fixture (C). Save decorative nuts for later use.
NOTE: Do not remove screws (BB) or nuts (DD) from mounting
plate (AA).
2.
3.
Remove existing fixture.
WARNING: When using an existing outlet box, be sure the
outlet box is securely attached to the building structure and
can support the full weight of the fixture. Failure to do so can
result in serious injury.
1.
6.
5.
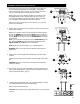
Pull wires through rod and canopy (A) until taut. Screw rods
(B) to holes located on top of the fixture and bottom of the
canopy (A).
NOTE: Keep cord taut during installation, ensuring it does not
get tangled or pinched.
4.
Determine the hanging length that is best for your fixture (C).
Loosen preassembled pins and restraints to adjust rods (B)
length to desired hanging length. Re-tighten pins and
restraints.
IMPORTANT: Make sure the pins and restraints are tightened
securely.
NOTE: If product should become misaligned during shipping,
it is possible to manually adjust and realign correctly.
CC
CC
BB
DD
AA
A
B
Wires
Holes
Restraint
B
FF
Attach mounting plate (AA) to outlet box (not included) using
the existing screws and washers or the mounting screws (FF)
provided in hardware pack.
Outlet Box
AA
C