
Installation Instructions


6
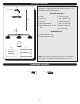
ASSEMBLY INSTRUCTIONS
Separate
10
11
12
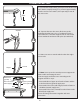
10. Separate the two silver wires all the way to the
mounting bracket. Strip 1/2 in. of insulation from the
end of the wires. Twist the stripped ends of each strand
of wire within the insulation with pliers (not included).
11. Notice one wire is smooth and the other has ridges
on one side.
12. Note: You may need a second person to support the
xture while connecting the wires.
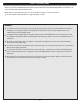
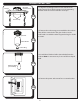
Connect supply and xture wires according to the
diagram and these steps:
• Connect the Bare Copper wire from the xture and the
to the Bare/Green (ground) supply wire.
• Connect the Silver wire (with ridges) from the xture to
the White (neutral) supply wire.
• Connect the Silver wire (smooth) from the xture to the
Black (hot) supply wire.
Secure all wiring connections together with wire
connectors.
Ridges
Smooth
Bare/Green
(ground)
Black (hot)
White (neutral)
Silver (smooth)
Silver (ridges)
Wire Connector
Bare
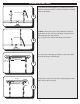
8 in.
9
9. If you shortened the chain, you may need to cut the lead
wires back to simplify wiring. If so, measure approximately
8 inches and use wire cutters (sold separately) to cut o
the excess wire.