® JOSKA 3-LIGHT ISLAND LIGHT Owner’s Manual Model #20713 (351-8395) If a problem cannot be remedied or you are experiencing difficulty in installation, please contact the Service Department: 1-877-459-3267, 9 a.m.- 5 p.m. Central time.
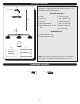
PACKAGE CONTENTS 4 preassembled Unpack your light fixture and check the contents. You should have the following items: 5 6 PACKAGE CONTENTS 3 2 1. Fixture 6. Screw Cap (x2) 2. Chain (x2) 7. Glass Shades (x3) 3. Canopy 8. Socket Ring (x3) 4. Mounting Bracket 9. Extension Rod (x2) 5. Mounting Bracket Screws 10. Owner’s Manual (x2) 11. Hardware Kit 9 HARDWARE LIST 12. Wire connector (x3) 1 13.
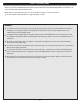
SAFETY INSTRUCTIONS READ ALL SAFETY INFORMATION AND INSTALLATION INSTRUCTIONS BEFORE BEGINNING TO INSTALL THE LIGHT FIXTURE AND SAVE INSTRUCTIONS. This fixture is intended for indoor use. Not suitable for damp or outdoor locations. The net weight of the light fixture is approximately: 7.28 lbs. WARNING To avoid risk of electric shock, be sure to shut off power at the main fuse or circuit breaker box before installing or servicing this fixture.
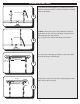
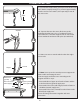
ASSEMBLY INSTRUCTIONS 1. Turn OFF the electrical power at the main fuse or circuit breaker. 1 Mounting Bracket Screw Mounting Bracket 2. Remove the screw caps from the mounting bracket screws and separate the mounting bracket from the canopy. 2 Canopy Mounting Screw Screw Cap Mounting Bracket 3 3. Attach the mounting bracket to the outlet box (not included) using the two mounting screws from the hardware kit.
ASSEMBLY INSTRUCTIONS 5. Feed the wires through the one extension rod. Then, turn the extension rods in a clockwise direction to attach them to the fixture. Extension Rod 5 Open Link 6 6. Note: If desired, use pliers (not included) to shorten both chains to the same desired length. Save the open links from the ends of the chains. Use an open link to attach each chain to the fixture. 7. Use the two remaining open links to secure the chains to the chain loops on the canopy. Chain Loop Open Link 7 8.
ASSEMBLY INSTRUCTIONS 9. If you shortened the chain, you may need to cut the lead wires back to simplify wiring. If so, measure approximately 8 inches and use wire cutters (sold separately) to cut off the excess wire. 8 in. 9 Separate 10. Separate the two silver wires all the way to the mounting bracket. Strip 1/2 in. of insulation from the end of the wires. Twist the stripped ends of each strand of wire within the insulation with pliers (not included). 10 11.
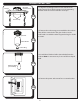
ASSEMBLY INSTRUCTIONS 13. Align the mounting bracket screws with the holes in the canopy. Then, lift the canopy over the mounting bracket screws and secure with the screw caps. Mounting Bracket Screw Canopy 13 Screw Caps 14. Remove the socket rings preassembled to the sockets. Then, lift the center hole in the glass shade over the socket and re-install the socket ring inside the glass shade to secure. Socket Glass Shade 14 Socket Ring 15.
TROUBLESHOOTING If you have difficulty operating your new light fixture, or have difficulty with installation, please contact Customer Service : 1-877-459-3267, 9 a.m.- 5 p.m. Central time. WARNING: Ensure the power is turned off to the light fixture before performing any maintenance. PROBLEM SUGGESTED REMEDY Fixture does not light up. 1. Turn on wall switch, and check fuses or circuit breakers. 2. Check wire connections from light fixture to the outlet box. 3. Replace the bulb(s).