
Installation Instructions
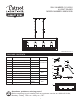

ASSEMBLY INSTRUCTIONS
4
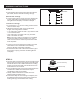
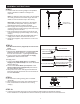
STEP 6:
a. The lanyard is provided as a means to support the
fixture from the junction box while connecting the
electrical wires. This enables the fixture to hang
from the junction box and your hands are free to
make the wire connections.
b. Turn the button stop so it may be inserted into the
crossbar slot. Make sure the button stop is
completely inside the crossbar.
c. Slowly release the fixture to make sure it is
supported by the button stop.
d. Proceed to Step 8. Once wiring is complete, the
lanyard will push into the junction box when the
Ceiling Canopy is Attached to the ceiling.
Crossbar Assembly
Button Stop
Lanyard
Slot
B
DD
DD
A
C
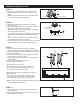
STEP 5:
8,9 and 10 ft. Ceilings
b. Connect the Fixture Loops (C) to the chain links
on the underside of the Ceiling Canopy (B) by
using Quick Links (DD). Continue to step 6.
c. If mounting to 11 or 12 foot ceiling, attach fixture
chain to fixture loop.
d. Adjust the Fixture Chain (A) to the desired
length, removing links if needed.
e. Connect one end of the Fixture Chain (A) to the
chain links on the underside of the Ceiling
Canopy (B) with one Quick Link (DD).
f. Connect the other end of the Fixture Chain (A) to
the Fixture Loop (C) with the remaining Quick
Link (DD).
11 and 12 ft. ceilings
a. Pass supply wires and ground wire through the
quick link, fixture chain and ceiling canopy.
- 11 ft. ceiling (6) 12 inches rods + (2) 6 inches rods
+ 12 inches of chain.
- 12 ft. ceiling (6) 12 inches rods + (2) 6 inches
rods + 24 inches of chain.
: You may need to use pliers (not included)
to open the links of Fixture Chain. If so, put a
cloth over the Fixture Chain to protect the finish
from the pliers.
Note
chain links