
Installation Instructions
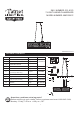


ASSEMBLY INSTRUCTIONS
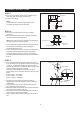
5
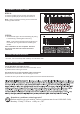
STEP 9:
: To prevent fingerprints and scratches on
the shade, put on gloves before installing the
shade.
Note
a. Attach Shade (G) to Fixture Assembly (D) using
Lock balls (A), Hand tighten until snug.
Your installation is now complete. Restore
electricity and retain this sheet for future
reference.
A
G
CARE AND MAINTENANCE
TROUBLESHOOTING
• To clean, turn off and wipe with a damp, non-abrasive cloth.
Questions, problems, missing parts?
Before returning to your retailer, call our customer service at 1-800-645-3184,
Monday - , 7:00 a.m. -4:00 p.m., CST.Friday
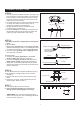
D
STEP 8:
a. Attach crystals (F) to the loops at location B.
b. Attach crystals (E) to the loops at location A.
: Hang crystals by starting on the inside and
working to the outside.
Note
F
E
1) The light does not come on at all:
2) Fuse blows or circuit trips when light is turned on.
a) Make sure the wall switch and circuit breaker are on.
b) Make sure the wiring is correct.
a) Check for crossed wires. Ensure wiring is correct.
If unable to fix any of the above issues, please consult a certified electrician.