
Installation Instructions
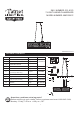


ASSEMBLY INSTRUCTIONS
33
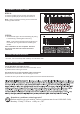
Mounting
Screw
Hex Nut
Mounting Ball
Ceiling Canopy
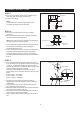
STEP 2:
a. Remove mounting balls from the crossbar
assembly.
b. Fit the ceiling canopy to the crossbar assembly
and secure with mounting balls.
The ceiling canopy should be snug against
the ceiling and the mounting balls.
If not, adjust the length of the mounting screws on
the crossbar assembly by unscrewing the
preassembled hex nuts.
Then, screw the mounting screws in or out of the
crossbar until the desired length is achieved.
Once the ceiling canopy is secure, remove the
mounting balls and ceiling canopy and proceed to
Step 3.
Note:
?
?
?
Outlet Box
STEP 1:
a. Secure the crossbar (AA) to the outlet box (not
included) with outlet box screws (CC).
b. Tighten until snug.
The preassembled mounting screws on the
Crossbar should protrude outward.
Note:
AA
CC
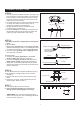
STEP 3:
a. The recommended hanging height is 30 inches
from the bottom of the fixture to the top of the table
or Island. To adjust the cable length, push and
hold the button on the underside of the canopy and
pull the cable to the desired length.
Recommended distance, from the canopy to
fixture body, when mounting above a 30 inch high
table:
8 foot ceiling – 25 inches
9 foot ceiling – 37 inches
10 foot ceiling – 49 inches
b. Once the correct height is achieved, pull an
additional 2 inches on length in order to set the
cable clasp.
c. Un-tighten the hex screw with the allen wrench.
Do not remove the hex screw.
d. Slide the Cable Clasp within two inches of the hex
nut inside of the Ceiling Canopy.
e. Re-tighten the hex screw with the wrench to
lock the Cable Clasp to the cable.
f. Lower cable until the Cable Clasp rest on the hex
nut.
allen
Cable Clasp
Hex screw
Allen Wrench
Hex Nut
Button
Wire Clasp