
User's Manual


Materials Testing Machine Appendix A: Calibration
14
012-13762D
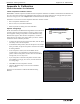
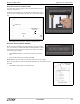
• Import Calibration From Sensor: If any compliance calibrations
have been stored in the Materials Testing Machine (the “Sensor”),
they will be displayed in the pull down menu. (The stored calibra-
tion “7100N 100N pre (Tue Feb 25)” is shown as an example.) If
you click Finish, the selected stored calibration will be imported
and added to the list for use. It will also become the “active” cali-
bration. NOTE: Calibrations stored in the Material Testing
Machine (the Sensor) can not be used or renamed until they are
imported.
• Use Raw Values: If this choice is selected and you click Finish,
the selected compliance calibration (if any) is temporarily dis-
abled. Any future data collected will not be adjusted. NOTE: The
calibration is still saved.
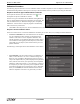
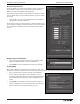
• Manage Existing Calibration: If this choice is selected and you
click Next, Step 3 is revealed as shown in the illustration. Your
choices are: Delete Calibration, Rename Calibration, or Save Cali-
bration in Sensor (the Materials Testing Machine).
• If you wish to delete a calibration, select the calibration you want
to delete from the pull down menu and then select “Delete Calibra-
tion”. Click Finish to delete the calibration.
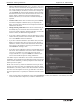
• If you select “Rename Calibration” (the default choice) and click
Next, a text window opens and you can enter a new name for a
calibration. ADVICE: Create a name that includes the maximum
force used. It is also helpful to record any pre load that is used.
Click Finish after entering a name.
• If you select “Save Calibration in Sensor” and click Next, the win-
dow shows “Store Calibration” and “Choose which calibration to
overwrite”. The default view of the pull down menu shows
“Empty Calibration 0”. If you click Finish, the calibration you
wish to store will take the place of “Empty Calibration”.
CAUTION: Only four calibrations can be stored in the Materials Test-
ing Machine. If you already have four calibrations stored, and you wish
to store another calibration, you will be prompted to select which cali-
bration you want to replace.
NOTE: You can have any number of calibrations saved as part of the
Capstone file. When you name your calibration as in Step Six “Name
the calibration” (see below), create a name that includes the maximum
force used. It is also helpful to record any pre load that is used. When
the saved Capstone file is re-opened, the calibrations will still be avail-
able.
• After you have made your Calibration Action choice (REMINDER: “Create New Calibration” is the default), click Next
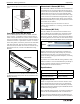
to show the illustration in Step Three, “Install the calibration rod”.