
User's Manual


Conductivity Sensor Appendix: Calibration
4
012-09688B
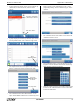
• In Step 1, the measurement of “Conductivity” is auto-
matically selected. Click “Next” to open the second
step.
• In Step 2, chose what to calibrate. Click the check-box
next to “Conductivity Sensor”. Then, click “Next” to
open the third step.
• In Step 3, choose the type of calibration. The default
choice is “One Standard (1 point slope)”. Click “Next”
to open the fourth step.
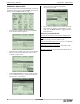
• In Step 4, enter the conductivity value of the standard
conductivity solution in the “Standard Value” text area.
For example, if the standard conductivity solution has a
value of 210 (see the table above), then enter 210 as the
Standard Value. Click “Set Current Value to Standard
Value” and then click “Next” to go to the last step.
• The Calibration panel shows the calibration informa-
tion. In Step 5, check that the calibration information is
acceptable. Then, click “Finish”.
• The Calibration panel returns to Step 1. Click the “Cali-
bration” icon in the Tools palette to close the panel.
Calibration: SPARKvue
Turn on the SPARK SLS hand-held datalogger. Connect the
Conductivity Sensor to one of the PASPORT input ports on
the SPARK SLS. The sensor parameters screen for the Con-
ductivity Sensor opens.